
Notes can be added to a claim to provide additional information or to serve as a reminder if any actions need to be taken at a later date (Follow Ups).
When viewing a claim, select the Notes option in the Common Screens widget. The Notes and Follow-ups list opens, containing all available notes currently attached to the claim.
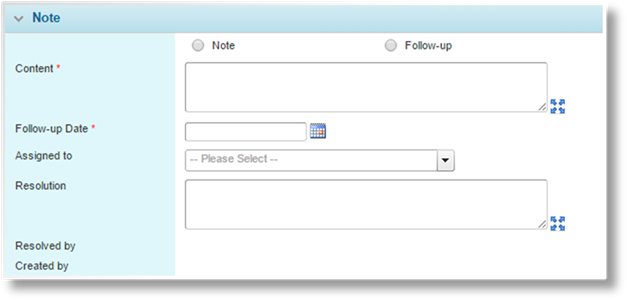
1. Click Add. The Note and Follow-up window opens.
2. Complete the necessary information. Fields marked with a red asterisk * are required.
|
Type |
Select the type of note. |
|
•Note |
This is a simple note to provide information. |
|
•Follow-up |
A follow-up note includes an expected follow-up date and can be assigned to a specific user. Reminder emails can be configured to notify the selected user. |
|
Content |
Enter the note details. |
|
Follow-up Date |
This field is only shown when Follow-up is
selected as the type. Select the due date for the note. Enter
the date or select it from the calendar lookup |
|
Assigned to |
This field is only shown when Follow-up is selected as the type. An adjuster user can be selected to handle the follow-up. |
|
Resolution |
This field is only shown when viewing a saved follow-up. Enter a resolution and save to mark a follow-up as Resolved. |
|
Resolved by |
This field is only shown once the note or follow-up has been saved. Once a follow-up has been marked as Resolved, this field displays the name of the user who resolved the follow-up, as well as the date and time it was resolved. |
|
Created by |
This field is only shown once the note or follow-up has been saved, displaying the name of the user who created the note or follow-up, as well as the date and time it was created. |
3. Click Save & New to save the note and clear the form to enter another note, click Save & Close to save the note and close the note window, or click Close to close the note window without saving the note.
The Notes and Follow-ups list is updated as new notes are added. Click Close to close the list and return to the claim.
When viewing a claim, select the Notes option in the Common Screens widget. The Notes and Follow-ups list opens, containing all notes currently attached to the claim.

1. Click a link in the Created On column. The Note and Follow-up window opens. If there are a large number of available notes, see the Using Grids section for help on finding the appropriate note.
2. See the section on Adding a Note or Follow-up to a Claim for a detailed description of the fields.
3. Click << or >> to navigate between notes. Click Save & New to save the note and clear the form to enter another note, click Save & Close to save the note and close the note window, or click Close to close the note window without saving the note.
Click Delete to delete the note.
When viewing a claim, select the Notes option in the Common Screens widget. The Notes and Follow-ups list opens, containing all notes currently attached to the claim.
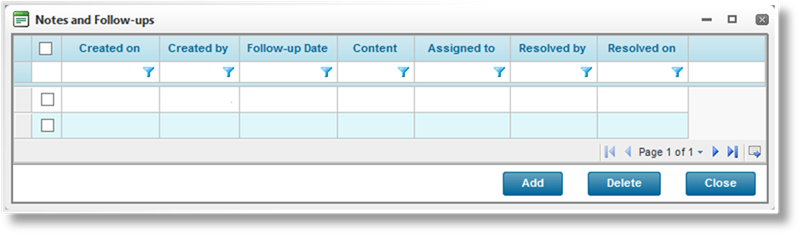
1. Locate the note or notes to be deleted. If there are a large number of available notes, see the Using Grids section for help on finding the appropriate notes.
2. Check the boxes for all notes to be deleted.
3. Click Delete. All selected notes are deleted.
|
|
Tip: Individual notes can also be deleted directly through the Note and Follow-up window. See the section on Viewing and Editing a Note or Follow-up for details. |
When viewing a claim, select the Notes option in the Common Screens widget. The Notes and Follow-ups list opens, containing all notes currently attached to the claim.

1. Click a link in the Created On column. The Note and Follow-up window opens. If there are a large number of available notes, see the Using Grids section for help on finding the appropriate note.
2. In the Resolution field, add a resolution description.
3. Click << or >> to navigate between notes. Click Save & New to save the note and clear the form to enter another note, click Save & Close to save the note and close the note window, or click Close to close the note window without saving the note.
When the note is saved with a Resolution, the follow-up is considered complete and the Resolved By information becomes available.
 .
.