
The Bridge system can be integrated with a variety of external systems, transferring data through pre-configured channels. Integration can be set to occur automatically at specific points in the workflow, or can be triggered manually using buttons added to the Actions widget.
The Integration Configurations section is used to create and maintain these links between systems, but initial configuration must be done by Oceanwide. Contact your Oceanwide Representative to request that a specific integration be setup, and receive certain configuration details required for this page.
1. In the main menu, select Product Design, then select Workflow Configurations, then Integration Configurations. A list of all available configurations is displayed.
|
|
Tip: By default, only Active configurations are displayed. Clear the filter in the Status column to view all configurations. |
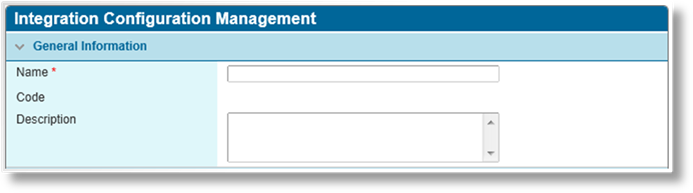
2. Click Create. The Integration Configuration Management page opens.
3. Complete the necessary information. Fields marked with a red asterisk * are required.
|
Name |
Enter the name of the configuration. This is the internal name, used to select this screen in the configurations list. This name does not appear on the form itself. |
|
Code |
This is an internal reference name which is generated by the system when the configuration is saved. |
|
Description |
Enter a description for this configuration. |

|
Integration Type |
Select the type of integration. This is provided by your Oceanwide Representative. |
|
•E-Signature |
This integration type defines a document that will be generated by the system and then submitted to a digital signature service. The user digitally signs the document, which is then attached to the transaction. |
|
•Compliance Scan |
This integration type collects data from the transaction and submits the data to be compared to one or more international watch lists of restricted people and places. If any part of the data matches a restriction in a list, equaling or exceeding a specified threshold, the integration returns that the transaction is not compliant. |
|
•Policy Decisions |
Submits policy details to the Policy Decisions system, and maps the response data to a specific field structure in the policy. Due to the complexity of configuring this integration and the associated workflow, this option should be handled by your Oceanwide Representative. |
|
Endpoint Code |
Enter the Endpoint Code for the external system. This is provided by your Oceanwide Representative. This field will not be displayed if it is not necessary for the selected integration type. |
|
Action |
Select the type of action to initiate the integration configuration. This may be a direct action by the user, or an indirect action resulting from other activities. The configuration conditions are evaluated to determine if the integration is performed, and how it will be handled. |
|
•Bind |
The configuration will activate when the user attempts to bind a transaction with the Bind, Confirm Cancellation, or Confirm Reinstatement actions. |
|
•Calculate Quote |
The configuration will activate when the system performs a quote calculation. This can be activated by the user, triggered by navigating through a workflow, or automated processes such as the optional quote calculation after automatic renewal. |
|
•Calculate Refund |
The configuration will activate when the system performs a refund calculation. This can be activated by clicking on the Calculate Refund link in the Actions widget, clicking on the Calculate Refund button in the Cancel window, changing the cancellation date on a Cancellation – Quoted transaction, or during an Automatic Cancellation Initiation. |
|
|
Note: This action requires Cancellation to be included in the Policy Transaction Types field and Incomplete and Quoted to be included in the Policy Transaction Statuses field. |
|
•Delete |
The configuration will activate when the user deletes a transaction by clicking on the Delete link in the Actions widget and then confirms the deletion. |
|
|
Note that Post-Action is not available for Delete actions. |
|
•Mark as Lost |
The configuration will activate when a quote is marked as lost, either by manual action on the part of the user, or the timed expiry of the quote. |
|
•Reinstate |
The configuration will activate when the user creates a reinstatement transaction. |
|
|
Notes: When Pre-Action is chosen from the Perform drop-down, Reinstatement must be included in the Policy Transaction Types field and Incomplete must be included in the Policy Transaction Statuses field. |
|
|
When Post-Action is chosen from the Perform drop-down, Reinstatement must be included in the Policy Transaction Types field and Quoted must be included in the Policy Transaction Statuses field. |
|
•Request Quote |
The configuration will activate when the user clicks the Request Quote action from a transaction in Underwriting Required status, sending the transaction into Referred status. |
|
|
Note that some users, commonly underwriters, will bypass Underwriting Required status and go directly to Referred status. This integration will not activate in those circumstances. |
|
•Save |
The configuration will activate with the following save events. |
|
|
o Clicking Save & Refresh or Next in the policy workflow, except when the screen is complete and no changes have been made within the screen. |
|
|
o Activating the Calculate Quote process, either manually or automatically. |
|
|
o Clicking Select Quote in the Quote Summary window for a multi-quote workflow. |
|
|
o Changing the Effective Date or Valid Until date in the Policy Information window, and clicking Save & Close. Except for Cancellation and Reinstatement transactions, where clicking Save & Close will save the settings even if no changes were made. |
|
|
o If any changes are made to the Assured, including creating or selecting an assured, changing the assured, or editing the assured information and saving. |
|
|
Note that field validations, such as invalid data or missing required fields, will prevent the save and the integration. |
|
•Custom |
Links the configuration to a custom item in the Actions widget, configured below. |
|
|
Note: An optional setting is available to have the system automatically recalculate the quote on completion of a custom integration. This will occur if the current screen is set to Calculate Quote in the Master Cover – Validation & Workflow Actions page, and this option is enabled in the core system configuration. To confirm whether or not this option is enabled, please contact your Oceanwide Representative. This optional setting does not apply to E-Signature integration types. |
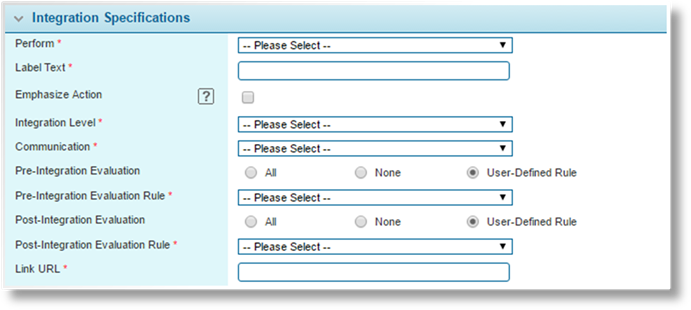
The Integration Specifications panel becomes available when an Action is selected.
|
Perform |
Select how the integration should be performed in relation to the selected Action. Not available when Custom is selected as the Action. |
|
•Pre-Action |
The integration will be performed before the selected Action. If the integration fails, the action will not occur. This does not apply to Save actions, which will occur regardless of the integration results. Any validations that can prevent the action, such as bind validations, are performed after the integration. This means the action may not occur, even if the integration is successful. |
|
•Post-Action |
The integration will be performed after the selected Action. The integration will occur even if the event itself fails due to validations. Use the Availability / Triggering Conditions detailed below if the integration requires specific conditions. |
|
•External Service |
This option is currently unavailable. |
|
Label Text |
For configurations that are initiated by the user, enter the label for the button. Available when Custom is selected as the Action. |
|
|
Tip: Once the configuration has been saved, the Label Text becomes available in the Custom Labels section. This allows translated versions of the text to be uploaded for when the browser is set to different languages. The text entered here will be set as the default English text. For details on customizing languages, see the Custom Labels section. |
|
Emphasize Action |
When Custom is selected as the Action, the custom item is added to the Actions widget. When this box is checked, a matching button is added at the bottom of the screen with the navigation buttons. If the custom action is not available in the Actions widget due to the selected Availability / Triggering Conditions, the associated button will also not be displayed. |
|
Integration Level |
Available when Custom is selected as the Action. Select where the processing is to be done. |
|
•Backend |
Calls an integration service on the Bridge server. |
|
•Frontend |
Redirects the current browser window to an external web page, with the address specified in the Link URL field below. |
|
Communication |
Available when Backend is selected for Integration Level. Select how the systems should communicate. This information is provided by your Oceanwide Representative. |
|
•Synchronous |
The Bridge system and integration system communicate both ways, allowing immediate updates of the submission as well as warning messages if there are any problems. |
|
|
Note: Replies and updates from synchronous integrations can only be accepted when the submission is a New Business or Renewal transaction in Incomplete status, or any transaction type in Bound status. In any other transaction type or status, any reply will be ignored. |
|
•Asynchronous |
The Bridge system sends the information to the integration system, and then continues with normal processing. While the integration may affect the submission in the background, it will not return any warning messages. |
|
Pre-Integration Evaluation |
Not available when Frontend is selected for Integration Level. Select how the system should evaluate calculated fields before performing the integration. |
|
•All |
The system performs the standard calculation process, evaluating all necessary calculated fields. |
|
•None |
The system does not evaluate any calculated fields. |
|
•User-Defined Rule |
A Field Evaluation Rule can be selected, which defines a specific selection of calculated fields to be evaluated. The rule may have a Trigger selected, which will be evaluated to determine if the rule is applicable. Selecting this option reveals the Pre-Integration Evaluation Rule field below. |
|
Pre-Integration Evaluation Rule |
Available when User-Defined Rule is selected for Pre-Integration Evaluation. Select a Field Evaluation Rule to determine which fields should be evaluated before performing the integration. |
|
Post-Integration Evaluation |
Available when Synchronous is selected for Communication. Select how the system should evaluate calculated fields after performing the integration. |
|
•All |
The system performs the standard calculation process, evaluating all necessary calculated fields. |
|
•None |
The system does not evaluate any calculated fields. |
|
•User-Defined Rule |
A Field Evaluation Rule can be selected, which defines a specific selection of calculated fields to be evaluated. The rule may have a Trigger selected, which will be evaluated to determine if the rule is applicable. Selecting this option reveals the Post-Integration Evaluation Rule field below. |
|
Post-Integration Evaluation Rule |
Available when User-Defined Rule is selected for Post-Integration Evaluation. Select a Field Evaluation Rule to determine which fields should be evaluated after performing the integration. |
|
Link URL |
Provide the URL address of the external system. Available when Frontend is selected as the Integration Level. The URL can contain placeholders that retrieve system information and insert it into the URL. |
|
|
Example: The [[TransactionResourceId]] placeholder can be used to retrieve the internal ID of a transaction. |
|
|
The URL may be constructed as follows. The exact format of the URL must be determined by the website administrator. |
|
|
https://website.com/ID?ResourceID=[[TransactionResourceId]] |
|
|
This would substitute the appropriate value and direct the user to the following URL. |
|
|
https://website.com/ID?ResourceID=12345 |
|
|
The destination website would then resolve the address according to its own configuration. |

The Document to be Generated and Signed panel becomes available when E-Signature is selected as the Integration Type. The Document field lists all documents configured within the available master covers. Select a document that has been configured for e-Signatures.
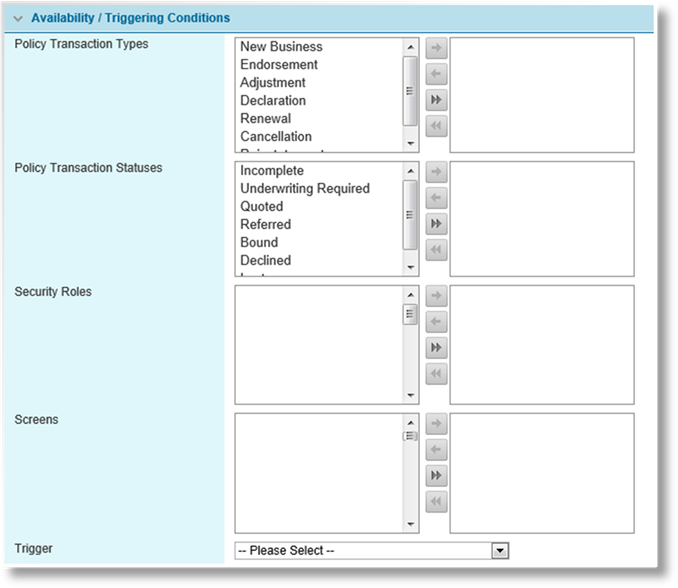
Integration configurations are enabled for a workflow in the Workflow Management page. Within the workflow, the Availability / Triggering Conditions panel defines when the integration can be activated by the event or user. The integration can only be activated if the transaction and user match at least one selected option in each group. At least one option must be selected in each group or the integration can never be activated.
|
Policy Transaction Types |
Select the transaction types where the integration can be activated. |
|
Policy Transaction Statuses |
Select the transaction statuses where the integration can be activated. |
|
Security Roles |
Select the user security roles that are required to enable the integration. |
|
Screens |
Select the screens where the integration can be activated. This only applies for Custom Actions. |
|
Trigger |
An optional trigger can be selected as a final requirement to enable the integration. The trigger must evaluate as true for the integration to occur, as well as meeting the other requirements in this panel. |
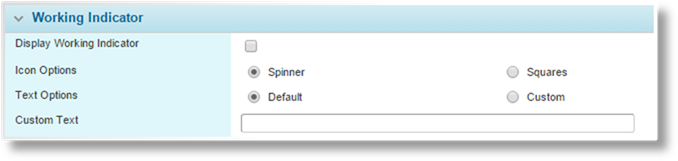
The Working Indicator panel becomes available when Custom is selected as the Action and Synchronous is selected for Communication. If an integration is expected to take a noticeable amount of time to complete, an icon can be displayed with a message that the integration is running.
|
Display Working Indicator |
Check this box to display the working indicator while the integration runs. If the system needs to reload the page after the integration completes, the selected indicator will remain until the page is reloaded. | |
|
Icon Options |
This field becomes available when Display Working Indicator is checked. Select the animated icon to be displayed. | |
|
•Spinner |
|
A square containing a shaded spinning circle. |
|
•Squares |
|
A set of nine squares that fade in and out. |
|
Text Options |
This field becomes available when Display Working Indicator is checked. Select if the indicator should display the Default text, "Loading…", or Custom text. | |
|
|
Note that the Default text cannot be customized for different languages using the Custom Labels feature, but the Custom text can. | |
|
Custom Text |
This field becomes available when Custom is selected for Text Options. Enter the text to appear below the indicator icon. Text will appear on one line, and will be cut off if it exceeds the display area, so it is recommended to keep the message brief. | |
4. Click Add to save the configuration but remain on the page, click Add & Close to save the configuration and return to the configurations list, or click Close to return to the configurations list without saving the configuration.
Once the configuration is saved, the following panels are added to the page.

The Select Policy Participants to Scan panel becomes available after saving an integration with Compliance Scan selected as the Integration Type.
|
Client |
Check this box to include the client details in the compliance scan. |
|
Distributor |
Check this box to include the distributor details in the compliance scan. |

The Sanction Lists panel becomes available after saving an integration with Compliance Scan selected as the Integration Type. This panel displays all selected sanction lists to be searched.
To add lists to the scan:
a) Click Add. The Sanction List window opens.

b) Complete the necessary information. Fields marked with a red asterisk * are required.
|
Name |
Select the list to add. |
|
Threshold |
Enter the threshold percentage. As the data being scanned is compared against entries in this list, it generates percentages to represent how closely the data matches. If the scan produces any matches that equal or exceed this threshold, it will be considered a compliance violation. |
c) Click Save & New to add the list and clear the form to add a new list, click Save & Close to add the list and close the window, or click Close to close the window without adding the list.
To view and modify selected lists:
a) Click a link in the Name column. The Sanction List window opens.
b) Make any necessary changes.
c) Click < Previous or Next > to navigate through the list entries. Click Save & Close to save the list details and close the window, or click Close to close the window without saving. Click Delete to remove the list from the scan list.
To remove lists from the scan list:
a) Check the boxes for all lists to be removed.
b) Click Delete. The selected lists are removed.
Lists can also be deleted when viewing the list details.

|
Active |
Marks the configuration as active and available for use. If unchecked, the integration is no longer available and cannot be activated. |
|
Created By |
Identifies the date and time the configuration was created, and the user who created it. |
|
Last Modified By |
Identifies the last date and time the configuration was changed, and the user who made the changes. |
1. In the main menu, select Product Design, then select Workflow Configurations, then Integration Configurations. A list of all available configurations is displayed.

|
|
Tip: By default, only Active configurations are displayed. Clear the filter in the Status column to view all configurations . |
2. Click a link in the Name column to view the configuration details. If there are a large number of available configurations, see the Using Grids section for help on finding the appropriate configuration.
3. See the section on Creating a New Integration Configuration for a detailed description of the fields. All fields may be edited, if necessary.
4. Click Save to save any changes and remain on the page, click Save & Close to save and return to the configurations list, or click Close to return to the configurations list without saving any changes.
Once created, a configuration cannot be deleted. It can be deactivated, which prevents it from being used.
1. In the main menu, select Product Design, then select Workflow Configurations, then Integration Configurations. A list of all available configurations is displayed.
|
|
Tip: By default, only Active configurations are displayed. Clear the filter in the Status column to view all configurations . |
2. Locate the configuration or configurations to be deactivated. If there are a large number of available configurations , see the Using Grids section for help on finding the appropriate configurations.
3. Check the boxes for all configurations to be deactivated.
4. Click Deactivate, then confirm the deactivation when prompted to do so. All selected configurations are deactivated. If the configurations list is still defaulted to only show active configurations , they disappear from the list.
|
|
Tip: Individual configurations can also be deactivated or reactivated directly through the configuration record. See the section on Creating a New Integration Configuration for details. |
The e-Signature integration type defines a document that will be generated by the system and then submitted to a digital signature service. The user digitally signs the document, which is then attached to the transaction.
1. The document template must contain the Signature Placeholder, available in the Signature group of the Word Ribbon. The template is then uploaded to the system and attached to a document configuration in the master cover.
2. Create a new integration configuration.
3. The following settings are required:
|
Name |
Enter the name of the integration. |
|
Code |
A code can be provided, or one will be generated by the system on saving. |
|
Description |
Enter a description, if necessary. |
|
|
|
|
Integration Type |
Select E-Signature. |
|
Endpoint Code |
Enter OwBridge.SilanisESignLive. |
|
Action |
Defaults to Custom on selecting E-Signature and cannot be changed. |
|
|
|
|
Label Text |
Enter the label for the custom action. |
|
Emphasize Action |
This option can be selected to add a button at the bottom of the screen in addition to the option in the Actions widget. |
|
Integration Level |
Select Backend. |
|
Communication |
Select Synchronous. |
|
|
|
|
Document |
Select the document to be generated and signed. |
|
|
|
|
Availability / Triggering Conditions |
Select the appropriate conditions to make the custom action available to users. |
4. Attach the integration to the appropriate workflow, and then republish the workflow. The custom action will be available in the workflow according to the Availability / Triggering Conditions.
5. As e-Signature documents are generated, details are tracked in the transaction. The name of the user who initiated the signature process, the current status of the document, and the last date/time that the status changed are all tracked. This information can be retrieved by calculated fields for a range of purposes such as tracking, display, and validations.
The name of the user who created the document is retrieved using the following path:
[[DocumentArray/Document[MasterCoverDocumentCode='Code' and Status='Status']/CreatedBy]]
The date of the last status change is retrieved using the following path:
[[DocumentArray/Document[MasterCoverDocumentCode='Code' and Status='Status']/StatusModifiedOn]]
In each case, the Code is the code of the document configuration in the master cover, and the Status is selected from the following list:
|
Status |
|
|
•SentForSigning |
The document has been generated and sent to the certification service. |
|
•Signed |
The document has been signed and verified. |
|
•SigningDeclined |
User declined to sign the document. |
|
•SigningPending |
The document signing process is in progress. |
|
•SigningSessionExpired |
The signing process timed out due to inactivity (20 minutes). |
|
•OptedOutOfSigning |
User opted out of signing the document. |
|
|
Note: Only the most recent document for each code and status combination is tracked in the transaction information. If a specific document has been generated and is in Signed status, while another version of the same document has been generated but is in SigningPending status, they will both be available. Once the second document is signed, it will replace the first signed document. This only applies to the document information stored in the transaction data. The actual documents will all be available in the Documents/Forms list. |


