Initiating an import is a simple enough action, but it is important to understand the process that occurs behind-the-scenes and the results of the import.
1. Preparation: Some steps should be taken to prepare the destination system, allowing for a smooth import.
•If a master cover exists in the destination system with the same code as the source master cover, it should be exported and kept as a backup, allowing the original to be restored.
•Any security roles referenced in the master cover, workflow, or resources must exist in the destination system. They can be recreated manually, or the Export / Import Security Roles feature can be used to copy the roles prior to importing the product. Only roles that are actually selected need to be available.
•Any document templates attached the master cover must exist in the destination system. The Export Document Templates and Import Document Templates features can be used to copy the templates prior to importing the product.
•Some resources may be shared between multiple master covers on the destination system. Overwriting these resources could cause problems with the other master covers. Identify such dependencies and create alternate resources wherever possible.
•Any triggers to be included should be checked to ensure they do not contain the angle brackets "<" ">" or ampersand "&" characters.
•All insurer and distributor companies linked to the master cover must be recreated in the destination system, with the same Codes used in the source system. If any companies already exist in the destination system and have the same codes as companies linked to the product, those companies will be linked to the product on import. Such companies must be manually removed from the product after import is complete, and replaced with the proper companies.
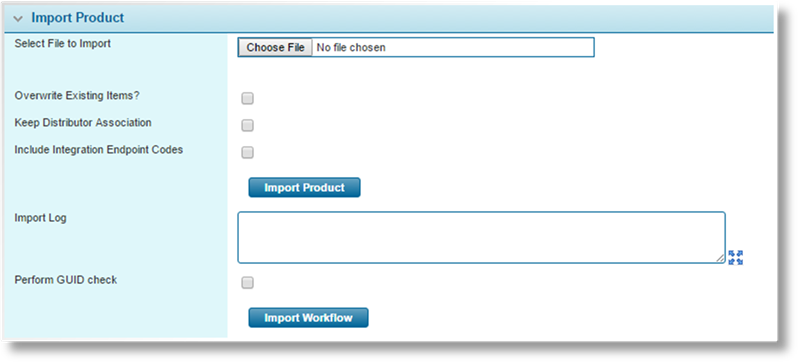
2. In the main menu, select Product Design then Export / Import. The Export / Import page opens. Go to the Import Product panel.
3. Complete the necessary information.
|
Select File to Import |
Click the button to open a standard file browser window. Locate and select the appropriate export file, and the file name and path appear in the field. |
|
Overwrite Existing Items? |
During the import the system checks if each resource already exists, identified by Code. If a resource of the same type exists with the same Code, this setting determines how the import proceeds. If checked, the system overwrites the resource, ensuring that the full product remains intact. If unchecked, the existing resource is not changed and the imported resource is discarded, which protects existing data, but can cause gaps in the imported product. |
|
|
Note: The master cover itself is an exception to this setting. If a master cover exists with the same Code, it is overwritten, regardless of the overwrite setting. |
|
Keep Distributor Association |
If unchecked, importing a product on top of an existing product will overwrite the distributor configurations associated to the master cover. Checking this box keeps the current distributor configuration in the destination product. |
|
Include Integration Endpoint Codes |
The Endpoint Code for an integration configuration will often need to be modified when moving from one environment to another. With this option unchecked, the codes will not be imported and can be added after import. With this option checked, the codes will be included and can be adjusted after import, if necessary. |
|
Import Log |
After import, any messages or errors will be displayed in this field. |
|
Perform GUID check |
If unchecked, any imported workflow resources will overwrite any resources of the same type that have the same code. If checked, resources will only be overwritten if both the code and internal GUID identifier both match. |
4. Click Import Product to begin the process. (the Import Workflow button is not used)
a) The system validates the import file to confirm that it has not been altered or corrupted. If the file fails validation, the import stops and an error message is displayed. A new export file must be generated for import.
b) The system checks that all required security roles are present in the destination system. If any roles are missing, the import stops and an error message is displayed. The missing roles must be created before attempting to import the file again.
c) The system checks all included triggers for invalid characters. If the angle brackets "<" ">" or ampersand "&" characters are found in any triggers, the import stops and an error message is displayed. The triggers must be corrected in the source system, then a new export file must be generated for import.
d) All workflow components (fields, panels, screens, workflow, options lists) are identified by two values, the Code visible in the management pages, as well as a GUID that serves as an internal ID value. If a component being exported has the same Code and GUID as a component in the destination system, they are considered the same item, and the destination component will be either attached to the product, or overwritten, depending on the import settings. If a component has the same Code as a component in the destination system, but the GUID does not match, the import stops and an error is displayed identifying the mismatched component. To resolve this error, the affected component in the destination system can be deactivated, or the component in the source system can be replaced by an identical component with a new Code, and the export process started again.
e) The workflow data is imported (fields, panels, screens, workflow, options lists).
f) Resources are imported (premium types, products, clauses, triggers, taxes).
g) Master cover settings are imported. If the settings refer to any universal triggers, and universal triggers were not included in the export, the import continues and the missing triggers are identified on completion.
h) Insurer and distributor companies are linked to the imported master cover. If any company is missing or the Code does not match, the settings for that company are omitted from the master cover. The import continues and the missing companies are identified on completion. The company settings must be configured manually after import has completed.
i) E-mail templates are imported and attached to the imported master cover. If any user accounts listed as recipients in the e-mail template do not exist in the destination system, the import continues and the missing companies are identified in the results field on completion. The setup of the recipient users can be corrected after import has completed.
5. Once the import has completed or stopped due to an error, the Import Log window is populated with the relevant messages and errors from the import. Copy the text (click inside the field, press Ctrl + A to select all text, then Ctrl + C to copy) and save it for future reference. This text can be used for troubleshooting or as a checklist of items that must be corrected after the import.
6. After the import is complete and the results have been copied and saved, close any additional browser windows and log out of the system. This clears the session data accumulated in the Import/Export process.
7. Once all corrections have been made, the workflow must be published before submissions can be created.
|
|
Note: Concurrency issues may occur if other users are working in the system during import. It is recommended to perform the import during a maintenance window or other downtime. |
