
Payment plans define the available options for payment scheduling. Multiple payment plans can be assigned to individual quote options, allowing the user to select their preferred plan.
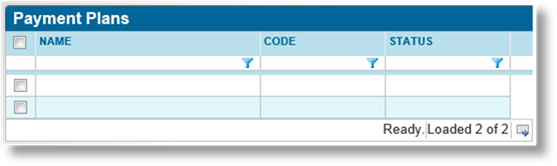
1. In the main menu, select Billing, Configuration, then Payment Plans. A list of all available plans is displayed.
|
|
Tip: By default, only Active plans are displayed. Clear the filter in the Status column to view all plans. |
2. Click Add. The Payment Plan Management page opens.
3. Complete the necessary information. Fields marked with a red asterisk * are required.

|
Name |
Enter the name of the payment plan. This name is displayed in the payment plan list and is used to select the plan in the Payment Plan window when viewing a quote option. |
|
Code |
Enter a unique code to identify the payment plan within the system. |
|
External Code |
Enter a code to be used for integration with external systems. |
|
Description |
Enter a description for the payment plan. |

|
Payment Start Date |
Select when the first charge occurs. |
|
•Term Effective Date |
The first charge occurs on the first day of the term. |
|
•Term Bound Date |
The first charge occurs when the term is bound. |
|
First Payment |
The first payment can be larger or smaller than the rest of the payments, to account for registration fees or discounts. Enter a percentage value with up to two decimal places. This percentage of the total charges must be paid first, with the remaining amount divided evenly across the rest of the payments. If no percentage is specified, the charges are divided evenly across all payments. |
|
Scheduling |
Select the scheduling option. |
|
•System-Defined |
Allows the scheduling to be selected from a list of system presets. |
|
•User-Defined |
Allows the configuration of a detailed custom schedule. |
|
Assign Taxes / Fees in Full to First Scheduled Payment |
In some cases, certain taxes and fees must be paid in full with the first payment. When a transaction includes any taxes or fees, each one is checked against these lists. If it is included in this setting, the full amount will be applied to the first scheduled payment. Otherwise, the tax or fee will be divided among all scheduled payments. This field lists all available taxes and fees. All entries that should be included in this setting should be moved to the right side. |

The System-Defined Properties panel becomes available when System-Defined is selected as the Scheduling option.
|
Payment Frequency |
Select one of the preset frequency options. |
|
•Annually |
Creates one payment per year, on the anniversary of the first installment. |
|
•Semi-Annually |
Creates one payment every six months, on the same day of the month as the first installment. |
|
•Quarterly |
Creates one payment every three months, on the same day of the month as the first installment. |
|
•Monthly |
Creates one payment per month, on the same day of the month as the first installment. |
The User-Defined Properties panel becomes available when User-Defined is selected as the Scheduling option.
|
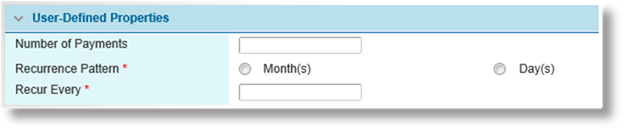
Number of Payments |
If this field is left blank, the Recurrence Pattern and Recur Every fields determine the number of payments within the term, and the total charges are divided among those payments. |
|
If a total number of payments is provided, the total charges are divided by that number and scheduled according to the Recurrence Pattern and Recur Every values. | |
|
In either case, the first payment may be overridden by the First Payment setting. | |
|
This setting can be used to decrease the payment period to less than the full term, but cannot extend past the end of the term. If any payments extend out of the term, they are ignored and the charges are divided solely among the payments within the term. | |
|
Recurrence Pattern |
The payments are set to specific intervals. Select if the intervals are to be based on Months or Days. |
|
Recur Every |
In combination with the Recurrence Pattern field, enter the number of days or months between payments. If Number of Payments is not specified, the system determines the number of payments within the term, and divides the total charge equally among the payments. Although the first payment may be overridden by the First Payment setting. |

The Transaction Payment Schedule Configuration panel is used to define how payments are handled for Endorsements and Adjustments. In either case, the scheduled payments from the billing plan selected for the term are maintained, with the new charges or credits affecting the invoice amounts.
|
Bill Immediately |
The additional charge or credit will be applied on the Effective Date of the transaction. |
|
Spread Evenly |
The additional charge or credit will be divided among the remaining scheduled payments for the term. This includes payments outside of the effective period of the endorsement or declaration. |
|
|
Note: If there are no scheduled payments remaining in the term, binding the endorsement or declaration will create a new charge or credit for immediate billing. |
4. Click Add to save the plan but remain on the page, click Add & Close to save the plan and return to the payment plan list, or click Close to return to the payment plan list without saving the plan.
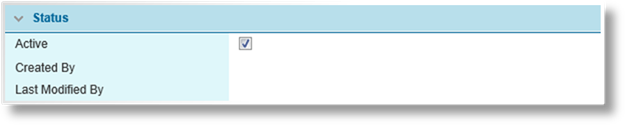
5. Once the payment plan has been saved, the Status panel is added at the bottom of the page.
|
Active |
Marks the payment plan as active and available for use. If unchecked, the plan remains in effect for any existing companies or individuals, but cannot be used for new ones. |
|
Created By |
Identifies the date and time the payment plan was created, and the user who created it. |
|
Last Modified By |
Identifies the last date and time the payment plan was changed, and the user who made the changes. |
1. In the main menu, select Billing, Configuration, then Payment Plans. A list of all available plans is displayed.

|
|
Tip: By default, only Active plans are displayed. Clear the filter in the Status column to view all plans. |
2. Click a link in the Name column to view the payment plan details. If there are a large number of available plans, see the Using Grids section for help on finding the appropriate plan.
3. See the section on Creating a New Payment Plan for a detailed description of the fields. All fields may be edited, if necessary, except for the Code field.
4. Click Save to save any changes and remain on the page, click Save & Close to save and return to the payment plan list, or click Close to return to the payment plan list without saving any changes.
Once created, a payment plan cannot be deleted. It can be deactivated, which leaves it linked to any existing companies or individuals, but prevents it from being used for new configurations.
1. In the main menu, select Billing, Configuration, then Payment Plans. A list of all available plans is displayed.
|
|
Tip: By default, only Active plans are displayed. Clear the filter in the Status column to view all plans. |
2. Locate the plan or plans to be deactivated. If there are a large number of available plans, see the Using Grids section for help on finding the appropriate plans.
3. Check the boxes for all payment plans to be deactivated.
4. Click Deactivate, then confirm the deactivation when prompted to do so. All selected plans are deactivated. If the payment plan list is still defaulted to only show active plans, they disappear from the list.
|
|
Tip: Individual plans can also be deactivated or reactivated directly through the payment plan record. See the section on Viewing and Modifying a Payment Plan for details. |

