
Rates are a vital part of any master cover. The Rates section defines a series of premium calculation rules which determine precisely what premiums are applied to a submission when a quote is requested. The quote calculation itself has a specific sequence of events which could affect the calculations, click here for more information.
For additional information on rates, including more examples, see Rates - Details and Examples.
With the master cover selected, click the Rates item in the Screens widget. For instructions on finding and viewing a master cover, see the section on Viewing and Modifying a Master Cover.
|
Product |
Identifies the product associated with the master cover. |
|
Status |
Identifies the current status of the master cover. |

Select a Quote Option to view the rates defined for that option.
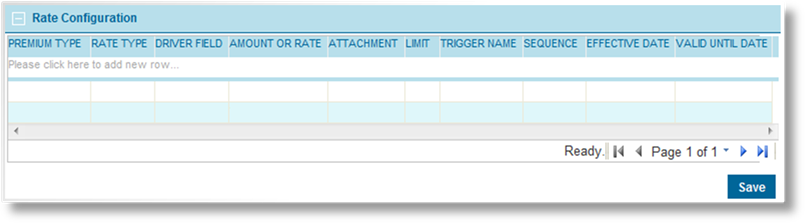
The Rate Configuration panel displays all rates under the selected Quote Option.
1. Click in the field marked Please click here to add new row.
2. Select a Premium Type. All rates and charges for the same premium type are accumulated as calculations are completed.
The premium type must be created before being attached to a master cover. See the Premium Types section for instructions on creating premium types.
3. Select a Rate Type to define what type of calculation is to be performed for this entry. All calculations for the same premium type and sequence number are performed in a specific order (see Sequence below). Each calculation is performed on the accumulated value of all preceding calculations for the same premium type and sequence number.
|
•Rate |
The amount in the Driver Field is multiplied by the Amount or Rate field. The result is added to the accumulated value. |
|
•Multiplier |
The accumulated value is multiplied by the Amount or Rate field. If a Driver Field is specified, then that amount is multiplied by the Amount or Rate field, with the result being multiplied by the accumulated value. |
|
•Flat Amount |
The amount in the Amount or Rate field is added to any accumulated value. The Driver Field is not used. |
|
•Minimum |
If the accumulated value for this premium type and sequence number is less than the amount in the Amount or Rate field, it is increased to the specified amount. |
|
•Discount or Surcharge |
The Amount or Rate is calculated from the accumulated value as either a discount or surcharge, with numbers from zero to one providing a discount and numbers greater than one resulting in a surcharge. If a Driver Field is also defined, that amount is calculated from the accumulated value the same way, but separate from the Amount or Rate. The calculated values for each are then added to or subtracted from the original accumulated value. |
|
|
Example: A final value of 0.8 results in a 20% discount. A final value of 1.3 results in a 30% surcharge. |
|
|
Note: The Discount or Surcharge type does not work with premium grids. |
4. Select a Driver Field, if required by the Rate Type.
Only fields within the attached workflow that have been designated as Rate Driver fields are available. See the Managing Fields section for instructions on configuring fields.
5. Enter an Amount or Rate, suitable to the selected Rate Type.
6. The Attachment and Limit fields can be used together or separately to define what portion of the Driver Field value should be used for the calculations in the selected entry. Both fields are optional.
When an Attachment value is provided, only the Driver Field amount exceeding the value is used. If the amount is less than or equal to the Attachment value, the amount is zero.
The Limit value is the maximum amount that is used from the Driver Field.
If both fields are provided, the calculations are done on the portion of the Driver Field that falls between the two values.
|
|
Examples: |
|
If the Attachment value is 10,000, and the Driver Field equals 15,000, the calculations are based on a value of 5,000. | |
|
If the Limit value is 25,000, and the Driver Field equals 30,000, the calculations are based on a value of 25,000. | |
|
If the Attachment value is 10,000, the Limit value is 25,000, and the Driver Field equals 30,000, the calculations are based on a value of 15,000. |
7. A Trigger Name can be selected to control the entry. If the trigger does not evaluate as true, the calculation for this entry is not applied. If no trigger is selected, the calculation for this entry is always applied.
8. A Sequence number can be entered. This is used to control the order in which entries are calculated. Entries without sequence numbers are processed first, followed by sequenced entries from the lowest value to the highest.
|
|
Tip: It is advisable to leave gaps between the sequence numbers, such as 5, 10, 15. This allows new items to be added to the list at a later date, inserted between existing items. Otherwise, the sequence numbers of existing items must be changed to allow for the new addition. |
Calculations start with the premium type that has the lowest initial sequence number (or no sequence number), and all entries for that premium type are completed before proceeding to the premium type with the next-lowest initial sequence number. If any rate calculations are to be based on the calculated results of another premium type, the initial sequence numbers should be kept unique to ensure the proper order of the calculations.
For each premium type, all entries with the same sequence number are handled according to Rate Type in the following order:
a. Rate
b. Flat Amount
c. Discount or Surcharge
d. Multiplier
e. Minimum
All entries with the same premium type, sequence number, and rate type are handled as follows:
|
Rates |
Each rate is calculated separately and added to the accumulated value for the premium type and sequence number. |
|
Flat Amount |
Each amount is added to the accumulated value for the premium type and sequence number. |
|
Discount or Surcharge |
Multiple entries are combined to determine a total discount or total surcharge, which is applied to the accumulated value for the premium type and sequence number. |
|
Multiplier |
Each multiplier is applied separately. |
|
Minimum |
Only one minimum should be applied to a single sequence number. |
9. The Effective Date and Valid Until Date fields can be used together or separately to control when the entry should be applied. If the effective date of the transaction is before the effective date of the entry or after the valid until date of the entry, the calculation for this entry is not applied.
10. Press the Tab key from the Valid Until Date field or click outside the table to add the item to the list. The item is highlighted in yellow to indicate that it has not been accepted yet.
11. Repeat steps 1 to 10 to add additional entries.
12. Once all entries have been added, right-click inside the table and select Accept All Changes. This saves the current table.
13. Click Save to save the changes.
14. Additional rates can be added to the same Quote Option, or a different Quote Option can be selected.
With the master cover selected, click the Rates item in the Screens widget. For instructions on finding and viewing a master cover, see the section on Viewing and Modifying a Master Cover.
|
Product |
Identifies the product associated with the master cover. |
|
Status |
Identifies the current status of the master cover. |
Select a Quote Option to view the rates defined for that option.

The Rate Configuration panel displays all rates currently set for the master cover.
1. Double-click on any field in the table to open it for editing. See the section on Creating a Rate for a detailed description of the fields.
2. Once all changes have been made, click outside the table. The edited rates are highlighted in yellow.
3. Right-click inside the table and select Accept All Changes. This saves the current table.
4. Click Save to save any changes.
A rate can be deleted from the master cover. Any current submissions or policies are unaffected, and submissions that are already quoted can be bound, but recalculating an existing submission or any new transactions does not include the deleted rate.
With the master cover selected, click the Rates item in the Screens widget. For instructions on finding and viewing a master cover, see the section on Viewing and Modifying a Master Cover.

|
Product |
Identifies the product associated with the master cover. |
|
Status |
Identifies the current status of the master cover. |

Select a Quote Option to view the rates defined for that option.

The Rate Configuration panel displays all rates currently set for the master cover.
1. To remove list items, right-click on the item in the table, and select Delete. The item is highlighted in red, and is removed when the list is saved.
2. Right-click inside the table and select Accept All Changes. This saves the current table.
3. Click Save to save any changes.


