
Processing a claim will often require a range of documents, which can be produced from within the claims system. Document templates can be built in Microsoft Word, attached to the master cover, and then generated from within the claim workflow, manually or automatically.
When the document is generated, placeholders in the template are automatically replaced with the relevant data from the claim and related resources. Logic structures can be used to include or exclude content, from individual words to entire sections.
All generated documents are logged within the claim for reference, or draft versions may be generated for review, which are not attached.
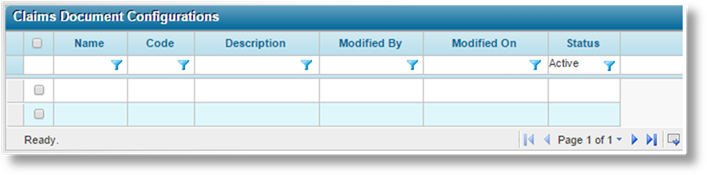
1. In the main menu, select Claims, Configuration, Workflow, then Documents. A list of all available document configurations is displayed.
|
|
Tip: By default, only Active configurations are displayed. Clear the filter in the Status column to view all configurations. |
2. Click Add. The Claims Document Configuration window opens.
3. Complete the necessary information. Fields marked with a red asterisk * are required.

|
Name |
Enter the name of the configuration. This name will be used to select the document in the printing window, and will be part of the default name of the file. |
|
Code |
Enter a code to identify the configuration internally. |
|
Description |
Enter a description for the configuration. |
|
Manual |
Users will be able to generate the document manually from the claims workflow, with multiple output options. The availability will be configured below. |
|
Automatic |
The system will automatically generate the document as a PDF in response to events configured below. |
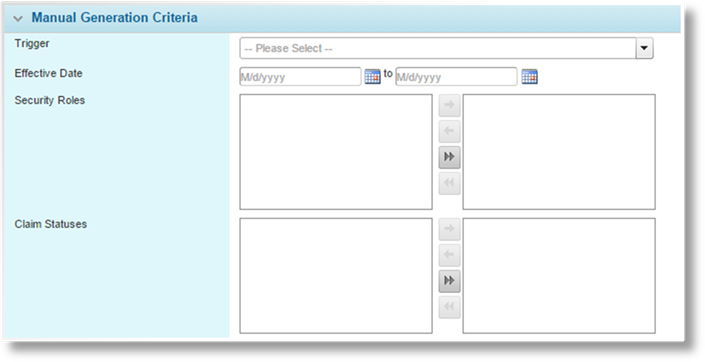
The Manual Generation Criteria panel is available when Manual has been checked. These settings control the availability of the document in the claims workflow. All defined criteria must be met for the document configuration to be available for printing.
|
Trigger |
The trigger must evaluate as true for the document to be available. |
|
Effective Date |
When attaching time-sensitive documents, a date range
can be provided. This document will only be available during the
defined period. Enter the dates or select them from the calendar
lookups |
|
Security Roles |
Select the user security roles for which the document should be available. Once a document has been generated, a copy is stored in the system. The selected security roles also determine if the user can view the stored documents. |
|
Claim Statuses |
Select the claim statuses for which the document should be available. |
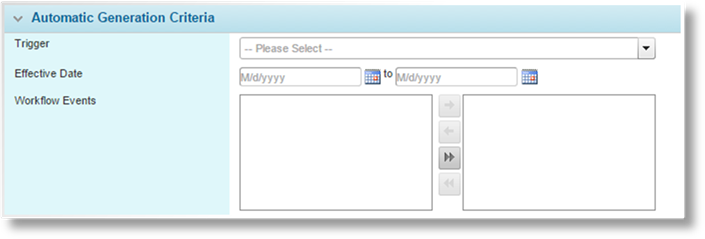
The Automatic Generation Criteria panel is available when Automatic has been checked. These settings control when the system will generate the document automatically. All defined criteria must be met for the document to generate.
|
Trigger |
The trigger must evaluate as true for the document to generate. |
|
Effective Date |
When attaching time-sensitive documents, a date range
can be provided. This document will only be generated during the
defined period. Enter the dates or select them from the calendar
lookups |
|
Workflow Events |
Select the Events where the document will be generated. |
4. Click Save to save the configuration and reveal additional settings, or click Close to return to the Claim Document Configurations list without saving the configuration.
Additional panels are added to the page once the configuration has been saved.

A document configuration contains one or more templates, uploaded to the system in the Document Templates section. See the Managing Document Templates section for instructions on adding templates to the system. When a document is generated, the system processes each template, evaluating conditions and replacing placeholders. The final content is then output as a single document.
The Templates grid lists all templates currently attached to the configuration. See Managing Templates Within a Claim Document Configuration for details on adding, editing, and removing templates.
|
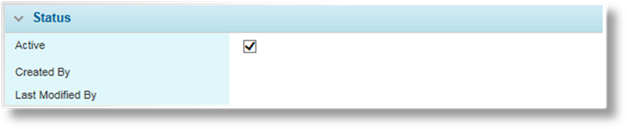
Active |
Marks the document configuration as active and available for use. If unchecked, any existing documents will remain attached to the claims, but this configuration will not be available to generate new documents. |
|
Created By |
Identifies the date and time the configuration was created, and the user who created it. |
|
Last Modified By |
Identifies the last date and time the configuration was changed, and the user who made the changes. |
1. In the main menu, select Claims, Configuration, Workflow, then Documents. A list of all available document configurations is displayed.
|
|
Tip: By default, only Active configurations are displayed. Clear the filter in the Status column to view all configurations. |
2. Click a link in the Name column to view the document configuration details. If there are a large number of available configurations, see the Using Grids section for help on finding the appropriate configuration.
3. See the section on Creating a New Claims Document Configuration for a detailed description of the fields. All fields may be edited, if necessary.
4. Click Save to save the configuration but keep the window open, or click Close to close the window without saving the configuration.
Once created, a document configuration cannot be deleted. It can be deactivated, which leaves any existing documents attached to the claims, but the configuration will not be available to generate new documents.
1. In the main menu, select Claims, Configuration, Workflow, then Documents. A list of all available document configurations is displayed.
|
|
Tip: By default, only Active configurations are displayed. Clear the filter in the Status column to view all configurations. |
2. Locate the document configurations to be deactivated. If there are a large number of available configurations, see the Using Grids section for help on finding the appropriate configurations.
3. Check the boxes for all configurations to be deactivated.
4. Click Deactivate, then confirm the deactivation when prompted to do so. All selected configurations are deactivated. If the configuration list is still defaulted to only show active configurations, they disappear from the list.
|
|
Tip: Individual document configurations can also be deactivated or reactivated directly through the configuration record. See the section on Viewing and Modifying a Claim Document Configuration for details. |
Once a claim document configuration has been created and saved, one or more templates must be added to define the content of the generated document. If multiple templates are added, they will all be merged into one document at generation.
Templates must be uploaded to the system before assigning them to a document configuration. See the Managing Document Templates section for instructions on adding templates to the system.
When viewing a saved claim document configuration, the Templates grid lists all templates currently attached to the configuration.
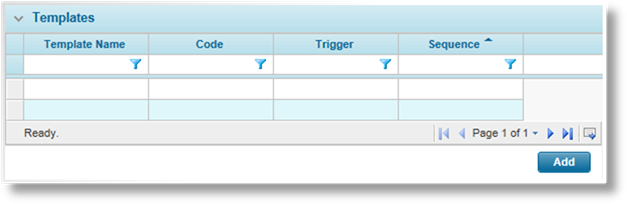
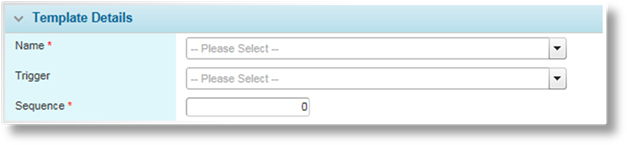
1. Click Add to add a template, or click a link in the Template Name column to view the setup for an existing template. The Templates window opens.
|
Name |
Select the template to be attached. |
|
Trigger |
A trigger can be selected to control whether this one template will be included in the generated document. The template will only be included if the trigger evaluates to true. |
|
Sequence |
Enter a sequence number to define the order that the templates will appear in the generated document. Gaps can be left in sequence numbers (10, 20, 30, etc.) to allow additional templates to be inserted later. |
2. Click Add & New or Save & New to save the template and clear the form to add another template, click Add & Close or Save & Close to save and close the window, or click Close to close the window without saving the template.
When viewing an existing template setup, click Delete to remove the template from the document configuration.

 .
.