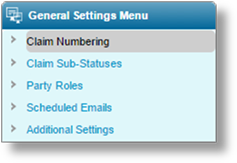
The General Settings section contains options and default settings controlling various parts of the system.
In the main menu, select Claims, Configuration, then General Settings. The General Settings page opens.
The information is divided into multiple pages. The pages are accessed through the General Settings Menu widget to the left of the screen.
Click a link to view the page details.
|
Includes settings for claim numbering. | |
|
Includes settings for managing claim Sub-Statuses. | |
|
Includes settings for managing claim parties. | |
|
Includes settings for automatic claim payment summary e-mails. | |
|
Includes miscellaneous claims settings. |
The General Settings - Sequence page provides options to set how claims are numbered.
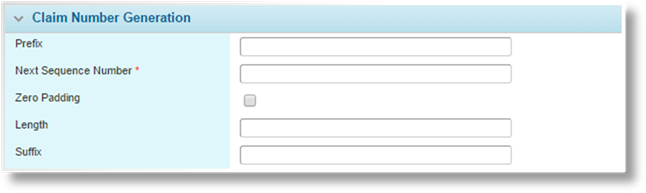
The Claim Number Generation panel provides settings for the formatting and sequential numbering of claim numbers.
|
Prefix |
Enter any text that should precede the sequence number. Any separator characters should be included here. |
|
Next Sequence Number |
Enter the number to be assigned to the next claim created in the system. The number is incremented with each claim, and this field is automatically updated to show the next number to be assigned. |
|
Zero Padding |
Adds leading zeroes to the sequence number to bring it to a set length. If unchecked, the entire claim number will gradually increase in length as more claims are created. |
|
Length |
This field is available when Zero Padding is checked. Enter the required length of the sequence number, not including the prefix and suffix. Leading zeroes are added to the sequence number to bring it to this length. The minimum length is 2, and the maximum length is 20. |
|
|
Note: The Sequence Number does not reset to zero when the selected length reaches its maximum value. The length is extended to continue counting in sequence. |
|
Suffix |
Enter any text that should follow the sequence number. Any separator characters should be included here. |
|
|
Examples: |
|
With the prefix set as "Pr-" (a sales code), the sequence number set as 2507 (picking up from previous business), and the suffix set as "/SA" (a regional code), the next three claims will have the following numbers. | |
|
Pr-2507/SA Pr-2508/SA Pr-2509/SA | |
|
With the prefix set as "Pr", the sequence number set as 1 with leading zeroes up to seven digits, and no suffix, the next three claims will have the following numbers. | |
|
Pr0000001 Pr0000002 Pr0000003 |
Click Save to save the settings.
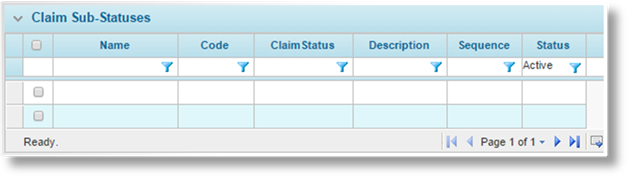
The General Settings – Claim Sub-Statuses page provides options for creating claim sub-statuses.

When changing the status of a claim, a core status and associated sub-status can be selected. The Claim Sub-Statuses panel lists all sub-statuses associated to the core claim statuses.
|
|
Tip: By default, only Active sub-statuses are displayed. Clear the filter in the Status column to view all sub-statuses. |
Click Add to create a new sub-status, see Creating a New Claim Sub-Status. Click a link in the Name column to view an existing sub-status, see Viewing and Modifying a Claim Sub-Status. To deactivate sub-statuses, see Deactivating a Claim Sub-Status.
1. In the main menu, select Claims, Configuration, then General Settings. The General Settings page opens. Navigate to the Claim Sub-Statuses page. See Navigating Claims General Settings for instructions. The Claim Sub-Statuses panel lists all sub-statuses associated to the core claim statuses.
|
|
Tip: By default, only Active sub-statuses are displayed. Clear the filter in the Status column to view all sub-statuses. |
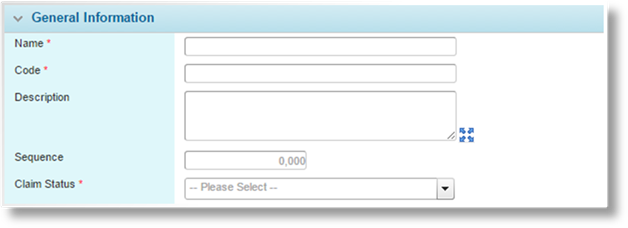
2. Click Add. The Claim Sub-Status window opens.
3. Complete the necessary information. Fields marked with a red asterisk * are required.
|
Name |
Enter the name of the sub-status. This is the name that will be displayed when selecting the sub-status. |
|
Code |
Enter a code to identify the sub-status internally. |
|
Description |
Enter a description of the sub-status. |
|
Sequence |
Enter a sequence number to define the order that the sub-statuses will appear in the list. Gaps can be left in sequence numbers (10, 20, 30, etc.) to allow additional sub-statuses to be inserted later. |
|
Claim Status |
Select the core status for which the sub-status will be available. |
4. Click Add & New to save the sub-status and clear the form to enter another sub-status, click Add & Close to save and close the window, or click Close to close the window without saving the sub-status.

The Status panel is added to the page once the sub-status has been saved.
|
Active |
Marks the sub-status as active and available for use. If unchecked, the sub-status will remain selected for existing claims, but can no longer be selected when changing status. |
1. In the main menu, select Claims, Configuration, then General Settings. The General Settings page opens. Navigate to the Claim Sub-Statuses page. See Navigating Claims General Settings for instructions. The Claim Sub-Statuses panel lists all sub-statuses associated to the core claim statuses.

|
|
Tip: By default, only Active sub-statuses are displayed. Clear the filter in the Status column to view all sub-statuses. |
2. Click a link in the Name column to view the sub-status details. If there are a large number of available sub-statuses, see the Using Grids section for help on finding the appropriate sub-status.
3. See the section on Creating a New Claim Sub-Status for a detailed description of the fields.
4. Click Save & New to save the sub-status and clear the form to enter another sub-status, click Save & Close to save and close the window, or click Close to close the window without saving the sub-status.
1. In the main menu, select Claims, Configuration, then General Settings. The General Settings page opens. Navigate to the Claim Sub-Statuses page. See Navigating Claims General Settings for instructions. The Claim Sub-Statuses panel lists all sub-statuses associated to the core claim statuses.
|
|
Tip: By default, only Active sub-statuses are displayed. Clear the filter in the Status column to view all sub-statuses. |
2. Locate the sub-statuses to be deactivated. If there are a large number of available sub-statuses, see the Using Grids section for help on finding the appropriate sub-statuses.
3. Check the boxes for all sub-statuses to be deactivated.
4. Click Deactivate, then confirm the deactivation when prompted to do so. All selected sub-statuses are deactivated. If the Claim Sub-Statuses list is still defaulted to only show active sub-statuses, they disappear from the list.
|
|
Tip: Individual sub-statuses can also be deactivated or reactivated directly through the Claim Sub-Status window. See the section on Viewing and Modifying a Claim Sub-Status for details. |
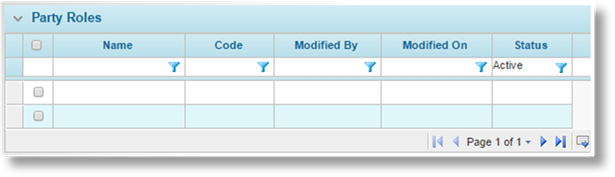
The General Settings – Party Roles page provides options for managing claim parties.

When attaching a claim party to a claim, a role can specified to identify how the party is involved in the claim process. While a single party can be attached under multiple roles, only one instance of each role can be attached to the claim. The Party Roles panel lists all available roles.
|
|
Tip: By default, only Active roles are displayed. Clear the filter in the Status column to view all roles |
Click Add to create a new role, see Creating a New Party Role. Click a link in the Name column to view an existing role, see Viewing and Modifying a Party Role. To deactivate roles, see Deactivating a Party Role.
1. In the main menu, select Claims, Configuration, then General Settings. The General Settings page opens. Navigate to the Party Roles page. See Navigating Claims General Settings for instructions.
When attaching a claim party to a claim, a role can specified to identify how the party is involved in the claim process. While a single party can be attached under multiple roles, only one instance of each role can be attached to the claim. The Party Roles panel lists all available roles.
|
|
Tip: By default, only Active roles are displayed. Clear the filter in the Status column to view all roles |
2. Click Add. The Party Role window opens.
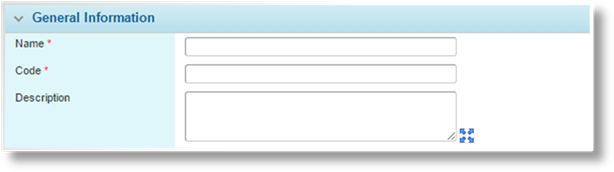
3. Complete the necessary information. Fields marked with a red asterisk * are required.
|
Name |
Enter the name of the role. This is the name that will be displayed when selecting the role. |
|
Code |
Enter a code to identify the role internally. |
|
Description |
Enter a description of the role. |
4. Click Add & New to save the role and clear the form to enter another role, click Add & Close to save and close the window, or click Close to close the window without saving the role.
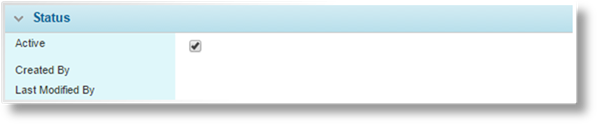
The Status panel is added to the page once the role has been saved.
|
Active |
Marks the role as active and available for use. If unchecked, the role will remain selected for existing parties, but can no longer be selected when adding or editing parties. |
|
Created By |
Identifies the date and time the role was created, and the user who created it. |
|
Last Modified By |
Identifies the last date and time the role was changed, and the user who made the changes. |
1. In the main menu, select Claims, Configuration, then General Settings. The General Settings page opens. Navigate to the Party Roles page. See Navigating Claims General Settings for instructions.
When attaching a claim party to a claim, a role can specified to identify how the party is involved in the claim process. While a single party can be attached under multiple roles, only one instance of each role can be attached to the claim. The Party Roles panel lists all available roles.
|
|
Tip: By default, only Active roles are displayed. Clear the filter in the Status column to view all roles |
2. Click a link in the Name column to view the role details. If there are a large number of available roles, see the Using Grids section for help on finding the appropriate role.
3. See the section on Creating a New Party Role for a detailed description of the fields.
4. Click Save & New to save the role and clear the form to enter another role, click Save & Close to save and close the window, or click Close to close the window without saving the role.
1. In the main menu, select Claims, Configuration, then General Settings. The General Settings page opens. Navigate to the Party Roles page. See Navigating Claims General Settings for instructions.

When attaching a claim party to a claim, a role can specified to identify how the party is involved in the claim process. While a single party can be attached under multiple roles, only one instance of each role can be attached to the claim. The Party Roles panel lists all available roles.
|
|
Tip: By default, only Active roles are displayed. Clear the filter in the Status column to view all roles |
2. Locate the roles to be deactivated. If there are a large number of available roles, see the Using Grids section for help on finding the appropriate roles.
3. Check the boxes for all roles to be deactivated.
4. Click Deactivate, then confirm the deactivation when prompted to do so. All selected roles are deactivated. If the Party Roles list is still defaulted to only show active roles, they disappear from the list.
|
|
Tip: Individual roles can also be deactivated or reactivated directly through the Custom Party Role window. See the section on Viewing and Modifying a Party Role for details. |
The General Settings – Scheduled E-mails page provides settings for sending scheduled emails related to claim payments. An e-mail is sent to each payee who received at least one payment since the last e-mail was sent, and summarizes all payments within that period.
|
|
Note: This feature can be configured, but currently cannot send e-mails. |
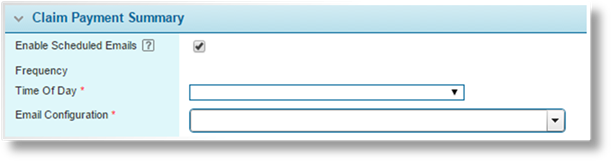
Complete the necessary information. Fields marked with a red asterisk * are required.
|
Enable Scheduled E-mails |
Check this box to enable the scheduled e-mails feature. This displays the remaining settings on the page. |
|
Frequency |
Defines how often the email should be sent. This is set to Daily. |
|
Time Of Day |
Select the time of day when the e-mail should be sent. |
|
E-mail Configuration |
Select an e-mail configuration. These are managed in the E-mail Configuration section, and must be set to Scheduled E-mail to be available here. |
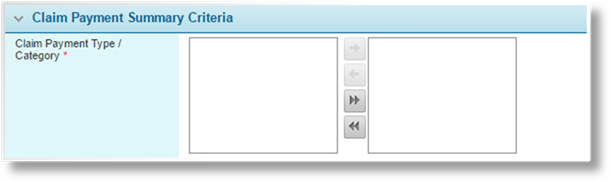
In general, not all payment types require notification e-mails. The Claim Payment Summary Criteria panel is used to define which combinations of Type and Category should produce e-mails. Select all combinations that apply.
Click Save to save the settings.
The General Settings – Additional Settings page provides miscellaneous claims options.

The Navigation Preferences panel controls access to policy information from within a claim.
|
Policy Navigation Preference |
When viewing a claim that has been associated to a policy, the Policy Information widget displays the policy number as a link. This option controls the functionality of that link. |
|
•Policy Summary Window |
The link will open a detail window within the current page, containing a summary of the policy information. The summary window includes a link to open a new tab or window with the full policy workflow. |
|
•Policy Page |
The link will open a new tab or window with the full policy workflow. |
Click Save to save the settings.


