While most billing charges and transactions are generated automatically according the payment plans and other features, there are times when custom entries need to be created manually. The Billing Adjustments feature allows individual, one-time charges and transactions to be created for discounts, additional fees, or any other purpose that requires an adjustment.
Bill to Party adjustments are scheduled as charges within the system, and will be available for automatic or manual invoice generation.
Insurer adjustments create the appropriate General Ledger entries for accounts related to the selected adjustment type.
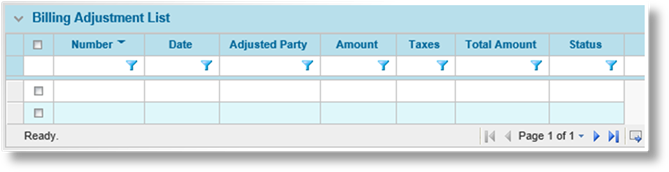
1. In the main menu, select Billing, Transactions, then Billing Adjustments. A list of all available adjustments is displayed.
Some columns have been hidden.
2. Click Add. The Billing Adjustment page opens.
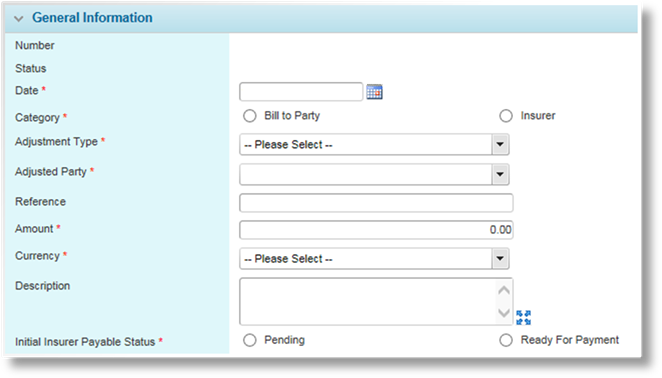
3. Complete the necessary information. Fields marked with a red asterisk * are required.
|
Number |
This is a system-generated number that will be created on saving the adjustment. |
|
Status |
Displays the current status of the adjustment. |
|
•Working |
When an adjustment is in Working status, it can be edited or deleted. |
|
•Posted |
Once an adjustment has been Posted, it can no longer be changed. |
|
Date |
Enter the date
for the adjustment, or select it from the calendar lookup |
|
Category |
Select whether the adjustment is related to a Bill To Party or Insurer company. This will define the available options for the adjustment. |
|
Adjustment Type |
Select one of the available Adjustment Types. This can be used to group adjustments in the reports, and may be related to specific General Ledger accounts. |
|
Adjusted Party |
This field becomes available when a Category is selected. Select the Bill To Party or Insurer company for the adjustment. |
|
Reference |
Enter a reference number for the adjustment. |
|
Amount |
Enter the amount of the adjustment. Negative values are credits payable to the adjusted party, while positive values are debits receivable from the adjusted party. |
|
Currency |
Select the currency for the adjustment. |
|
Description |
Enter a description for the adjustment. |
|
Initial Insurer Payable Status |
This field is available when Insurer is selected for the Category field. This determines the starting status for all insurer payable transactions resulting from this adjustment. |
|
•Pending |
The premium has been invoiced, but the payment from the client has not yet been received and the receipt posted. |
|
•Ready For Payment |
The payment from the client has been received in full and the receipt has been posted. |
4. Click Save to save any changes and remain on the page, click Save & Close to save and return to the adjustments list, or click Close to return to the adjustments list without saving any changes.
5. Once the adjustment has been saved, the following panels are added to the page.
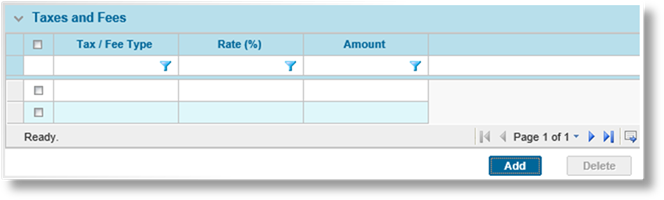
The Taxes and Fees panel becomes available when Bill to Party is selected for the Category field. This allows taxes and fees to be applied to the adjustment. The grid lists all taxes and fees currently assigned to the adjustment, as well as the rate and the calculated total.
To delete one or more taxes or fees, check the boxes for all items to be removed and click Delete.
a) Click Add to add a new tax or fee. The adjustment is saved and the Taxes / Fees window opens.

|
Tax / Fee Type |
Select a tax or fee from the available options. |
|
Rate |
Enter the percentage rate for the tax or fee. |
b) Click Add & New to save the tax or fee and clear the form to add additional entries, click Add & Close to save the tax or fee and close the window, or click Close to close the window without saving the tax or fee.

|
Created By |
Identifies the date and time the adjustment was created, and the user who created it. |
|
Last Modified By |
Identifies the last date and time the adjustment was changed, and the user who made the changes. |
6. On the Billing Adjustment page, click Save to save any changes and remain on the page, click Save & Close to save and return to the adjustments list, or click Close to return to the adjustments list without saving any changes.
1. In the main menu, select Billing, Transactions, then Billing Adjustments. A list of all available adjustments is displayed.

Some columns have been hidden.
2. Click a link in the Number column to view the adjustment details. If there are a large number of available adjustments, see the Using Grids section for help on finding the appropriate adjustment.
3. See the section on Creating a New Adjustment for a detailed description of the fields. All fields may be edited, if necessary, except for the Adjustment Number and Status fields.
Click Save to save any changes and remain on the page, click Save & Close to save and return to the adjustments list, or click Close to return to the adjustments list without saving any changes. Click Delete to delete the adjustment. Click Post to post the adjustment (See Posting an Adjustment for details).
1. In the main menu, select Billing, Transactions, then Billing Adjustments. A list of all available adjustments is displayed.
Some columns have been hidden.
2. Locate the adjustments to be deleted. If there are a large number of available adjustments, see the Using Grids section for help on finding the appropriate adjustments.
3. Check the boxes for all adjustments to be deleted.
4. Click Delete, then confirm the deletion when prompted to do so. All selected adjustments are deleted.
|
|
Tip: Individual adjustments can also be deleted directly through the billing adjustment record. See the section on Viewing and Modifying an Adjustment for details. |
Until an adjustment is posted, it is not final. Posting adjustments make Bill to Party adjustments available for invoicing as of the chosen Date, and Insurer adjustments become available in the Insurer Payables section. Once an adjustment has been posted, it cannot be edited or deleted.
1. In the main menu, select Billing, Transactions, then Billing Adjustments. A list of all available adjustments is displayed.

Some columns have been hidden.
2. Click a link in the Number column to view the adjustment details. If there are a large number of available adjustments, see the Using Grids section for help on finding the appropriate adjustment.
3. Click Post, then confirm the posting when prompted to do so. The adjustment is posted and the relevant charges and General Ledger account entries are created.
 . This is when the adjustment
charge becomes available for invoicing.
. This is when the adjustment
charge becomes available for invoicing.