
In order to manage large amounts of data within a grid, a new tabbed workflow can be created as the grid interface. Instead of a detail window opening when adding a record to a grid, the main screen is replaced with a new workflow divided into tabs.
1. The tab workflow is constructed much like a standard workflow, where fields are added to panels, panels are added to screens, and screens are added to the workflow.
The workflow configuration itself has a new setting, Type. The workflow type can be set to Steps, which is the standard type for the core workflow, or Tabs, which is the new format for use with grids. Note that once the workflow is saved, this setting cannot be changed.
Once the workflow is saved as a tab workflow, the screens can be added. Each screen will be a separate tab in the grid workflow.
The tab workflow does not need to be published. When the core workflow is published, all associated tab workflows are included.
2. Once the tab workflow is available, the grid panel can be configured. A new field has been added in the Grid Settings panel, Management Style. The Window option produces the standard grid with a detail window. The Tabs option produces the new tabbed grid.
Selecting Tabs reveals the Tab Workflow field, where the workflow can be selected.
All fields included in the tab workflow should be added to the panel. Any fields in the tab workflow that are not included in the panel will be displayed in the workflow, but will not be saved. Fields that are not included in the tab workflow can be included in the panel, but will not be displayed in the workflow.
3. Tab grids support parent/child relations. The tab workflow can contain additional grids, even additional tab grids. Each grid within a tab workflow must have the associated tab grid selected as its parent.
If a child grid is also included in the core workflow along with the parent tab grid, it will appear as a cascading grid. Note that cascading child grids are not supported within the tab workflow itself.
4. The tab workflow includes a new widget that displays an identifier for the current record and any parent records. The Panel Management page has a new panel, Field Assignments, that is available for Grid and Premium Grid panels. The Representative Field list in that panel is used to select which field in the grid should be displayed as the identifier for individual records.
In the core workflow, the tab grid appears the same as any other grid. However, when adding or editing a record, the tab workflow fills the main screen in place of the core workflow or parent tab workflow. Note that adding a record automatically creates and saves that record.
Navigating between screens is handled by clicking the tabs at the top of the screen. Changing tabs automatically saves the record.
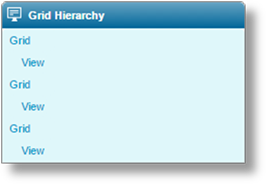
When the tab workflow is displayed, the Grid Hierarchy widget becomes available to the left of the screen. The widget displays the name of the current grid and an identifier for the current record (indented) within that grid. If the identifier for the current record is blank or contains data that cannot be displayed in the widget, View will be displayed instead. If you navigate deeper into a multi-level grid, the grid name and current record will be displayed for each parent grid as well.
The widget can be used to navigate to higher levels of the hierarchy. Clicking a grid name will go to the screen containing that grid. If the grid appears multiple times in a workflow, this will go to the first instance of that grid. The exception to this is when using the link to the top-level grid, which will go to the instance of the grid that was used to enter the tab workflow.
Clicking a record will go to the first screen of that record.
Access to the widget is controlled by the new ViewGridHierarchyWidget security right, which has been automatically added to any roles that have the ViewSubmissionScreenWidget, ViewPolicyWidget, or ViewCommonScreen rights.
The buttons for the tab workflow include Save, Save & Close, Delete, and Close.
Clicking a screen in the Submission Screens widget will exit the tab workflow without saving, and go to the selected screen (a warning will be displayed if there are unsaved changes). The Actions widget will be unavailable within a tab workflow.
Depending on the complexity of the process, when a user activates an integration, there could be a noticeable delay before the user can proceed.
A message and animated icon can now be displayed to notify the user that the system is performing a task. Two icon options are available, and a custom message can be provided.
The Working Indicator panel has been added to the Integration Configuration Management page, and is available when Custom is selected as the Action and Synchronous is selected for Communication.
− For details on integrations, see the Integration Configurations section.
The Colors option when working with Portals has been renamed to Appearance, and expanded with a new feature.
The Skins field provides four options to change the general appearance of the portal.
•Classic Small Font: This is the existing style, and is the default setting.
•Classic Large Font: The classic configuration, but with larger fonts and fields.
•Modern Small Font: A new look with squared corners and fewer dividing lines.
•Modern Large Font: The modern configuration, but with larger fonts and fields.
The options in the Colors panel have been reorganized, breaking the larger options into more specific components to allow for greater customizability. The existing color values in the larger options have been duplicated in the new fields, so there should be no effect on existing portal configurations.
− For details on managing portals, see the Portals section.
A new function has been created to perform compliance scans. This function can scan against multiple lists, and store the results in designated fields for use in the workflow, documents, and e-mails.
The CheckComplianceHit() function is detailed in the Functions section.
A new function has been created to return the full system date and time. This will be returned in the detailed system format, which can be modified using other functions.
The CurrentDateTime() function is detailed in the Functions section.
Two new Workflow Events have been added for use in Automatic E-mail Configurations.
Add - Attachment: This event will cause the e-mail to be sent when a file is attached to the transaction, either by the user or by a web service. The attached file will be included in the e-mail as an attachment.
Add/Update - Document: This event will cause the e-mail to be sent when a new document is generated for a transaction or an existing document is modified, either by the user or by a web service. The document will be included in the e-mail as an attachment. Generating Draft documents will not activate this event. For documents generated by an E-Signature integration, the event will activate when the document is successfully signed, not during the initial generation of the document.
− For details on configuring e-mails, see the E-mail Configurations section.
Previously, e-mail configurations would default to the sending address configured in the system, but a specific sending address could be specified for each configuration.
This option has been enhanced to allow each e-mail configuration to use the default system address, specify a new address for that configuration, or take the sending address from a field in the workflow.
In addition, manual e-mail configurations can be set to allow manual override by the user. This allows the user to edit or replace the from address when sending the e-mail.
− For details on configuring e-mails, see the E-mail Configurations section.
A series of placeholders have been introduced for use in preparing statement templates for generated documents and e-mails.
The following information is available:
•Outstanding invoice details for use in tables:
− Transaction date, due date, and number.
− Original amount and currency.
− Remaining balance amount and currency.
•Outstanding invoice details for use in table summary rows:
− Total amount and currency.
− Total Remaining balance amount and currency.
•Transaction details for use in tables:
− Transaction date, due date, number, reference, and type.
− Transaction amount and currency.
− Remaining balance amount and currency.
•Transaction details for use in table summary rows:
− Total amount and currency.
− Total Remaining balance amount and currency.
•Overall statement information such as closing balance and total amount due.
This information is available in the Oceanwide Word Ribbon. A new Word Ribbon definition file can be downloaded in the Export / Import page. Select the Billing Statement option in the Workflow list, and the new placeholders will be included in the Outstanding Invoice, Statement, and Statement Transaction sections. Bill To Party details are also available to personalize the statement.
− For details on using placeholders, see the Placeholders section.
Three new placeholders have been added for charge details in generated documents.
|
Charge Policy Transaction ID |
Provides the ID number of the transaction associated to the charge. |
|
Charge Policy Number |
Provides the policy number of the transaction associated to the charge. |
|
Charge System Claim Number |
Provides the system claim number of the claim associated to the charge. |
This information is available in the Oceanwide Word Ribbon. A new Word Ribbon definition file can be downloaded in the Export / Import page. Select the Billing Invoice option in the Workflow list, and the new placeholders will be included in the Charge section.
− For details on using placeholders, see the Placeholders section.
In general, data related to an individual claim is separate from data in other claims. When using placeholders in documents, e-mails, and calculated fields, they will only retrieve data from the currently selected claim.
The new Field Indexing feature collects data across all claims, and makes it available for searches, data comparisons, documents, and e-mails.
The Field Indexing option has been added to the Product Menu widget when viewing a Product Model. Fields can be added to the index, with an Alias name or code allowing a single placeholder to represent all data from multiple fields across all claims.
− For details on configuring field indexes, see the Field Indexing section.
Searching and comparing indexed data is achieved using the new ValueExists() function. This function takes the value of a field in the current claim and checks one or more indexed fields to determine if it exists in any other claim.
− For details on using functions, see the Functions section.