
Each master cover can have a customized library of e-mails. These e-mails can be sent automatically in response to actions taken by the users, or can be made available within the submission/policy form for users to send manually.
All e-mails are logged within the submission or policy for reference.
Automatic e-mails are sent by the system when selected workflow events occur, unless an optional trigger condition is not met.
With the master cover selected, click the E-mail Configurations item in the Screens widget. For instructions on finding and viewing a master cover, see the section on Viewing and Modifying a Master Cover.
|
Product |
Identifies the product associated with the master cover. |
|
Status |
Identifies the current status of the master cover. |

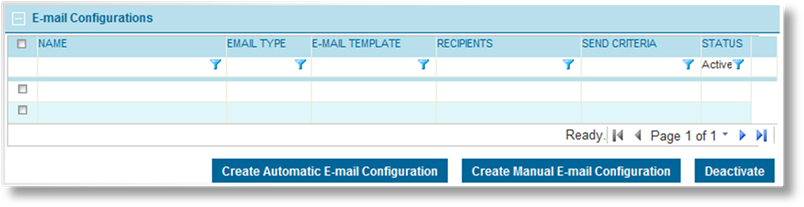
The E-mail Configurations panel displays all configurations currently attached to the master cover.
|
|
Tip: By default, only Active configurations are displayed. Clear the filter in the Status column to view all configurations. |
1. Click Create Automatic E-mail Configuration. The Master Cover - E-mail Configurations page opens.

|
Product |
Identifies the product associated with the master cover. |
|
Status |
Identifies the current status of the master cover. |
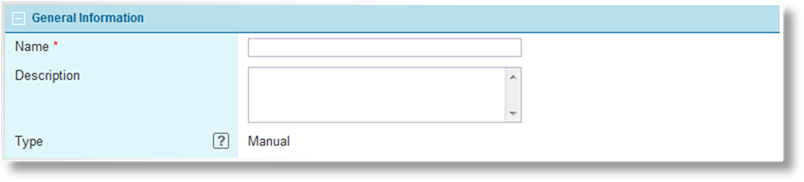
2. Fill in the necessary information.

|
Name |
Enter the name of the e-mail. This name is used in the E-mail Configurations list. |
|
Description |
A description can be entered to provide information about the e-mail. This description is only visible here in the configuration. |
|
Type |
Identifies whether the current e-mail configuration is for an automatic or manual e-mail. |

|
E-mail Template |
Select a template for the subject line and body of the e-mail. |
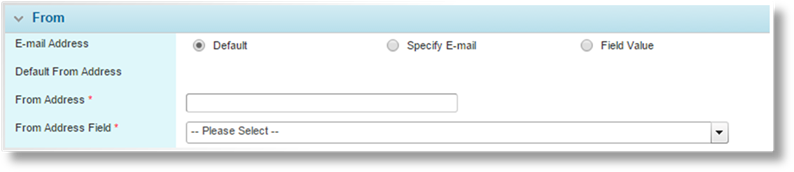
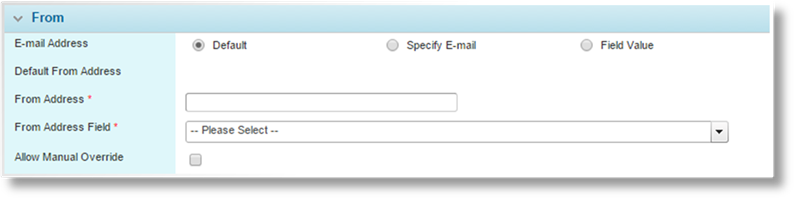
The From panel is used to configure the sending address for e-mails. Any replies will be sent to this address.
|
E-mail Address |
Select the source of the sending address. |
|
•Default |
This uses the default sending address configured in the system. To change the default address, please contact your Oceanwide Representative. |
|
•Specify E-mail |
A custom sending address can be entered for this e-mail configuration. |
|
•Field Value |
The sending address will be taken from a field in the workflow at the time the e-mail is sent. |
|
Default From Address |
This field is visible when Default is selected as the From Address Source. This displays the default sending address configured in the system. |
|
From Address |
This field is visible when Specify E-mail is selected as the From Address Source. Enter the e-mail address to be used as the sender. Only one address can be provided. |
|
From Address Field |
This field is visible when Field Value is selected as the From Address Source. Select a field from the workflow associated to the current master cover. Available field types are Label, Text Area, Textbox, and Textbox (Email). The field can be a calculated field that conditionally returns one of several addresses. |
|
|
Notes: However the From address is configured, if the final address for the e-mail is not valid or if multiple addresses are provided, the e-mail will revert back to the default system address. |
|
The domain of all e-mail addresses should match that of the SMTP server configured by the System Administrator, or the e-mails may be blocked by spam filters. |
|
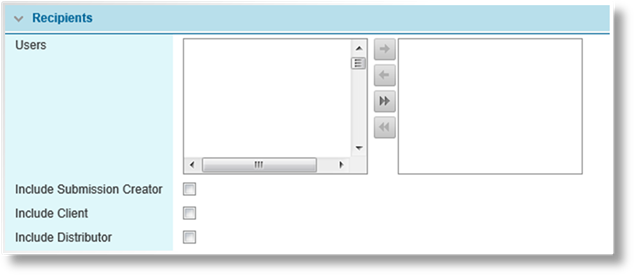
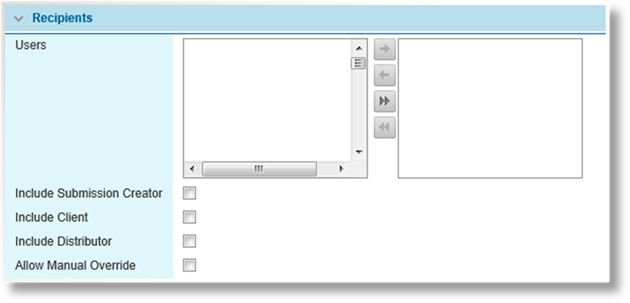
Users |
Select the default users to receive the e-mail. |
|
Include Submission Creator |
Check this box to send the e-mail to the user who created the submission or policy. |
|
Include Client |
Check this box to send the e-mail to the client attached to the submission or policy. The e-mail is sent to the designated primary contact for the company. If no primary contact has been designated, the e-mail is sent to the first user created for the company. |
|
Include Distributor |
Check this box to send the e-mail to the distributor attached to the submission or policy. The e-mail is sent to the designated primary contact for the company. If no primary contact has been designated, the e-mail is sent to the first user created for the company. |
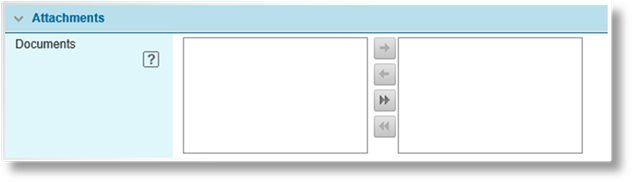
Documents can be automatically generated and attached to e-mails.
|
Documents |
Select any documents to be included in the e-mail. Only documents set to be auto-generated are available. |
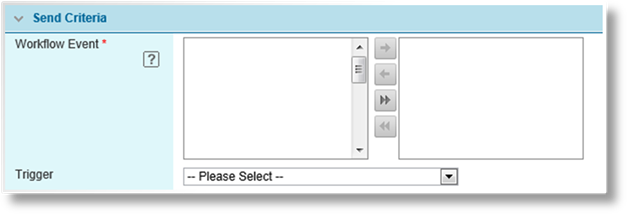
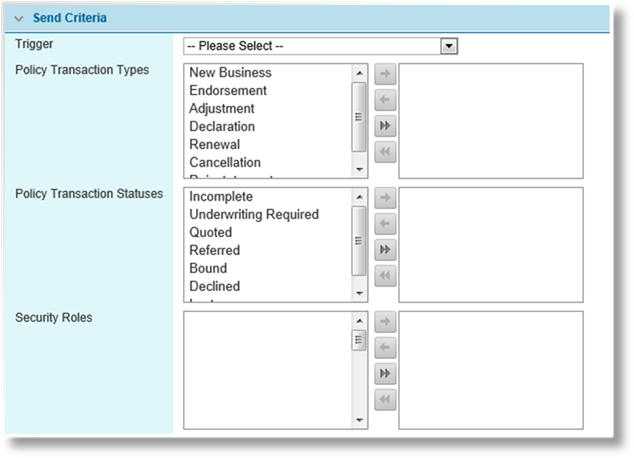
The Send Criteria panel defines when the automated e-mail should be sent.
|
Workflow Event |
Select one or more workflow events where the e-mail should be sent. |
|
|
For details on the event types, please see Workflow Event Types. |
|
Trigger |
A trigger can be defined to control if the e-mail is sent or not. If the trigger does not evaluate as true, the e-mail is not sent. |

Once an automatic e-mail is sent, a copy is stored in the E-mails list within the submission. These e-mails are visible to all authorized users who were recipients of the e-mail, or who have at least one of the security roles defined in the E-mail History View Criteria panel.
3. Click Add to save the settings but remain on the page, click Add & Close to save the settings and return to the e-mail configurations list, or click Close to return to the e-mail configurations list without saving the settings.
4. The following panels are added once the configuration has been saved.

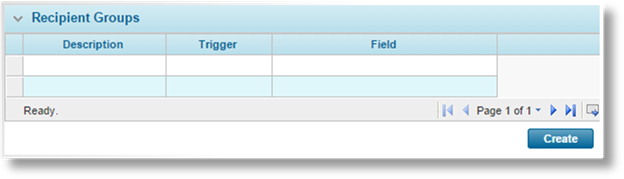
The e-mail can be sent to additional recipients defined in the workflow. The recipients are stored in a field, which may be predefined or provided by the user, and pulled into the e-mail when it is generated. A trigger can be defined to determine if each group is included.
Each group can contain multiple addresses, separated by commas or semi-colons. Spaces will be ignored. Any invalid addresses will be removed before sending.
a) To add a group, click Create. The Recipient Group window opens.
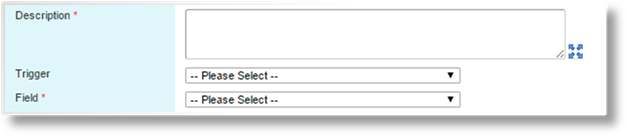
b) Complete the necessary information. Fields marked with a red asterisk * are required.

|
Description |
Enter a description for the group. |
|
Trigger |
Select a trigger. The group will only be included if the trigger evaluates as true, or if no trigger is selected. |
|
Field |
Select the field that will contain the recipient addresses. The list includes Textbox, Text Area, Textbox (Email), and Label fields from the workflow attached to the current master cover. |
c) Click Save & New to save the recipient group and clear the form to add a new group, click Save & Close to save the group and close the window, or click Close to close the window without saving the group.

|
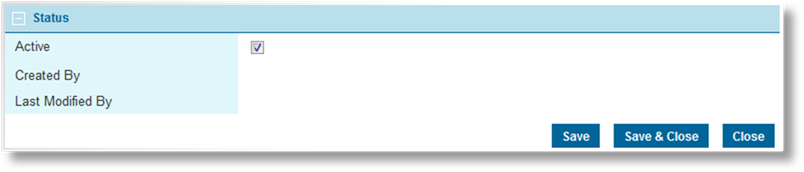
Active |
Marks the configuration as active and available for use. If unchecked, any existing e-mails sent with this configuration remain attached to any submissions or policies, but the configuration cannot be used for new e-mails. |
|
Created By |
Identifies the date and time the configuration was created, and the user who created it. |
|
Last Modified By |
Identifies the last date and time the configuration was changed, and the user who made the changes. |
5. Click Save to save the settings but remain on the page, click Save & Close to save the settings and return to the e-mail configurations list, or click Close to return to the e-mail configurations list without saving the settings.
Manual e-mails are available to users in the submission/policy form, and can be sent whenever necessary.
With the master cover selected, click the E-mail Configurations item in the Screens widget. For instructions on finding and viewing a master cover, see the section on Viewing and Modifying a Master Cover.

|
Product |
Identifies the product associated with the master cover. |
|
Status |
Identifies the current status of the master cover. |

The E-mail Configurations panel displays all configurations currently attached to the master cover.
|
|
Tip: By default, only Active configurations are displayed. Clear the filter in the Status column to view all configurations. |
1. Click Create Manual E-mail Configuration. The Master Cover - E-mail Configurations page opens.

|
Product |
Identifies the product associated with the master cover. |
|
Status |
Identifies the current status of the master cover. |
2. Fill in the necessary information.
|
Name |
Enter the name of the e-mail. This name is used in the E-mail Configurations list, as well as in the E-mail Templates dropdown on the submission/policy form. |
|
Description |
A description can be entered to provide information about the e-mail. This description is only visible here in the configuration. |
|
Type |
Identifies whether the current e-mail configuration is for an automatic or manual e-mail. |

|
E-mail Template |
Select a template for the subject line and body of the e-mail. |
|
Allow Manual Override |
When checked, this option allows the user to edit the subject line and body text of the e-mail before sending. If unchecked, the subject and body appear as they will be sent, and cannot be changed. |
The From panel is used to configure the sending address for e-mails. Any replies will be sent to this address.
|
E-mail Address |
Select the source of the sending address. |
|
•Default |
This uses the default sending address configured in the system. To change the default address, please contact your Oceanwide Representative. |
|
•Specify E-mail |
A custom sending address can be entered for this e-mail configuration. |
|
•Field Value |
The sending address will be taken from a field in the workflow at the time the e-mail is sent. |
|
Default From Address |
This field is visible when Default is selected as the From Address Source. This displays the default sending address configured in the system. |
|
From Address |
This field is visible when Specify E-mail is selected as the From Address Source. Enter the e-mail address to be used as the sender. Only one address can be provided. |
|
From Address Field |
This field is visible when Field Value is selected as the From Address Source. Select a field from the workflow associated to the current master cover. Available field types are Label, Text Area, Textbox, and Textbox (Email). The field can be a calculated field that conditionally returns one of several addresses. |
|
Allow Manual Override |
When checked, this option allows the user to edit the From field when sending the e-mail. If unchecked, the From field will appear as configured here and cannot be changed. |
|
|
Notes: However the From address is configured, if the final address for the e-mail is not valid or if multiple addresses are provided, the e-mail will revert back to the default system address. |
|
The domain of all e-mail addresses should match that of the SMTP server configured by the System Administrator, or the e-mails may be blocked by spam filters. This should be considered when allowing the user to override the address. |
|
Users |
Select the default users to receive the e-mail. |
|
Include Submission Creator |
Check this box to send the e-mail to the user who created the submission or policy. |
|
Include Client |
Check this box to send the e-mail to the client attached to the submission or policy. The e-mail is sent to the designated primary contact for the company. If no primary contact has been designated, the e-mail is sent to the first user created for the company. |
|
Include Distributor |
Check this box to send the e-mail to the distributor attached to the submission or policy. The e-mail is sent to the designated primary contact for the company. If no primary contact has been designated, the e-mail is sent to the first user created for the company. |
|
Allow Manual Override |
When checked, this option allows the user to edit the Users list, as well as the checkboxes for Include Submission Creator, Include Client, and Include Distributor before sending the e-mail. The user is also able to manually add additional e-mail addresses to the Additional To, Cc, and Bcc fields. If unchecked, the selected recipients are displayed, but cannot be edited. |
|
|
Note: Individual e-mails are sent to all recipients, including any addresses the user may add in the Additional To field at the time the email is sent. If the user adds any addresses to the Cc or Bcc fields, those addresses are added to each individual e-mail sent to the recipients. This can result in Cc or Bcc addressees receiving multiple copies of e-mails. |
The Send Criteria panel defines when the e-mail is available to users in the submission/policy form.
|
Trigger |
A trigger can be defined to control if the e-mail is available or not. If the trigger does not evaluate as true, the e-mail template is not shown in the New E-mail window when sending an e-mail. |
|
Policy Transaction Types |
Select the transaction types for which the e-mail should be available. |
|
Policy Transaction Statuses |
Select the transaction statuses for which the e-mail should be available. |
|
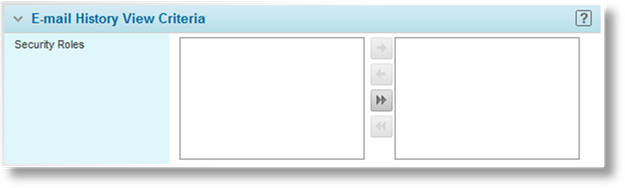
Security Roles |
Select the user security roles for which the e-mail should be available. Once an e-mail has been sent, a copy is stored in the submission/policy form. The selected security roles also determine if the user can view the stored e-mails. |
|
|
Note: The e-mail is only available if the transaction and user match at least one selected option in each group. At least one option must be selected in each group or the e-mail is never shown. |
Once a manual e-mail is sent, a copy is stored in the E-mails list within the submission. These e-mails are visible to all authorized users who sent the e-mail, were recipients of the e-mail, or who have at least one of the security roles defined in the E-mail History View Criteria panel.
3. Click Add to save the settings but remain on the page, click Add & Close to save the settings and return to the e-mail configurations list, or click Close to return to the e-mail configurations list without saving the settings.
4. The following panels are added once the configuration has been saved.
The e-mail can be sent to additional recipients defined in the workflow. The recipients are stored in a field, which may be predefined or provided by the user, and pulled into the e-mail when the users begins the send e-mail process. A trigger can be defined to determine if each group is included.
Each group can contain multiple e-mail addresses, separated by commas or semi-colons. Spaces will be ignored. Any invalid addresses must be removed or corrected by the user before sending, if Allow Manual Override is enabled for the recipients. If the user cannot remove the invalid addresses, they will need to contact an administrator.
d) To add a group, click Create. The Recipient Group window opens.
e) Complete the necessary information. Fields marked with a red asterisk * are required.
|
Description |
Enter a description for the group. |
|
Trigger |
Select a trigger. The group will only be included if the trigger evaluates as true, or if no trigger is selected. |
|
Field |
Select the field that will contain the recipient addresses. The list includes Textbox, Text Area, Textbox (Email), and Label fields from the workflow attached to the current master cover. |
f) Click Save & New to save the recipient group and clear the form to add a new group, click Save & Close to save the group and close the window, or click Close to close the window without saving the group.
|
Active |
Marks the configuration as active and available for use. If unchecked, any existing e-mails sent with this configuration remain attached to any submissions or policies, but the configuration cannot be used for new e-mails. |
|
Created By |
Identifies the date and time the configuration was created, and the user who created it. |
|
Last Modified By |
Identifies the last date and time the configuration was changed, and the user who made the changes. |
5. Click Save to save the settings but remain on the page, click Save & Close to save the settings and return to the e-mail configurations list, or click Close to return to the e-mail configurations list without saving the settings.
With the master cover selected, click the E-mail Configurations item in the Screens widget. For instructions on finding and viewing a master cover, see the section on Viewing and Modifying a Master Cover.
|
Product |
Identifies the product associated with the master cover. |
|
Status |
Identifies the current status of the master cover. |

The E-mail Configurations panel displays all configurations currently attached to the master cover.
|
|
Tip: By default, only Active configurations are displayed. Clear the filter in the Status column to view all configurations. |
1. Click a link in the Name column to view the configuration details.
2. See the sections on Creating an Automatic E-mail Configuration or Creating a Manual E-mail Configuration for detailed descriptions of the fields. All fields may be edited, if necessary.
3. Click Save to save the settings but remain on the page, click Save & Close to save the settings and return to the e-mail configurations list, or click Close to return to the e-mail configurations list without saving the settings.
With the master cover selected, click the E-mail Configurations item in the Screens widget. For instructions on finding and viewing a master cover, see the section on Viewing and Modifying a Master Cover.
|
Product |
Identifies the product associated with the master cover. |
|
Status |
Identifies the current status of the master cover. |
The E-mail Configurations panel displays all configurations currently attached to the master cover.
|
|
Tip: By default, only Active configurations are displayed. Clear the filter in the Status column to view all configurations. |
1. Locate the configuration or configurations to be deactivated. If there are a large number of available configurations, see the Using Grids section for help on finding the appropriate configurations.
2. Check the boxes for all configurations to be deactivated.
3. Click Deactivate, then confirm the deactivation when prompted to do so. All selected configurations are deactivated. If the configurations list is still defaulted to only show active configurations, they disappear from the list.
|
|
Tip: Individual configurations can also be deactivated or reactivated directly through the configuration record. See the section on Viewing and Modifying an Email Configuration for details. |

