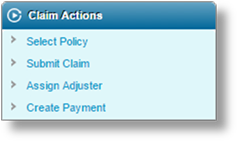
The Claim Actions widget lists the available actions that can be taken on the claim in its current status. Below are some general descriptions of each action.
The available actions are determined by the type of transaction, the status of the transaction, the availability of items to work with (such as e-mails and documents), and the user's security roles.
If no actions are available for the current claim, the Claim Actions widget is not displayed.
|
Select Policy |
Once the Date of Loss has been specified for the claim, click Select Policy to choose the appropriate policy for the claim. The Policy Selection window opens. See Selecting the Policy for a Claim for details. |
|
Submit Claim |
Once all necessary claim information has been provided, click Submit Claim to submit the claim for processing. |
|
|
Depending on the details of the claim, an adjuster may be assigned automatically. |
|
Assign Adjuster |
Click Assign Adjuster to select or replace the adjuster for the claim. See Assigning an Adjuster for details. |
|
Create Payment |
Click Create Payment to enter a payment for policy participants or claim parties. This is the same as entering a payment on the Payments screen. At least one policy participant or claim party must be attached to the claim for this option to be available. See Adding a Payment to a Claim for details. |
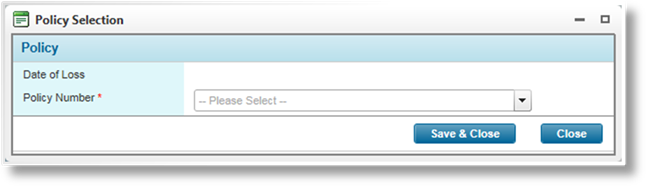
Once the Date of Loss has been provided, displayed in the Claim Information widget, the Select Policy option becomes available in the Claim Actions widget. This option opens the Policy Selection window.
|
Date of Loss |
This field displays the date of loss provided for the claim. |
|
Policy Number |
To select the appropriate policy for the claim, enter at least the first three characters of the policy number or assured name. Only policies that are valid for the date of loss will be available. |
Click Save & Close to save the policy selection and close the window, or click Close to close the window without selecting a policy.
Once a policy has been selected, the Policy No: is displayed in the Policy Information widget.
Submitting a claim may automatically assign an adjuster, replacing any previous adjuster assignment. The adjuster may be changed manually after automatic assignment.
If an adjuster has not already been assigned to a claim, click Assign Adjuster to add an adjuster to a claim. The Adjuster window opens.

|
Adjuster |
Select the adjuster to attach to the claim. The list includes all available users that have been defined as adjusters. |
Click Save & Close to save the selection and close the window, or click Close to close the window without saving.