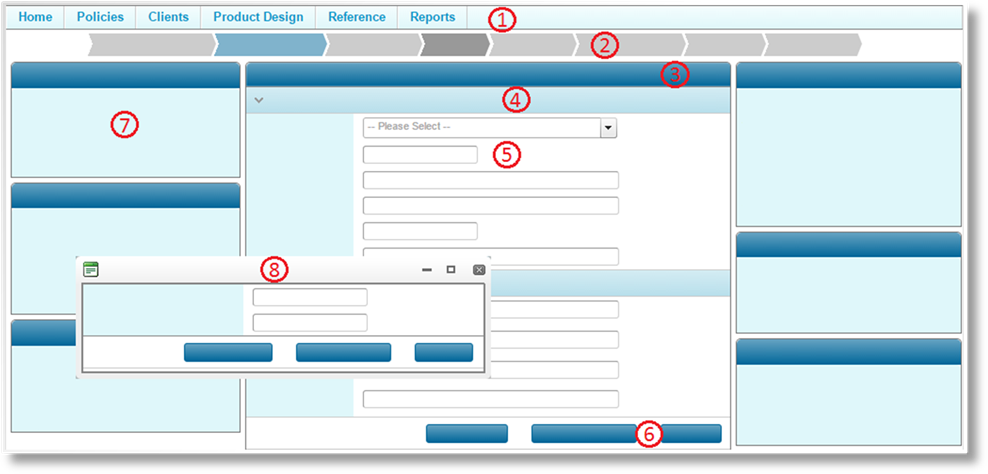
The layout of the Bridge screen adjusts as needed for the current feature or content, but has a standard organization.

|
1 – Main Menu |
The main menu provides cascading menus and submenus to navigate to the major sections of the system. |
|
2 – Progress Bar |
When working within a sequential workflow, the progress bar displays the current position, completed steps, and incomplete steps. |
|
3 – Main Screen |
The center of the screen is the primary work area, with the majority of the fields and controls. When adding data to a tabbed grid, the main screen will be replaced with a series of screens with tabs at the top of the screen. |
|
4 – Panels |
Fields and grids are organized into panels within the
main screen or Detail Windows (8). Grid panels are detailed
in the Using Grids
section. Panels can be collapsed and expanded using the |
|
|
Panels may contain their own buttons for additional actions related to the content of the panel. |
|
5 – Fields and Controls |
Each panel will contain either a grid (see the Using Grids section) or a
collection of fields and controls. This includes controls for
entering data, selecting dates, checking boxes or
radio buttons, dropdown menus, or selecting groups of
options. If any help information is available for the field or
control, a help icon |
|
|
Some fields and controls have restrictions, such as a maximum length or a certain type of data (e-mail address, integer, etc.). Validation messages will be displayed by the fields when trying to save with invalid data. |
|
6 – Screen Button Bar |
A variety of buttons can be available at the bottom of the screen, from save and close buttons, to navigation controls, and custom buttons related to the content of the current screen. |
|
7 – Sidebars |
To the left and right of the screen are the sidebars, which may not be available in every screen. These can contain widgets with information and controls related to the current screen, or additional content defined in the system. |
|
|
To the top-right of each sidebar is a hidden pin |
|
|
When a sidebar is collapsed, clicking the expand or
collapse icons |
|
|
The ability to pin and unpin the sidebars can be disabled in the system configuration, and may not be available. |
|
8 – Detail Windows |
Many features will open detail windows for additional
information. These windows are similar to the Main Screen,
containing panels and grids, and have their own Screen Button Bar
with controls to navigate, save, and close the window. The window
can also be minimized, maximized, or closed using the controls in the
top-right |