
The Outstanding Invoices page provides details on all invoices for the bill to party that have not yet been paid in full. Invoices can be selected to view the specific details. This page is similar to the standalone Invoices report, except this report is limited to the selected bill to party and is filtered by currency.
Select a Currency and click Search. The Invoice List panel appears with the results.
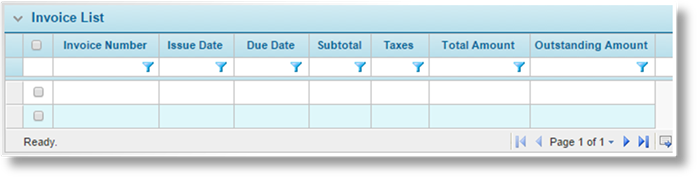
Some columns have been hidden.
Click a link in the Invoice Number column to view the Invoice details window. To make payments for invoices, see the Online Payment of Invoices section. To use credit invoices to pay off debit invoices, see the Offset Invoices section.
Click Close to return to the Bill To Parties list.
Invoices can be paid directly from the Outstanding Invoices page in the Bill To Party information. One or more invoices can be paid, with the option to use any funds held on account and paying any remaining balance online.
1. Open a bill to party record and navigate to the Outstanding Invoices page. See Viewing and Navigating Bill To Party Information for instructions.

2. Select a Currency and click Search. The Invoice List panel appears with the results.

Some columns have been hidden.
3. Check the boxes for all invoices to be paid, then click Pay. The Payment Initiation window opens.
4. Complete the necessary information. Fields marked with a red asterisk * are required.
|
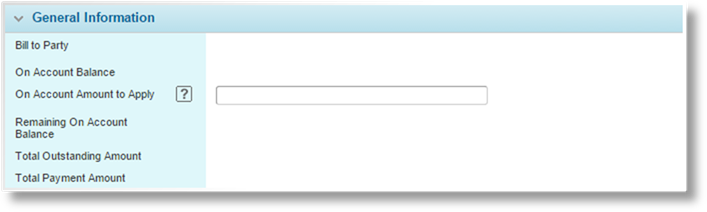
Bill To Party |
Displays the name of the current bill to party. |
|
On Account Balance |
Displays any funds in the selected currency that may be on account for the bill to party. |
|
On Account Amount to Apply |
Enter an amount to use on account funds for this payment. The amount may not exceed the current On Account Balance or the Total Outstanding Amount. |
|
Remaining On Account Balance |
Displays the amount that will remain on account after this payment is completed. |
|
Total Outstanding Amount |
Displays the total unpaid amount of the invoices selected for payment. |
|
Total Payment Amount |
Displays the total remaining amount to be paid after any on account amount has been applied. Depending on the configuration of the payment system, this amount may be changed to make a partial payment. |
5. Click Submit to proceed with the payment, or click Close to close the window without making the payment.
If the Total Payment Amount is zero, meaning the full payment amount was covered by the on account funds, clicking Submit will complete the payment and return to the Outstanding Invoices list.
If there is a remaining amount to be paid, clicking Submit will close the window and change to the online payment screen. The instructions will be on-screen.
6. When the payment is completed, the Online Payments screen opens with a summary of the payment.
|
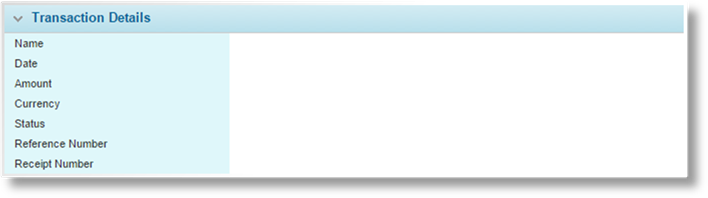
Name |
Displays the name of the bill to party for the current transaction. |
|
Date |
Displays the date the transaction was processed. |
|
Amount |
Displays the amount of the transaction. |
|
Currency |
Displays the currency for the transaction. |
|
Status |
Displays the status of the transaction. |
|
Reference Number |
Displays the system-generated reference number for the payment. |
|
Receipt Number |
Displays the number of the receipt generated within the system. |
7. Click the Back to Previous Page button to return to the Outstanding Invoices list page. Additional payments can be made, or click Close to return to the Bill To Parties list.
Invoices with negative amounts (credits) can be used to pay invoices with positive amounts (debits).
1. Open a bill to party record and navigate to the Outstanding Invoices page. See Viewing and Navigating Bill To Party Information for instructions.

2. Select a Currency and click Search. The Invoice List panel appears with the results.

Some columns have been hidden.
3. Check the boxes for all invoices to be included in the offset comparison. It is not necessary to select invoices that balance out, although at least one debit invoice and one credit invoice must be selected.
4. Click Offset. The Invoice Offset Preview window opens.
5. Complete the necessary information. Fields marked with a red asterisk * are required.

|
Date |
Enter the date
for the offset batch, or select it from the calendar lookup |
|
Reference |
Enter a reference code or number to be saved in the offset receipt. |

The Offset Summary panel lists all selected invoices and the calculated allocations.
Invoices are allocated by due date, from the oldest to the newest. The credit invoices are deducted from the debit invoices until the credit balance is depleted or all debit invoices are paid. Final balances are displayed in the Remaining Outstanding Amount column.
6. If the allocations are acceptable, click Confirm to complete the transaction, or click Close to close the window without performing the offset.
If the transaction is completed, the Invoice List is updated with the new balances on any remaining invoices. The system generates and posts a receipt batch containing one zero-value receipt. The receipt includes all invoice allocations from the offset transaction.
 . An offset cannot be
backdated.
. An offset cannot be
backdated.