
Note: A domain can only be registered to one website, so it is not possible to use your company's corporate domain. A unique domain must be registered, although it may be a variation of your corporate domain.
Any Licensee of Bridge can create as many Portals as required for their distribution channels. These Portals can be configured by the Business User to have the corporate look and feel of each given distribution channel.
In addition to branding portals with corporate colors and logos, a custom domain can be assigned to a default portal. While navigating the system, your users see the custom domain as the root of the URL for each page, and e-mails sent from the system are sent from the selected domain.
The first step is to purchase the domain (if it is not already owned), and register the domain to your Bridge licensee site. Please contact your Oceanwide Account Representative for the details necessary to complete the registration.
|
|
Note: A domain can only be registered to one website, so it is not possible to use your company's corporate domain. A unique domain must be registered, although it may be a variation of your corporate domain. |
1. In the Main Menu, select Reference, then select Portals. The Portals page opens with a list of all available portals.
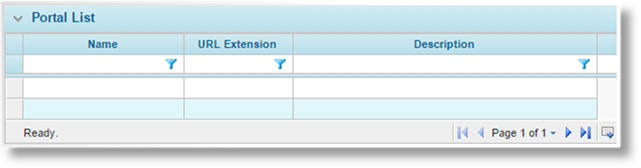
2. Click the (default) link in the Name column to view the default portal. The Portal - General Information page opens.
|
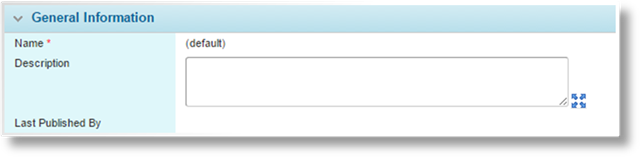
Name |
Displays the name of the portal. For the default portal, the name cannot be changed. |
|
Description |
Enter a description to appear on the portals list. |
|
Last Published By |
This field displays the name of the user who last published this portal, plus the date and time it was published. |

|
URL |
This field displays the internal URL of the portal. This is the direct access to the portal, which should be used by all users if a custom domain is not defined. Even if a custom domain has been defined, this URL remains functional. This can be used as an emergency access option if there are any problems with the custom domain. |
|
|
Note: Logging in using the internal URL bypasses the custom domain. When navigating the system using this option, the internal URL is shown as the address of each page, instead of the custom domain. This also affects e-mails sent from the system while logged into the internal URL. |
|
Custom Domain |
Once the custom domain has been registered, enter the domain in this field. The domain name should include the name and extension, such as "oceanwide.com", without any server identifiers or protocol information (www, https, etc.), or any subfolders (/login, /home, etc.). The domain entered in this field must also match the registered domain exactly. |

|
Created By |
This field displays the name of the user who created this portal, plus the date and time it was created. |
|
Last Modified |
This field displays the name of the last user to make changes to this portal, plus the date and time of the changes. |
3. Click Save to save the portal but remain on the page, click Save & Close to save the portal and return to the portal list, or click Close to return to the portal list without saving the portal.
|
|
Note: While this page can be saved, as well as all the other pages in the Screens widget, the changes are not applied to the live website until the portal is published. |
4. Additional configuration options can be applied to the default portal before publishing. The other features are available under the Screens widget, and are described in detail in the sections below.
5. Once all changes have been made to the portal and saved, click Publish in the General Information page to apply all changes to the live website. Any changes that have not been saved are not published.
Once a custom domain has been registered and assigned to the default portal, any additional portals (see below) can be accessed at that domain with the appropriate sub-folders. To confirm the exact URL to access additional portals, check the URL field in each additional portal record.