
During the normal submission process, the system regularly evaluates (calculates) calculated fields. It may evaluate all calculated fields or just the ones required for a specific purpose.
It may be necessary to evaluate specific fields at times when they otherwise would not be. Field Evaluation Rules define a set of fields, and the conditions when they will be evaluated.
Each field evaluation rule may have multiple screens of information and settings, accessed through the Field Evaluation Rule Menu widget to the left of the page. The widget becomes available on opening an existing rule or completing and saving the Field Evaluation Rule Management page for a new rule.
|
Field Evaluation Rule |
Includes settings to define the rule. |
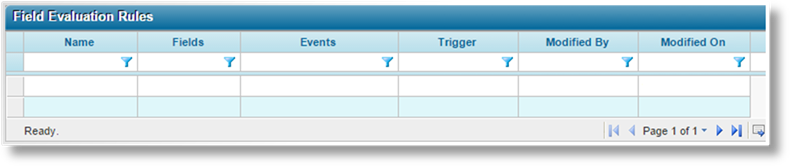
1. Once a Product has been selected, click Field Evaluation Rules in the Product Menu widget. A list of all available rules is displayed. For instructions on selecting a product, see Viewing and Modifying a Product.
2. Click Add. The Field Evaluation Rule Management page opens.
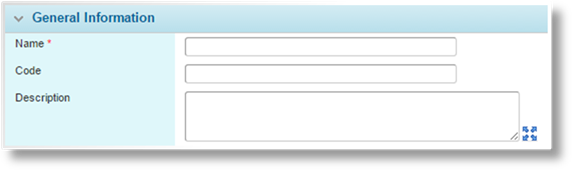
3. Complete the necessary information. Fields marked with a red asterisk * are required.
|
Name |
Enter the name of the rule. |
|
Code |
This is an internal reference name. A code can be entered manually, or leave the field blank to have the system generate a code on saving. |
|
Description |
Enter a description of the rule. |

|
Master Cover |
Select a master cover from those attached to the current product. If only one master cover is available, it will be selected automatically. The master cover cannot be changed once the rule has been saved. |
4. Click Save to save the rule but remain on the page, click Save & Close to save the rule and return to the Field Evaluation Rule list, or click Close to return to the Field Evaluation Rule list without saving the rule.
5. On saving, additional panels become available to complete the rule configuration, and the Field Evaluation Rule Menu widget opens to the left of the page, allowing access to different pages of rules data and settings.
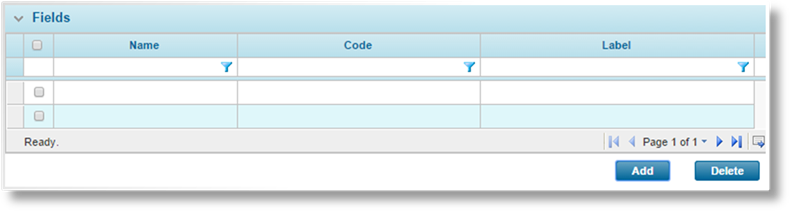
The Fields panel lists all fields that will be evaluated for this rule.
a) To add fields to the list, click Add. The Available Fields window opens.
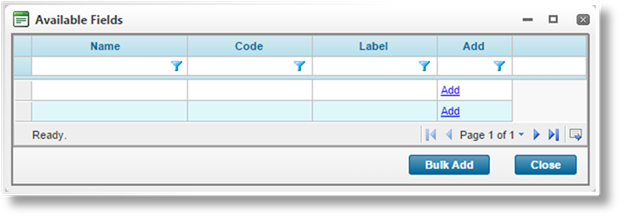
The list contains all available calculated fields from the workflow associated to the selected Master Cover, not including fields that are already attached to the rule. The columns can be sorted and filtered to locate the necessary fields.
b) Click Add for each field to be included in the rule. Each field is grayed out as it is selected.
c) Click Bulk Add to close the window and add the selected fields to the Fields list.
d) To remove fields from the list, check the boxes for all unnecessary fields and click Delete.
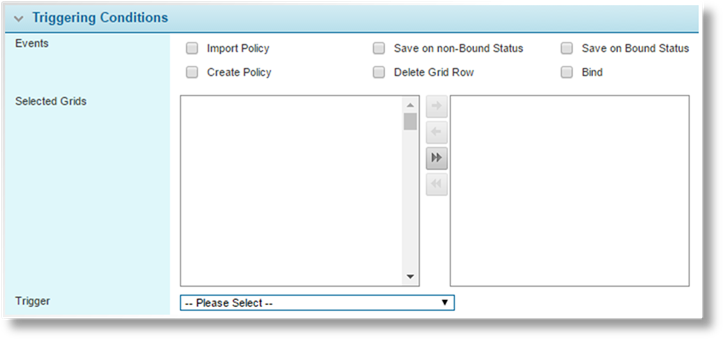
The Triggering Conditions panel includes the conditions for when the selected fields will be evaluated.
|
Events |
Select one or more events where the fields will be evaluated. |
|
•Import Policy |
Evaluates when a bound transaction is imported from an external source, either through an integration or through the Import feature. |
|
•Save on non-Bound Status |
Evaluates when an unbound transaction is saved. The transaction is saved at various points, such as the user clicking Save & Refresh or Next, or when changes are made to grid data, the transaction dates, or the client. |
|
•Save on Bound Status |
Evaluates when a bound transaction is saved. The transaction is saved at various points, such as the user clicking Save & Refresh or Next, or when changes are made to grid data. |
|
•Create Policy |
Evaluates when a new policy submission is created (New Business only). |
|
•Delete Grid Row |
Evaluates when a row is deleted from one of the grids defined in the Selected Grids field. |
|
•Bind |
Evaluates when a transaction is bound. |
|
Selected Grids |
This field is used when Delete Grid Row is selected in the Events field. Select all grids where deleting a row should evaluate the fields. |
|
Trigger |
A trigger can be selected to control whether the rule will be applied or not on the selected events. The rule will not be applied if the trigger evaluates to false. |

|
Created By |
Identifies the date and time the rule was created, and the user who created it. |
|
Last Modified By |
Identifies the last date and time the rule was changed, and the user who made the changes. |
1. Once a Product has been selected, click Field Evaluation Rules in the Product Menu widget. A list of all available rules is displayed. For instructions on selecting a product, see Viewing and Modifying a Product.

2. Click a link in the Name column to view the field evaluation rule details. If there are a large number of available rules, see the Using Grids section for help on finding the appropriate rule.
The Field Evaluation Rule Management page opens, and the Field Evaluation Rule Menu widget appears to the left of the page for navigation to other screens.
3. Make any necessary changes.
4. Click Save to save the rule but remain on the page, click Save & Close to save the rule and return to the Field Evaluation Rule list, or click Close to return to the Field Evaluation Rule list without saving the rule.
Click Delete to delete the rule.
1. Once a Product has been selected, click Field Evaluation Rules in the Product Menu widget. A list of all available rules is displayed. For instructions on selecting a product, see Viewing and Modifying a Product.
2. Click a link in the Name column to view the field evaluation rule details. If there are a large number of available rules, see the Using Grids section for help on finding the appropriate rule.
The Field Evaluation Rule Management page opens, and the Field Evaluation Rule Menu widget appears to the left of the page for navigation to other screens.
3. Click Delete to delete the rule.