The following sections provide detailed descriptions of
certain functions.
Verifying
User Security Roles
Some situations may change depending on the type of user
working in the system. The following functions are used to determine if
the current user has a specific security role.
For use in the Policy module:
$UserContainsRole(UserRole)
Where UserRole
is the Name of the security role as it appears in the system.
For use in the Claims module:
UserContainsSecurityRole(UserRole)
Where UserRole
is the Code of the security role.
The function returns “True” if the
user has the role, or “False” if they do not. The result can be used in a
conditional formula, or as a condition within a trigger.
Compare Data
Against Sanction or Watch Lists
With the potential consequences of violating international
restrictions, it can be very important to validate data and ensure that it is in
compliance with regulations. The Compliance() function allows one
or more fields to be compared to one or more sanction or watch lists from around
the world.
To compare a field against a single list:
Compliance([[ScanField]],List)
Where ScanField is the field to be scanned and
List is the code of the list.
Comparing a field against multiple lists:
Compliance([[ScanField]],List1,List2,List3)
Where ScanField is the field to be scanned and each
List# is the code of a list.
Any number of lists can be included.
Comparing multiple fields against multiple
lists:
Compliance([[ScanField1]] [[ScanField2]] [[ScanField3]],List1,List2,List3)
Where ScanField# are the fields to be scanned and
each List# is the code of a
list. The scan fields are combined and scanned as one large block of text,
which is why a space should be added between each field to prevent the text from
flowing together.
This function outputs a numerical
value from 0 (no match) to 100 (perfect match). If a different score is
achieved on different lists, the highest score is returned.
See Compliance() Function
Parameters for a table of all lists and their associated codes.
Identifying
When Fields Have Changed After an Integration
Transaction workflows may contain integration configurations
that share data with external systems. In some cases, such as when the
integration scans data for security concerns, it is important to know if the
user has made changes to certain fields since the last time the integration was
run.
This section describes how to assemble the necessary fields
and configurations to identify such changes.
Overview:
Once configured, each time the
calculated fields in a transaction are recalculated, the
HashAndModifiedOn() function evaluates the tracked fields and
generates a composite value derived from those fields. The first time the
function runs within a transaction, it stores the composite value (the Hash
value) and the current date and time.
Each time it runs after the first
time, the function recalculates the composite value and compares it to the
stored value. If the value has changed, the old composite value is
replaced with the new value and the date and time are updated to the current
date and time. Note that this stores the date and time the changes were
detected by the function, and not when the changes actually occurred.
In the background, whenever an
integration is completed successfully, the system stores the date and time the
integration was performed. Each different integration configuration is
tracked separately, so the most recent date and time information is available
for each. These dates and times can be retrieved using a calculated field,
providing a reference date to determine if the data was changed since the last
time the integration was performed.
With the date of the integration,
and the date that changes were detected in the tracked fields, the
IsDateGreaterThan() function is used to compare the dates. If
the tracked fields were changed after the last integration, the function returns
"True". This result can be used in a trigger to re-run the integration,
activate a validation, or affect any other feature that uses the trigger.
Configuration:
1.
Identify and create the necessary fields.
|
Tracked
Fields |
These are the
fields that will contain the data that will be monitored for
changes. These fields may already be part of the workflow, or may be
new fields created specifically for tracking. All field types can be
tracked. |
|

|
Note: Use caution when tracking
fields that may be changed by the integration. That change will be
detected and trigger the integration again, creating a loop. |
|
Hash
Reference Field |
This field will
contain the generated composite value from the HashAndModifiedOn()
function. This should be a Text Area field with no
default value. |
|
Detected
Changes Timestamp Field |
This field will
contain the date and time that the HashAndModifiedOn() function
detected changes to the tracked fields. |
|
Hash
Function Field |
This field will
contain the HashAndModifiedOn() function. This should be a
standalone Text Area field containing just this
function. |
|
|
HashAndModifiedOn(p0, p0, p0, ..., p1, p2) |
|
|
P0: Placeholders
for all Tracked Fields to be included in the
hash calculation should be provided, separated by commas. |
|
|
P1: The
Code of the Hash Reference
Field must be the second-to-last parameter after
all of the tracked fields. This condition is literal and must
contain the Code of the field without any square
brackets, no placeholders or functions can be used here. |
|
|
P2: The
Code of the Detected Changes Timestamp
Field must be the last parameter. This condition is
literal and must contain the Code of the field
without any square brackets, no placeholders or functions can be used
here. |
|

|
Example:
HashAndModifiedOn([[tracked field
1]], [[tracked field
2]], [[tracked field
3]], HashReferenceFieldCode, DetectedChangesTimestampFieldCode) |
|
Date
Comparison Field |
This field
retrieves the date of the integration and compares it to the last detected
changes date from the HashAndModifiedOn() function. This
field will resolve to "True" if changes are detected after the
integration, or "False" if no changes are detected. |
|
|
IsDateGreaterThan(p0, p1, p2) |
|
|
P0: Placeholder for
the Detected Changes Timestamp Field. |
|
|
P1: Placeholder
containing the date and time the relevant integration was last completed
successfully. The following placeholder can be placed directly in
the function, or can be included in a calculated field that is then
referenced in the function.
If using a field, a Date Picker
field should not be used or the time component will be
lost. A Textbox field should be used. |
|
|
[[Integrations/Integration[Code='code']/StartTime]] |
|
|
The code should be the
code of the integration configuration defined for the workflow. |
|
|
P2: Tolerance in
milliseconds. The system date/time format is accurate to a
ten-millionth of a second. Even dates that seem to be calculated at
the same time will have a small difference. If the P0 date is only
greater than the P1 date by less than the provided tolerance, it will not
be considered a difference and the function will return false. |
|
|
Example:
IsDateGreaterThan([[Detected Changes
Timestamp Field]], [[Integrations/Integration[Code='IntegrationConfigurationCode']/StartTime]],
1000) |
|
|
With this
configuration having a tolerance of 1000 milliseconds, if the Detected
Changes Timestamp Field date is earlier than the
integration timestamp or less than one second after, it will not be
considered a change. |
|
Integration
Flag Field |
If the relevant
integration has not yet been performed, the IsDateGreaterThan()
function will try to compare the Detected Changes Timestamp
Field with a non-existent date, and return an
incorrect "true" value. |
|
|
This field can
be any type of field, but must be updated by the relevant integration when
it runs. Any triggers created to detect the changes should also
check this field to confirm the integration has been performed at least
once in the current transaction. |
|

|
Tip: Any of the fields used in this
configuration can be hidden. Since many of the fields will only
contain raw data used in the functions, it is probably best to hide
them. |
2.
Once the fields have been configured, the results can be used in triggers.
The trigger conditions should check the Date Comparison
Field for a true result (Field - Equals -
1) AND the Integration Flag Field should
equal the value inserted by the integration.
3.
The triggers can then be used to reactivate the integration or for any other
controls.
Interpolation/Extrapolation
The process of interpolation or extrapolation involves taking
a known set of paired values, like the x and y-values of points in
a grid, and determining unknown y-values from known
x-values. Determining values within the known range is called
interpolation, while determining values beyond the known range is called
extrapolation.
The $InterpolatedLookup() function takes a lookup
table already defined in Bridge as the known set, and will interpolate or
extrapolate a value of y for a specific value of x.
The function is constructed as
follows:
$InterpolatedLookup(p0, p1, p2)
P0
(text): The Code of the table containing the
data. The first column of the table must be a numeric column to be used as
the y-values.
P1
(text): The name of the column containing the x-values. This
must be a numeric column with unique values.
P2
(numeric): The x-value for which to calculate the
y-value.
The function sorts the points by
the x-values in the P1 column, and then finds the two points nearest to
the x-value provided as P2, shown as the dotted vertical line in the
examples below. For x-values within the known range, the function
finds the closest points above and below the x-value. For
x-values lower than the known range, the function finds the two points
with the lowest x-values, and for values higher than the range, it finds
the two points with the highest x-values.
Those two points are used to
determine a linear rate of increase or decrease, shown as the dashed line in the
examples below.
|
|
Examples: |
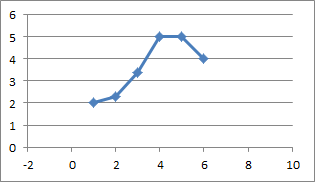
This graph shows the source data. The
x-axis comes from the column identified in P1, and the
y-axis comes from the first column of the table provided in P0.
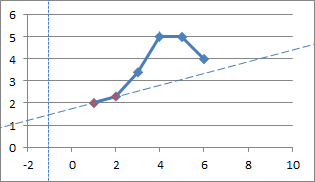
With an x-value of -1, the function selects the
points at (1, 2) and (2, 2.3) as the nearest points. |
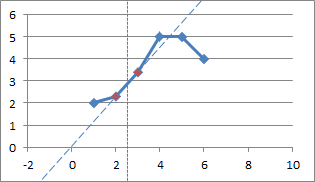
With an x-value of 2.5, the function selects the
points at (2, 2.3) and (3, 3.4) as the nearest points.
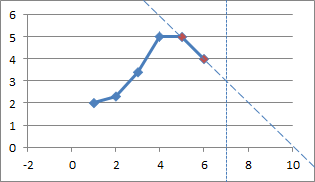
With an x-value of 7, the function selects the
points at (5, 5) and (6, 4) as the nearest points. |
|
Sample
Data |
|
X |
Y |
|
1 |
2 |
|
2 |
2.3 |
|
3 |
3.4 |
|
4 |
5 |
|
5 |
5 |
|
6 |
4 |
|
|
|
|
|
|
|
|
|
|
|
|
The point where the dashed line
crosses the dotted line is the interpolated or extrapolated point. The
value of y at that point is determined using the following
calculation.
Where (x1, y1) and
(x2, y2) are the two nearest points.
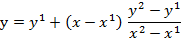
The calculated value of y is
then returned by the function.
Some exceptions exist:
• If the
P2 value exactly matches an x-value in the P1 column, the function
returns the associated y value.
• If the
table only contains one row of data, interpolation/extrapolation is not
possible. The function will return the single y-value.
• If the
P0 lookup table is empty, the function will return 0.
Custom Date Format
Function
While there are several functions to format dates, sometimes
a date needs to be presented in a very specific manner. The Custom Date
Format function uses formatting codes that can be mixed and matched to
provide an exceptional level of control.
The function is constructed as
follows:
CustomDateFormat(Date,"{0:Code}")
Date is the date to be formatted. This can
be a constant value or a placeholder. The date must be provided in the
full system date format, such as "2016-06-15T14:55:22.1234-04:00". Date
picker fields automatically save the date in this format.
Code is the formatting code. See the table
of codes below. Some codes must be used alone, while others can be
combined.
The formatting code can be pulled
from a placeholder. There are two ways to achieve this.
• With
the function CustomDateFormat(Date,[[CodeField]]), the Code Field must include the full {0:Code} notation. The quotes are not
required within the Code Field. If the
[[CodeField]] is empty, the function will
not return any results.
• With
the function CustomDateFormat(Date,"{0:"[[CodeField]]"}"), the Code Field only needs to contain the Code. If the [[CodeField]] is empty, the code will default to
G.
Codes:
The following are pre-formatted
codes that cannot be combined with other codes.
All examples are from the source
date "2016-06-15T14:55:22.12-04:00".
|
Format |
Code |
Example |
Notes |
|
Date (short) |
d |
6/15/2016 |
|
|
Date (long) |
D |
Wednesday, June 15, 2016 |
|
|
Time |
t |
2:55 PM |
|
|
Time, with seconds |
T |
2:55:22 PM |
|
|
Date (short) and Time |
g |
6/15/2016 2:55 PM |
|
|
Date (short) and Time, with seconds |
G |
6/15/2016 2:55:22 PM |
|
|
Date (long) and Time |
f |
Wednesday, June 15, 2016 2:55 PM |
|
|
Date (long) and Time, with seconds |
F |
Wednesday, June 15, 2016 2:55:22 PM |
|
|
Month Name and Day |
M |
June 15 |
|
|
Month Name and Year |
Y |
June, 2016 |
|
|
Date and Time, sortable |
s |
2016-06-15T14:55:22 |
Date and time can be accurately sorted as
text. |
|
Coordinated Universal Time (UTC) |
u |
2016-06-15 14:55:22Z |
|
|
RFC 1123 Format |
r |
Wed, 15 Jun 2016 14:55:22 GMT |
|
The following are component codes
that can be combined to form a custom date format. Components can be
divided by spaces, slashes, colons, commas, or periods.
All examples are from the source
date "2016-06-15T14:55:22.12-04:00".
|
Format |
Code |
Example |
Notes |
|
Year (short) |
yy |
16 |
A single "y" can be used to show the year as
either 2-digits or 1-digit without any preceding zero, but will only work
when other component codes are included. |
|
Year (long) |
yyyy |
2016 |
|
|
Month (number) |
MM |
06 |
A single "M" can be used to show the month as
either 2-digits or 1-digit without any preceding zero, but will only work
when other component codes are included. |
|
Month (short name) |
MMM |
Jun |
|
|
Month (long name) |
MMMM |
June |
|
|
Day (number) |
dd |
15 |
A single "d" can be used to show the day as
either 2-digits or 1-digit without any preceding zero, but will only work
when other component codes are included. |
|
Day (short name) |
ddd |
Wed |
|
|
Day (long name) |
dddd |
Wednesday |
|
|
Hour |
hh |
02 |
A single "h" can be used to show the hour as
either 2-digits or 1-digit without any preceding zero, but will only work
when other component codes are included. |
|
Hour (24 hour) |
HH |
14 |
A single "H" can be used to show the hour as
either 2-digits or 1-digit without any preceding zero, but will only work
when other component codes are included. |
|
AM/PM |
tt |
PM |
|
|
Minutes |
mm |
55 |
A single "m" can be used to show the minutes as
either 2-digits or 1-digit without any preceding zero, but will only work
when other component codes are included. |
|
Seconds |
ss |
22 |
A single "s" can be used to show the seconds as
either 2-digits or 1-digit without any preceding zero, but will only work
when other component codes are included. |
|
Milliseconds (with trailing zeros) |
fff |
120 |
Up to seven fs can be used to show the necessary
precision, with trailing zeros if the source date does not have that many
digits.
A single "f" can be used to show just the first
digit, but will only work when other component codes are
included. |
|
Milliseconds (without trailing zeros) |
FFF |
12 |
Up to seven Fs can be used to show the necessary
precision, without trailing zeros if the source date does not have that
many digits.
A single "F" can be used to show just the first
digit, but will only work when other component codes are
included. |
|
|
Examples: [[SourceDate]] is
"2016-06-15T14:55:22.12-04:00". |
|
|
|
CustomDateFormat([[SourceDate]],"{0:F}") |
|
displays |
|
Wednesday,
June 15, 2016 2:55:22 PM |
|
|
|
CustomDateFormat([[SourceDate]],"{0:h:mm tt, dddd, MMMM dd}") |
|
displays |
|
2:55 PM,
Wednesday, June 15 |
Functions to Enter
Data Into Grids (Grid Mapping)
While there are multiple ways to enter data into a grid, they
generally require user input. Calculated fields can be used to enter data
into grids, either as static values or copied from other fields or grids within
the workflow. The functions can add rows, edit or replace existing rows,
or clear the grid and start fresh.
The first function is
ClearGrid(), which deletes all rows from a grid, as well as any
associated child grids.
ClearGrid(p0)
|
Parameter 0 |
Code of the target grid. This must be a static
code, not enclosed in brackets or quotes. |
The two functions for copying rows
are SaveToGrid() and NewGrid(), and use the same parameters.
The difference is that SaveToGrid() adds new rows after any existing
rows, while NewGrid() deletes any existing rows and adds new rows to the
empty grid.
SaveToGrid(p0, p1_SequenceNo, p2, p3, p4, p3, p4, …)
-or-
NewGrid(p0, p1_SequenceNo, p2, p3, p4, p3, p4, …)
|
Parameter 0 |
Code of the target grid. This must be a static
code, not enclosed in brackets or quotes. |
|
Parameter 1 |
This parameter is optional, and is used in conjunction
with P2 to update a single row in the
target grid. The format is the Code of the target grid
followed by "_SequenceNo", such as GridCode_SequenceNo. This must be
a static code, not enclosed in brackets or quotes. |
|
Parameter 2 |
This parameter is optional, and is used in conjunction
with P1 to update a single row in the
target grid. This is the row number to be updated. This must
be an integer, and can be a static value, the result of an embedded
formula, or a placeholder to retrieve the value from another
field. |
|
Parameter 3 |
Code of the recipient field in the target grid.
This must be a static code, not enclosed in brackets or quotes.
There can be multiple recipient fields, but each p3 must be followed by an associated p4 parameter. |
|
Parameter 4 |
Value to be inserted into the recipient field.
This can be a static value or a placeholder to retrieve the value from
another field. Each p4 must
follow an associated p3
parameter. |
|
|
Notes: Without controls, the grid mapping
will occur every time the calculated field is evaluated. This
can result in unnecessary processing, duplicate data, or data loss if the
grid is cleared after being edited. |
|
|
The best way to control the processing is to isolate
each function within its own calculated field, which can be hidden in the
workflow. The function fields must have the Always Calculate
option unchecked, or they will be activated each time the system evaluates
calculated fields. Another calculated field can then be set to call
the function fields from within a conditional structure. |
|
|
Due to the method used to process multiple rows, the
entire calculated field is re-evaluated for each row combination in
the source grids, even if a conditional structure prevents the grid
mapping functions from creating new rows. This can result in
repetitive processing of other functions or calculations in the
field. This can be avoided by moving any extra calculations to other
fields that will be called before or after processing the grid mapping
functions. |
Basic
Processing of Standalone Grids:
By default, the SaveToGrid() and NewGrid()
functions process every row in the source grids, and consider any child grids as
separate grids. This section describes this default functionality.
For details on other options, see the Conditional
Processing of Standalone Grids and Processing
Parent and Child Grids sections.
If all p4 source fields are within form panels in the
primary workflow, known as top-level fields, the functions create one row in the
target grid.
If one or more grid fields are used
as p4 source fields, the behavior depends on
the configuration.
• If all
grid fields are from the same grid, one new row is created in the target grid
for each row in the source grid.
• If the
source fields are from two or more separate grids, one new row is created in the
target grid for each possible combination of the source rows. The number
of new rows will equal the number of rows in the first grid, multiplied by the
number of rows in the second grid, multiplied by the number of rows in the third
grid, and so on. Only rows are multiplied, so taking multiple fields from
a single grid will not increase the number of new rows.
For example:
With three grids, each with two rows, the following new rows are created.
|
Grid 1 Row
1 |
Grid 2 Row
1 |
Grid 3 Row
1 |
|
Grid 1 Row
1 |
Grid 2 Row
1 |
Grid 3 Row
2 |
|
Grid 1 Row
1 |
Grid 2 Row
2 |
Grid 3 Row
1 |
|
Grid 1 Row
1 |
Grid 2 Row
2 |
Grid 3 Row
2 |
|
Grid 1 Row
2 |
Grid 2 Row
1 |
Grid 3 Row
1 |
|
Grid 1 Row
2 |
Grid 2 Row
1 |
Grid 3 Row
2 |
|
Grid 1 Row
2 |
Grid 2 Row
2 |
Grid 3 Row
1 |
|
Grid 1 Row
2 |
Grid 2 Row
2 |
Grid 3 Row
2 |
• If the
source fields are from a parent grid with one or more child grids, one new row
is created for each parent/child/grandchild combination. Only rows are
multiplied, so taking multiple fields from a single grid will not increase the
number of new rows.
For example:
For a parent grid with one child grid, where the first row in the parent has
three child rows, the second parent row has two child rows, and the third parent
row has one child row, the following new rows are created.
|
Grid 1 Row
1 |
Grid 2 Row
1 |
|
Grid 1 Row
1 |
Grid 2 Row
2 |
|
Grid 1 Row
1 |
Grid 2 Row
3 |
|
Grid 1 Row
2 |
Grid 2 Row
1 |
|
Grid 1 Row
2 |
Grid 2 Row
2 |
|
Grid 1 Row
3 |
Grid 2 Row
1 |
• If any
top-level source fields are mixed in with grid sources, the value of the
top-level field is repeated in each row resulting from the grid
combinations. If the top-level field contains multiple values, such as a
checkbox group, all selected values are combined into one value and repeated in
each new row.
When using p1 and p2 to
update a specific row, only one value can be inserted into each field. For
this reason, updates are best performed using top-level fields. To use a
grid value, the formula must use a conditional structure that returns a single
value from the grid.
After being evaluated, both
functions return the row numbers that were added or edited.
Conditional Processing of
Standalone Grids:
By default, the SaveToGrid() and NewGrid()
functions process every row in the source grids, and consider any child grids as
separate grids. This section describes how the Where() function can
be used to apply conditions that omit individual values or entire rows.
For details on other options, see the Basic
Processing of Standalone Grids and Processing
Parent and Child Grids sections.
Both the SaveToGrid() and
NewGrid() functions can be used to copy data from specific rows in the
source grid. The Where() function applies a condition that is
evaluated for each row in the source grid. If the condition evaluates to
True, the row or value is processed, and if it evaluates to False, the row or
value is skipped. The placement of the Where() function affects the
results, as shown below.
•
Placing the Where() function outside of the grid function applies
to the entire function, causing it to skip entire rows.
For example, a
source grid has the following data.
|
Source
Grid |
|
Field
1 |
Field
2 |
Number |
|
Row 1 Field
1 |
Row 1 Field
2 |
5 |
|
Row 2 Field
1 |
Row 2 Field
2 |
14 |
|
Row 3 Field
1 |
Row 3 Field
2 |
9 |
|
Row 4 Field
1 |
Row 4 Field
2 |
20 |
The following
formula is used.
NewGrid(TargetGrid,
TargetGridField1, [[SourceGridField1]],
TargetGridField2, [[SourceGridField2]],
TargetGridNumber, [[SourceGridNumber]])
Where([[SourceGridNumber]] > 10)
The Where()
function evaluates if the value in the Number field is greater than 10,
which produces the following content in the target grid.
|
Target
Grid |
|
Field
1 |
Field
2 |
Number |
|
Row 2 Field
1 |
Row 2 Field
2 |
14 |
|
Row 4 Field
1 |
Row 4 Field
2 |
20 |
•
Placing the Where() function inside the grid function applies to
the preceding parameter. The grid function will process all rows, but the
optional value will only be included if the condition evaluates to True.
For example, a
source grid has the following data.
|
Source
Grid |
|
Field
1 |
Field
2 |
Number |
|
Row 1 Field
1 |
Row 1 Field
2 |
5 |
|
Row 2 Field
1 |
Row 2 Field
2 |
14 |
|
Row 3 Field
1 |
Row 3 Field
2 |
9 |
|
Row 4 Field
1 |
Row 4 Field
2 |
20 |
The following
formula is used.
NewGrid(TargetGrid,
TargetGridField1, [[SourceGridField1]],
TargetGridField2, [[SourceGridField2]],
TargetGridNumber, [[SourceGridNumber]] Where([[SourceGridNumber]] > 10))
The Where()
function evaluates if the value in the Number field is greater than 10,
which produces the following content in the target grid.
|
Target
Grid |
|
Field
1 |
Field
2 |
Number |
|
Row 1 Field
1 |
Row 1 Field
2 |
|
|
Row 2 Field
1 |
Row 2 Field
2 |
14 |
|
Row 3 Field
1 |
Row 3 Field
2 |
|
|
Row 4 Field
1 |
Row 4 Field
2 |
20 |
Note: Care should be taken
when applying conditions to parameters. Using Where to omit a
required parameter will result in an error. However, two versions of a
required parameter can be provided with conditions that use one version or the
other (do not include additional commas).
Processing
Parent and Child Grids:
By default, the SaveToGrid() and NewGrid()
functions process every row in the source grids, and consider child grids as
separate grids. This section describes how the Where() function can
be used to copy grids with child grids, maintaining the associations.
For details on other options, see the Basic
Processing of Standalone Grids and Conditional
Processing of Standalone Grids sections.
Copying rows from a parent grid and
child grid is a two-step operation. The first step copies all rows in the
parent grid, assigning the row numbers in the process. The next step
conditionally copies the rows in the child grid, matching the parent row number
from the source grid to the parent row number in the target grid.
The functions for the parent copy
and child copy should be kept in separate calculated fields, and called one
after the other from a third field, such as "[[CopyParentGrid]]
[[CopyChildGrid]]". If the two functions are not activated together like
this, there is a chance that the parent data could be modified before the child
data is copied, resulting in mismatched data.
1.
The Parent Copy function: The parent copy can be performed using
the same basic
processing or conditional
processing methods detailed above. However, the row numbers must be
tracked to allow the child copy function to associate the correct child grid
rows to each parent.
The [[GridCode_SequenceNo]] placeholder can be
used to reference the internal row numbers in the grid. When copying all
grid rows from a source grid to an empty target grid, the row numbers will
match. However, if the copy is conditional or if the target grid is not
empty, the row numbers will likely not match up and the child copy will
associate the incorrect rows. The best practice in all cases is to add an
extra field to the parent target grid, perhaps named "SourceRowNumber" or
something similar, and copy the row numbers into this field along with the rest
of the parent data. This extra field can be set to read-only, and hidden
in the workflow.
2.
The Child Copy function: The child copy function is similar to the
conditional
processing method detailed above, except that the condition specifically
uses row numbers to associate the child rows to the correct parent rows.
Without the
condition, the child copy would copy all rows in the source child grid for each
row in the target parent grid. With the condition, the system still
evaluates all rows in the source child grid for each row in the target parent
grid, but leaves out any child rows that do not match the current parent.
The Where()
function should be outside of the grid function, and should be formatted as
shown below.
NewGrid(TargetChildGrid,
TargetChildGridField1, [[SourceChildGridField1]],
etc…)
Where([[TargetParentSourceRowNumber]] = [[SourceParent_SequenceNo]])
This compares the
[[TargetParentSourceRowNumber]] copied by
the parent copy function to the [[SourceParent_SequenceNo]] from the original parent
grid, and only copies the child rows belonging to the current target parent
row.
|
|
Example: |
|
|
|
|
|
|
|
This example uses the following source data for one
parent grid and one child grid. Note that the row numbers and parent
row numbers (PR#) displayed in the fields are part of the test data to
track the original values as they get copied. The actual
internal SequenceNo values are displayed to the left of the
tables. |
|
|
|
|
|
|
|
|
|
|
|
Source Parent Grid |
|
|
|
|
Seq. No |
Field 1 |
Field 2 |
Number |
|
|
|
|
1 |
Row 1 Field 1 |
Row 1 Field 2 |
5 |
|
|
|
|
2 |
Row 2 Field 1 |
Row 2 Field 2 |
14 |
|
|
|
|
3 |
Row 3 Field 1 |
Row 3 Field 2 |
9 |
|
|
|
|
4 |
Row 4 Field 1 |
Row 4 Field 2 |
20 |
|
|
|
|
|
|
|
|
|
|
|
|
|
Source Child Data for Source Parent Row 2 |
|
|
|
|
Seq. No |
Field 1 |
Field 2 |
Number |
|
|
|
|
1 |
PR2 Row 1 Field 1 |
PR2 Row 1 Field 2 |
1 |
|
|
|
|
2 |
PR2 Row 2 Field 1 |
PR2 Row 2 Field 2 |
2 |
|
|
|
|
|
|
|
|
|
|
|
|
|
Source Child Data for Source Parent Row 4 |
|
|
|
|
Seq. No |
Field 1 |
Field 2 |
Number |
|
|
|
|
1 |
PR4 Row 1 Field 1 |
PR4 Row 1 Field 2 |
1 |
|
|
|
|
2 |
PR4 Row 2 Field 1 |
PR4 Row 2 Field 2 |
2 |
|
|
|
|
|
|
|
|
|
|
|
The following formula is used to copy the rows from the
source parent where the Number is greater than 10. |
|
|
|
|
|
|
|
|
|
NewGrid(TargetParentGrid,
TargetParentGridField1, [[SourceParentGridField1]],
TargetParentGridField2, [[SourceParentGridField2]],
TargetParentGridNumber, [[SourceParentGridNumber]],
TargetParentGridSourceRowNumber,
[[SourceParentGrid_SequenceNo]])
Where([[SourceParentGridNumber]] > 10) |
|
|
|
|
|
|
|
|
|
This produces the following rows in the target parent
grid. |
|
|
|
|
|
|
|
|
|
|
|
Target Parent Grid |
|
|
|
Seq. No |
Field 1 |
Field 2 |
Number |
Source Row Number |
|
|
|
1 |
Row 2 Field 1 |
Row 2 Field 2 |
14 |
2 |
|
|
|
2 |
Row 4 Field 1 |
Row 4 Field 2 |
20 |
4 |
|
|
|
|
|
|
|
|
|
|
Note that the internal SequenceNo values do not
match those in the source grid, but the Source Row Number values
retain the correct original row numbers. This allows the child data
to be associated to the correct parent rows. |
|
Immediately after the parent grid copy is performed,
the child grid copy is called. This formula is used to copy the rows
from the source child where the Target Parent Grid Source Row
Number matches the Source Parent Grid SequenceNo. |
|
Note: It may seem odd to use conditional values
that are not in either of the source or target child grids. However,
when the system is processing data in child grids, it is automatically
tracking the associated parent grid rows. This makes the parent
values available for use in the conditions. |
|
|
|
|
|
|
|
|
|
NewGrid(TargetChildGrid,
TargetChildGridField1, [[SourceChildGridField1]],
TargetChildGridField2, [[SourceChildGridField2]],
TargetChildGridNumber, [[SourceChildGridNumber]],
Where([[TargetParentGridSourceRowNumber]] = [[SourceParentGrid_SequenceNo]]) |
|
|
|
|
|
|
|
|
|
This produces the following rows in the target child
grid. |
|
|
|
|
|
|
|
|
|
|
|
Target Child Data for Target Parent Row 1 |
|
|
|
|
Seq. No |
Field 1 |
Field 2 |
Number |
|
|
|
|
1 |
PR2 Row 1 Field 1 |
PR2 Row 1 Field 2 |
1 |
|
|
|
|
2 |
PR2 Row 2 Field 1 |
PR2 Row 2 Field 2 |
2 |
|
|
|
|
|
|
|
|
|
|
|
|
|
Target Child Data for Target Parent Row 2 |
|
|
|
|
Seq. No |
Field 1 |
Field 2 |
Number |
|
|
|
|
1 |
PR4 Row 1 Field 1 |
PR4 Row 1 Field 2 |
1 |
|
|
|
|
2 |
PR4 Row 2 Field 1 |
PR4 Row 2 Field 2 |
2 |
|
|
|
|
|
|
|
|
|
|
|
The necessary parent rows have been copied, and the
child rows have been copied and associated to the correct
parents. |
|
|
|
|
|
|
|
|
|
This example is a relatively straightforward copy
process. Combined
Conditions can be used in the Where() function of the child
copy to only copy specific children, calculations and other functions can
be inserted to modify data as it's copied, and a range of other
combinations are possible. |