
Tips: If the file upload field is within a grid, the entry will need to be saved before a file can be uploaded.
Uploading or deleting a file will cause the field to be saved immediately. This does not save any other changes to the form.
When working on a policy transaction, there may be fields that allow files to be uploaded.
|
|
Tips: If the file upload field is within a grid, the entry will need to be saved before a file can be uploaded. |
|
Uploading or deleting a file will cause the field to be saved immediately. This does not save any other changes to the form. |
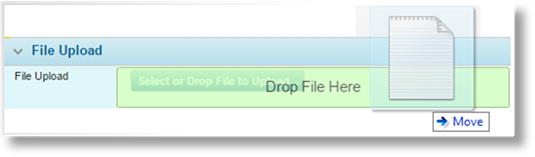
There are two methods for adding a file to the field, browsing for files or drag-and-drop.
•To browse for a file, click the Select or Drop File to Upload button. A standard file selection window opens. Locate and select the appropriate file, then click Open.

•To drag-and-drop files, drag the file into the window near the Select or Drop File to Upload button. The area will be highlighted in green. The file can be dropped anywhere in the green area.
|
|
Note: Be sure to drop the files into the green area. If a file is dropped outside of the green area, the browser will attempt to open the file instead of uploading it. |
Once a file is attached, the file name is displayed next to a Delete button.

To download or view the file, click the file name in the field. If the field is displayed in a grid, the links will be available there as well. The browser will perform the download according to its settings.
To delete the file, click the Delete button. Confirm the deletion when prompted. The file is removed and the field returns to its default appearance so that a new file can be uploaded.
|
|
Note: These instructions apply only to workflow pages. On configuration pages, this control may behave differently. |
