
Once all rates and charges have been calculated for a particular Premium Type, Taxes & Fees can be applied that are displayed separately in the Premium column of the Quote Summary window. The quote calculation itself has a specific sequence of events which could affect the calculations, click here for more information.
Each tax or fee can be conditional, using triggers to determine if it should be applied or not. This can be used to create localized taxes for countries or states, or special handling fees depending on settings in the submission.
With the master cover selected, click the Taxes & Fees item in the Screens widget. For instructions on finding and viewing a master cover, see the section on Viewing and Modifying a Master Cover.
|
Product |
Identifies the product associated with the master cover. |
|
Status |
Identifies the current status of the master cover. |

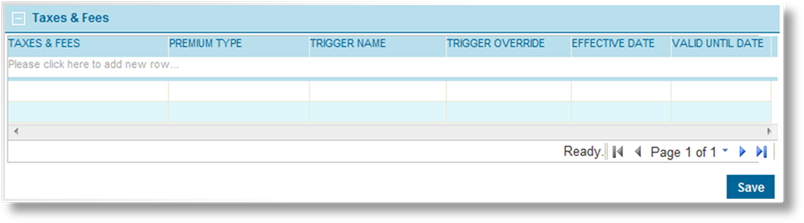
The Taxes & Fees panel displays all additional charges currently attached to the master cover.
1. Click in the field marked Please click here to add new row.
2. Select an available Taxes & Fees option.
3. Select a Premium Type, or leave the field blank to apply the tax or fee to all premium types.
4. A Trigger Name can be selected to set the conditions for this tax or fee to be applied. If the trigger evaluates as true, the tax or fee is applied to the premium types.
If no trigger is specified, the tax or fee is always applied.
5. A Driver Field can be selected to use a value from the workflow instead of the rate defined for the tax or fee. If no driver field is selected, the system will use the default rate defined for the tax or fee.
|
|
Notes: |
|
If the tax or fee is applied to all premium types, the driver field value will be applied once for each individual premium type that has a rate entry in the master cover, unless the trigger evaluates as false. | |
|
If a premium type calculates as zero premium in a transaction, the driver field value will not be applied, even if the trigger evaluates as true. | |
|
|
This flat value will not be applied in Cancellation or Reinstatement transactions, as the premium is based on the existing premium from the policy. |
6. The Effective Date and Valid Until Date fields can be used together or separately to control when the tax or fee is applied. If the effective date of the transaction is before the effective date of the entry or after the valid until date of the entry, the tax or fee is not applied.
8. Repeat the previous steps to add additional entries.
9. Once all entries have been added, right-click inside the table and select Accept All Changes. This saves the current table.
10. Click Save to save the changes.
With the master cover selected, click the Taxes & Fees item in the Screens widget. For instructions on finding and viewing a master cover, see the section on Viewing and Modifying a Master Cover.
|
Product |
Identifies the product associated with the master cover. |
|
Status |
Identifies the current status of the master cover. |
The Taxes & Fees panel displays all additional charges currently attached to the master cover.
1. Double-click on any field in the table to open it for editing. See the section on Adding a Tax or Fee for a detailed description of the fields.
2. Once all changes have been made, click outside the table. The edited taxes or fees are highlighted in yellow.
3. Right-click inside the table and select Accept All Changes. This saves the current table.
4. Click Save to save any changes.
With the master cover selected, click the Taxes & Fees item in the Screens widget. For instructions on finding and viewing a master cover, see the section on Viewing and Modifying a Master Cover.

|
Product |
Identifies the product associated with the master cover. |
|
Status |
Identifies the current status of the master cover. |

The Taxes & Fees panel displays all additional charges currently attached to the master cover.
1. To remove list items, right-click on the item in the table, and select Delete. The item is highlighted in red, and is removed when the list is saved.
2. Right-click inside the table and select Accept All Changes. This saves the current table.
3. Click Save to save any changes.
