
Note: It is not recommended to mix fields from different workflows in one document. A generated document can only access data from the workflow where it is generated, and unrecognized placeholders will not be replaced.
This section describes how to insert placeholders into a document template using the Oceanwide Word Ribbon. Once the template is uploaded to the Bridge system, generating a document using the template will replace all placeholders with live data from the system.
Four types of data can be pulled in from the Bridge system.
•Dynamic fields in panels: These are the normal fields in the submission workflow, where data is entered or selected once. These are inserted as standalone placeholders to pull in the data from the associated field.
•Dynamic fields in grids: These are the fields in the submission workflow that are arranged in grids, allowing multiple entries for each field. These are inserted within "Repeater" structures that repeat the content and placeholders for each entry in the grid.
•System and Transaction data: This includes system data such as the current time and date (at the time the document was generated) and transaction data such as policy details, information about the companies attached to the transaction (insurer, distributor, and client), and calculated premiums.
•Triggers: Triggers are conditional controls defined within Bridge. They are used throughout the Bridge system to control data and options, and can be used in templates to define if blocks of text will be included or excluded when the document is generated.
For a complete list of system variables that can be used in documents, e-mails, and calculated fields, see the Full Placeholders List section.
The Word Ribbon provides two methods of finding and inserting placeholders, the Workflow Explorer and the Lookup lists.
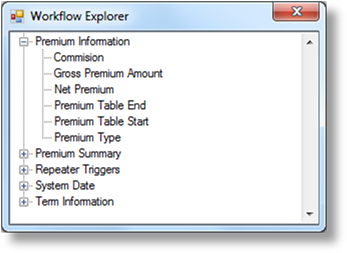
The Workflow Explorer is a pop-up window containing all available placeholders for fields, system data, repeater structures, and triggers, organized in a tree structure. The window can be resized and moved outside of the document window for easy access.
1. In the Workflow group, open the dropdown list and select the appropriate workflow.
|
|
Note: It is not recommended to mix fields from different workflows in one document. A generated document can only access data from the workflow where it is generated, and unrecognized placeholders will not be replaced. |
2. In the Workflow Explorer group, click View. The Workflow Explorer window opens. If you lose track of the window, it can be found in the windows list or click View again to reset the window.
3. In the document window, place the cursor at the point where the placeholder should be inserted.
4.
In the Workflow Explorer window, the top level includes groups for each
panel in the selected workflow, plus standard groups for system information and
triggers. Click the plus icon  or double-click the title to expand the
group.
or double-click the title to expand the
group.
5. Double-click the placeholder. The placeholder is inserted into the document, displayed as the name of the selected field enclosed in double chevrons.
<<FieldName>>
6. The placeholder can be formatted using any standard formatting options within Word, and that formatting will be applied to the data that is pulled in during document generation.
|
|
Note: Placeholders can be copied and pasted, but trying to edit the placeholder manually could cause errors. To change a placeholder, it is best to delete the existing one and insert a new one. The exception is when editing trigger placeholders, detailed here. |
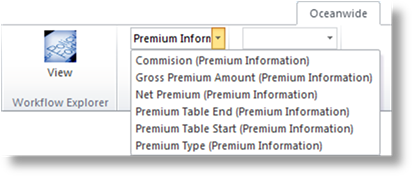
The Field Lookup and Trigger Lookup groups provide placeholder lists that can be filtered and searched. The Field Lookup group contains all available placeholders for workflow and system data, while the Trigger Lookup group contains all available triggers.
1. In the Workflow group, open the dropdown list and select the appropriate workflow.
|
|
Note: It is not recommended to mix fields from different workflows in one document. A generated document can only access data from the workflow where it is generated, and unrecognized placeholders will not be replaced. |
2. In the document window, place the cursor at the point where the placeholder should be inserted.
3. In either the Field Lookup or Trigger Lookup group, click the down arrow in the dropdown list to view the available placeholders. Each option displays the name of the field followed by the related panel or system group.
If more than 1,000 placeholders exist, the list will appear empty and must be filtered to reduce the number of available placeholders to less than 1,000.
4. To apply or change the filter:
a) Enter one or more characters in the lookup field. If any placeholder in the list starts with the entered text, the first matching name will be filled in as a suggestion. Hit Delete to remove the suggested text.
b) Hit Enter to apply the filter. If the list was already open, it will close as the new filter is applied.
|
|
Note: If a matching placeholder name was suggested and the suggested portion of the text was not deleted, hitting Enter or trying to open the list will insert the suggested placeholder into the document instead of applying the filter. |
c) Click the down arrow to open the filtered list. All placeholders that contain the filter text anywhere within them, including in the related panel or system group name, will be listed.
|
|
Tip: Once the filter has been applied, it cannot be removed. However, changing the filter text to a single space will display all available placeholders, as each option includes at least one space. |
5. Once the lookup list is open and displaying a range of placeholders, with or without a filter applied, the content can be searched.
Begin typing in the lookup field. As text is entered, the list will jump to the first placeholder that begins with that text, and that placeholder will be displayed in the lookup field.
6. Once the necessary placeholder has been found, hitting Enter will select the highlighted placeholder, or a different placeholder in the list can be selected using the arrow keys or mouse. The placeholder is inserted into the document, displayed as the name of the selected field enclosed in double chevrons.
<<FieldName>>
|
|
Note: To insert the same placeholder multiple times in a row, it may be necessary to refresh the filter. Deleting the last character (the closing bracket of the group or panel name) and hitting Enter will achieve this. |
7. The placeholder can be formatted using any standard formatting options within Word, and that formatting will be applied to the data that is pulled in during document generation.
|
|
Note: Placeholders can be copied and pasted, but trying to edit the placeholder manually could cause errors. To change a placeholder, it is best to delete the existing one and insert a new one. The exception is when editing trigger placeholders, detailed here. |
