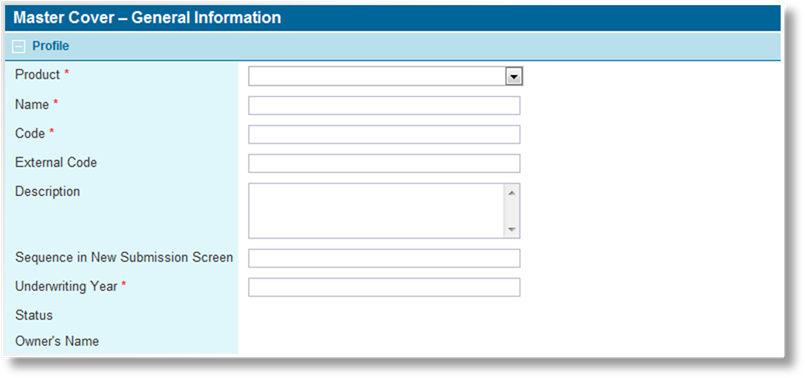
The General Information page contains general settings for submissions and policies, as well as for the master cover itself. The controls for setting the master cover to Draft, Test, or Live, copying the master cover, or generating a master cover report are also included here. This page is presented when creating a new master cover, and is the first page shown when opening an existing master cover.
For instructions on finding and viewing a master cover, see the section on Viewing and Modifying a Master Cover.
|
Product |
Select the insurance product to be associated with this master cover. |
|
Name |
Enter the name of the master cover. This is displayed in the master covers list. If a custom Product Description is not defined, this name is also used in the product listing when creating new submissions. |
|
Code |
Enter an identification code for the master cover. |
|
External Code |
This field is used for integration between the Bridge and Genoa systems. This code should match the Client Code field in the related product in Genoa. The code should not include spaces. Any spaces are removed when the field is saved. |
|
Description |
A description of the master cover can be entered for reference purposes. |
|
Sequence in New Submission Screen |
Sequence numbers can be assigned to master covers to control their order in the product selection screen. |
|
Underwriting Year |
Enter the underwriting year of the master cover. |
|
Status |
Displays the current status of the master cover. |
|
•Draft |
This is the starting status for new master covers. All settings can be changed, but submissions cannot be created. |
|
•Test |
In test mode, all settings can be changed, and test submissions can be created to verify the settings and functionality of the workflow. All submissions created in test mode (as well as any clients created with those submissions) are deleted when the master cover is set to Live. |
|
•Live |
When set to live, most settings in the master cover are locked. The master cover is ready for business. |
|
Owner's Name |
Identifies the company defined as the owner of the master cover. |

|
Effective Date |
Enter the effective period of the master cover, or
select the dates from the calendar lookups |
|
Display Valid Until Date With Same Day & Month as Effective Date |
This option adds a day to the default Valid Until date when creating submissions and renewals, and causes renewals to start on the last day of the previous term instead of the following day. |
|
This setting does not affect internal calculations such as prorating, but could affect comparative date calculations that use the Valid Until date. | |
|
This feature is often used in conjunction with the Policy Start Time setting below. | |
|
See Setting Time of Day for Policy Terms for more information on configuring this feature. | |
|
|
Note: Only the default Valid Until date is adjusted by this feature. If the Valid Until date is changed manually, this setting must be taken into account, as any renewals still start on the same day due to this option. |
|
Policy Start Time |
By default, the time for the Effective Date and Valid Until date fields (the "effective period") in a submission or policy is set to midnight (12:00 AM, not shown in the submission/policy form). When the Display Valid Until Date With Same Day & Month as Effective Date option is checked, the effective period can be set to begin and end at a specific time of day (to the hour). If the Display Valid Until Date With Same Day & Month as Effective Date option is not checked, the Policy Start Time is always set to midnight. |
|
|
When set to 12:00 AM, the effective period includes the full first day, and may or may not include the full last day of the period, depending on the Display Valid Until Date With Same Day & Month as Effective Date setting. |
|
|
When set to any other time, the effective period is from the selected time of the first day, to the selected time of the last day. |
|
|
This feature requires the Display Valid Until Date With Same Day & Month as Effective Date setting above to be checked. Otherwise the time is defaulted to 12:00 AM, regardless of the selected time. See Setting Time of Day for Policy Terms for more information on configuring this feature. |
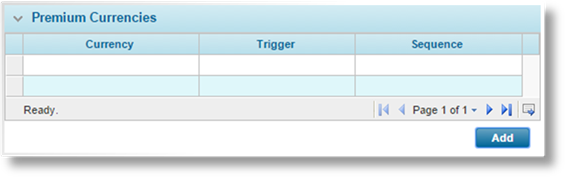
The Premium Currencies panel is used to define which currencies are available for policies under this master cover. Whenever the system calculates quotes for a New Business or Renewal transaction, the available currencies will be evaluated according to sequence and trigger. The first currency whose trigger evaluates to true will be used for all premiums in the current policy term and any additional transactions within the term.
|
|
Note: The currency is applied to the calculated premium values without any conversion. For example, a calculated premium of 100 would show as 100 USD, 100 EUR, or 100 CAD, depending on which currency is assigned. |
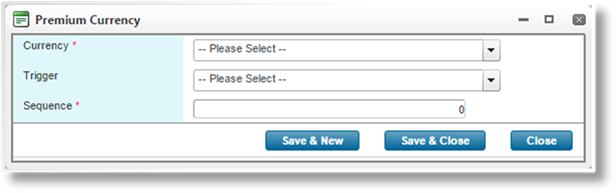
1. To add a currency, click Add. To view an existing currency, click a link in the Currency column. The Premium Currency window opens.
2. Fill in the necessary information. Fields marked with a red asterisk * are required.
|
Currency |
Select a currency to add. |
|
Trigger |
Select a trigger to control if the currency should be applied. Enter at least three characters to search for triggers. |
|
|
If all triggers fail, an error will occur. The currency with the highest Sequence number can be set without a trigger as a default value, in case no other currencies are valid. |
|
Sequence |
Enter a sequence number. The system will evaluate each currency in increasing sequence, and the first currency whose trigger evaluates to true will be assigned to the transaction. |
|
|
Tip: It is advisable to leave gaps between the sequence numbers, such as 5, 10, 15. This allows new items to be added to the list at a later date, inserted between existing items. Otherwise, the sequence numbers of existing items must be changed to allow for the new addition. |
3. Click Save & New to save the currency and clear the form to add a new currency, click Save & Close to save the currency and close the window, or click Close to close the window without saving the currency.
When viewing an existing currency, click Delete to delete the currency.

|
Submission/Policy Screen |
Select the workflow to be used for this master cover. The workflow defines the layout of the entire submission process. |
|
|
Tip: Changing a workflow after attaching items linked to the existing workflow could cause those linked items to stop functioning. After changing a workflow, check the rest of the master cover settings to ensure that all features are complete. |

The Bridge system supports integration with some external systems. The master cover can be mapped to those systems in this panel.
|
External Rating Engine |
An external rating engine can be selected. |
|
External Referral Engine |
An external referral engine can be selected. |

Premiums, commissions, and other calculated values are generally rounded off when displayed on the screen. The Rounding Configuration panel is used to set how rounding is performed.
|
Rounding Precision |
Select what digit the numbers should be rounded off to. |
|
•0.01 |
To be rounded to the cent. |
|
•0.1 |
To be rounded to the next 10 cents. |
|
•1 |
To be rounded to the next dollar. |
|
•10 |
To be rounded to the next ten dollars. |
|
•100 |
To be rounded to the next hundred dollars. |
|
•1000 |
To be rounded to the next thousand dollars. |
|
Rounding Style |
Select how the rounding is performed. |
|
•Half Up |
The value 23.5 gets rounded to 24, but −23.5 gets rounded to −23. |
|
•Half Away From Zero |
The value 23.5 gets rounded to 24, and −23.5 gets rounded to −24. |
|
•Half To Even |
The value 23.5 gets rounded to 24, 22.5 gets rounded to 22, −22.5 gets rounded to −22, and −23.5 gets rounded to −24. |
|
•Always Up |
The value 2.1 gets rounded to 3, and -2.9 gets rounded to -2. |
|
|
Warning: In cases where a rate driver changes for one endorsement, but does not change in subsequent endorsements, the rounding may result in an endorsement premium equal to the selected Rounding Precision. |
|
•Always Down |
The value 2.9 gets rounded to 2, and -2.1 gets rounded to -3. |
|
|
Warning: In cases where a rate driver changes for one endorsement, but does not change in subsequent endorsements, the rounding may result in an endorsement premium equal to the selected Rounding Precision. |

When a user creates a submission, they have the option to select or create a client. The Supported Clients panel defines what clients can be selected or created.
|
Type |
Clients can be companies or individuals, depending on the nature of the product. Select Individual or Company to only permit that type of client, or select All to allow either type. |
|
Countries |
If the product is only meant to be available for certain regions, a list of countries can be selected. Only clients from the listed countries can be selected, or when creating a new client, only the listed countries are available. |
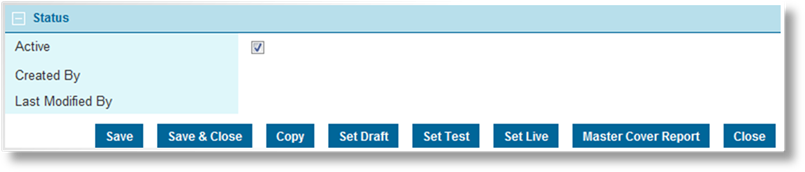
The Status panel is available once the master cover has been saved.
|
Active |
Marks the master cover as active and available for use. If unchecked, the master cover remains linked to any existing submissions, policies, and resources, but cannot be used for new submissions. |
|
Created By |
Identifies the date and time the master cover was created, and the user who created it. |
|
Last Modified By |
Identifies the last date and time the master cover was changed, and the user who made the changes. |
Click Save to save the master cover but remain on the page, click Save & Close to save the master cover and return to the master cover list, or click Close to return to the master cover list without saving the master cover.
Click Copy to make a copy of the master cover. See the section on Copying a Master Cover for details and notes about copying.
Click Set Draft, Set Test, or Set Live to control the status of the master cover. See the section on Setting Master Cover Status for details.
Click Master Cover Report to generate a report containing details of the master cover and settings. See the section on Generating a Master Cover Report for details.
 . When a start date is entered or
selected, the end date is automatically defaulted to one year later (minus
one day), but can be changed.
. When a start date is entered or
selected, the end date is automatically defaulted to one year later (minus
one day), but can be changed.


