The Configuration menu includes sections for general billing settings and adding reference data for use throughout the system.
The General Settings section contains options and default settings controlling various parts of the system.
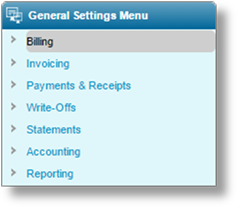
In the main menu, select Billing, Configuration, then General Settings. The General Settings page opens.
The information is divided into multiple pages. The pages are accessed through the General Settings Menu widget to the left of the screen.
Click a link to view the page details.
|
This is the default page when opening the General Settings. This contains settings for the billing cycle. | |
|
Settings for invoices, generated manually or by the automatic billing cycle. | |
|
Settings for handling receipts and matching to invoices. | |
|
Settings for write-off reasons and rules for automatic write-offs. | |
|
Settings for the production of statements. | |
|
General accounting settings, such as managing fiscal years. | |
|
Managing the automatic generation of reports. |
The General Settings - Billing page provides configuration options for the billing cycle.
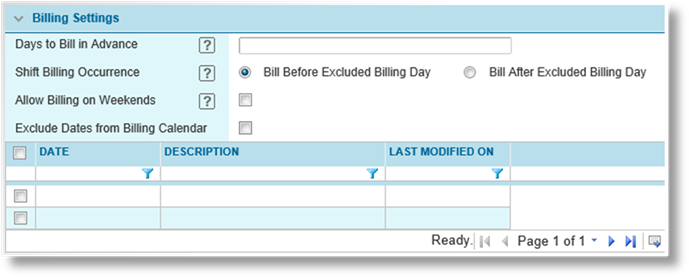
The frequency and scheduling of the billing process are configured in the Default Bill To Party Settings panel below, although custom settings can be applied for individual bill to parties. The Billing Settings panel contains options to adjust when the billing process will run.
|
|
Note: When a bill to party is created, the system schedules the first billing date. Each time the billing process runs, it schedules the next billing date. Changes to these settings will not affect billing dates that are already scheduled. The changes will be applied as new billing dates are determined, either when the billing process runs, or when new bill to parties are created. |
|
Days to Bill in Advance |
This setting will run the billing process ahead of the scheduled billing day. The scheduled billing day will still be used as the cut-off point, so any existing charges between the advance date and the scheduled date will still be included. |
|
Shift Billing Occurrence |
If the billing date falls on a day where the billing process should not run, such as a weekend or other excluded date, this setting will shift the billing day either one day earlier or one day later. If the shift lands on another invalid date, the system will continue to shift earlier or later until a valid day is reached. |
|
Allow Billing On Weekends |
By default, the system will not run the billing process on weekends. This is due to common regulations about not generating invoices when mail services are not available. The billing will be scheduled earlier or later, according to the Shift Billing Occurrence setting. If this is not an issue, checking this box will allow the billing process to run on weekends. |
|
Exclude Dates from Billing Calendar |
By default, the billing process will run on any day defined in the bill to party settings, with the possible exception of weekends, depending on the Allow Billing On Weekends setting. If billing should not run on certain days of the year, such as holidays, this setting will cause the billing process to be scheduled earlier or later, according to the Shift Billing Occurrence setting. Checking this box will display a list of all defined dates to be excluded. |
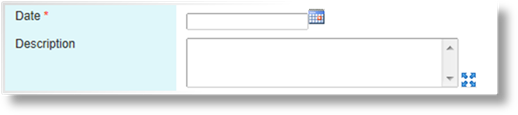
To add dates to the excluded list, click Add to open the Exclude Dates from Billing Calendar window.
|
Date |
Enter the date
to be excluded, or select it from the calendar lookup |
|
Description |
Enter a description of the date. |
Click Add & New to save the date and clear the form to enter another date, click Add & Close to save and close the window, or click Close to close the window without saving the date.
Once a date has been added to the list, they can be edited by clicking a link in the Date column. Dates can be deleted by checking boxes in the list and clicking Delete, or by editing individual dates and clicking Delete.
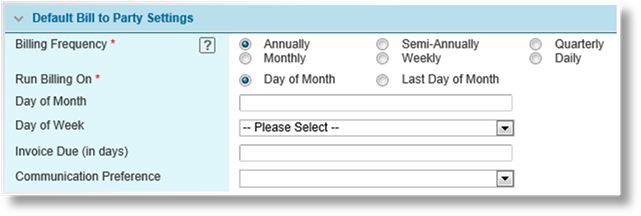
The Default Bill to Party Settings panel includes settings that will be applied to all new and existing Bill to Parties that are set to use the default configuration.
|
Billing Frequency |
Select how often the billing process will run, producing invoices. |
|
Run Billing On |
Depending on the Billing Frequency setting, it may be necessary to select the day of the week or day of the month when the billing process will run. |
|
•Day of Month |
This selection will enable the Day of Month field where a specific day can be entered. |
|
•Last Day of Month |
This selection causes billing to run on the last day of each month. |
|
Day of Month |
This field is not available when Billing Frequency is set to Weekly or Daily, or when Run Billing On is set to Last Day of Month. Enter a number from 1 to 30 for the day of the month on which to run billing. To run billing on the 31st, select Last Day of Month instead. If a certain month ends before the chosen day, billing will run on the last day of that month. |
|
Day of Week |
This field is available when Billing Frequency is set to Weekly. Select a day of the week on which to run billing. |
|
Invoice Due |
Enter the numbers of days from the invoice issue date before the payment is due. For manually generated invoices, the issue date is selected by the user. For automatically generated invoices, the invoice issue date is set to either the charge date of the earliest charge included in the invoice, or the date the invoice is generated if the earliest charge date has already passed. |
|
Communication Preference |
Select the preferred method of communicating with the Bill to Party. |

|
Last Modified By |
Identifies the last date and time the settings were changed, and the user who made the changes. |
Click Save to save the settings.
The General Settings - Invoicing page provides configuration options for invoices.
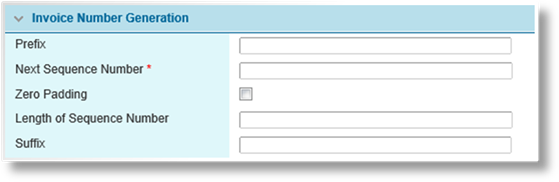
The Invoice Number Generation settings control the numbering of invoices.
|
Prefix |
Enter any text that should precede the sequence number. Any separator characters should be included here. |
|
Next Sequence Number |
Enter the number to be assigned to the next invoice generated in the system. The number is incremented with each invoice, and this field is automatically updated to show the next number to be assigned. |
|
Zero Padding |
Adds leading zeroes to the sequence number to bring it to a set length. If unchecked, the entire invoice number will gradually increase in length as more invoices are generated. |
|
Length of Sequence Number |
This field is available when Zero Padding is checked. Enter the required length of the sequence number, not including the prefix and suffix. Leading zeroes are added to the sequence number to bring it to this length. The minimum length is 2, and the maximum length is 20. |
|
|
Note: The Sequence Number does not reset to zero when the selected length reaches its maximum value. The length is extended to continue counting in sequence. |
|
Suffix |
Enter any text that should follow the sequence number. Any separator characters should be included here. |
|
|
Examples: |
|
With the prefix set as "Pr-" (a sales code), the sequence number set as 2507 (picking up from previous business), the suffix set as "/SA" (a regional code), the next three invoices will have the following numbers. | |
|
Pr-2507/SA Pr-2508/SA Pr-2509/SA | |
|
With the prefix set as "Pr", the sequence number set as 1 (starting a new line) with leading zeroes up to seven digits, and no suffix, the next three invoices will have the following numbers. | |
|
Pr0000001 Pr0000002 Pr0000003 |

|
Last Modified By |
Identifies the last date and time the settings were changed, and the user who made the changes. |
Click Save to save the settings.
The General Settings – Payments & Receipts page provides configuration options for managing receipts.
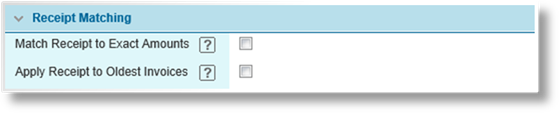
The Receipt Matching settings determine how the system will handle payment amounts that are not assigned to specific invoices.
|
Match Receipt to Exact Amounts |
The system searches all outstanding invoices for those that match the identified billing party, currency, and policy (if provided), and assigns the balance to one invoice that matches the total exactly. The system searches from the oldest invoices to the newest. If no match is found, the amount will be kept as a credit unless the Apply Receipts to Oldest Invoices is also enabled. |
|
Apply Receipt to Oldest Invoices |
The system finds all invoices for the identified billing party, currency, and policy (if provided), and applies the payment to invoices sequentially, from oldest to newest. This can result in partial payment of invoices. If all invoices are paid, any remainder is kept as a credit. |
|
|
Note: Receipt matching is only possible if the billing party is identified. Unidentified payments are kept in a suspense account until the billing party can be identified. |
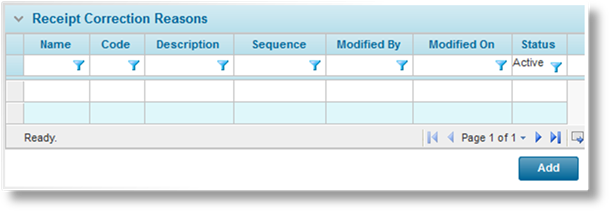
When reversing or reallocating a receipt, the user must select a Correction Reason. The available options are defined here in the Receipt Correction Reasons panel. See Managing Receipt Correction Reasons for instructions on adding and editing options.

|
Allow Partial Online Payments |
With his option checked, a user making an online payment can choose to pay the full amount or enter a partial amount. If unchecked, the user must pay the full amount. |
|
Last Modified By |
Identifies the last date and time the settings were changed, and the user who made the changes. |
Click Save to save the settings.
Managing Receipt Correction Reasons
1. In the Receipt Corrections Reasons panel, click a link in the Name column to view an existing option, or click Add to add a new option. The Receipt Correction Reason window opens.
2. Complete the necessary information. Fields marked with a red asterisk * are required.

|
Name |
Enter the name as it should appear in the Correction Reason field. |
|
Code |
Enter a unique code as the internal identifier for this option. |
|
Description |
Enter a description for this option. This description only appears in this window, and is not displayed in the Correction Reason field. |
|
Sequence |
Enter a sequence number to control the order of the options in the Correction Reason field. Options without sequence numbers are displayed first, followed by numbered options in ascending order. |
|
|
Tip: It is advisable to leave gaps between the sequence numbers, such as 5, 10, 15. This allows new options to be added to the list at a later date, inserted between existing options. Otherwise, the sequence numbers of existing options must be changed to allow for the new addition. |
3. Click Save & New to save the option and clear the form to enter another receipt correction reason, click Save & Close to save and close the window, or click Close to close the window without saving the option.
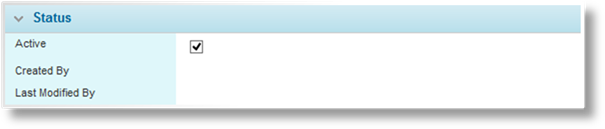
The Status panel is added once the option has been saved.
|
Active |
Marks the option as active and available for use. If unchecked, the option remains as part of any existing corrections, but cannot be selected for new corrections. |
|
Created By |
Identifies the date and time the option was created, and the user who created it. |
|
Last Modified By |
Identifies the last date and time the option was changed, and the user who made the changes. |
4. Click Save & New to save the option and clear the form to enter another receipt correction reason, click Save & Close to save and close the window, or click Close to close the window without saving the option.
The General Settings – Write-Offs page provides configuration options for writing off outstanding invoice amounts, either manually or automatically.
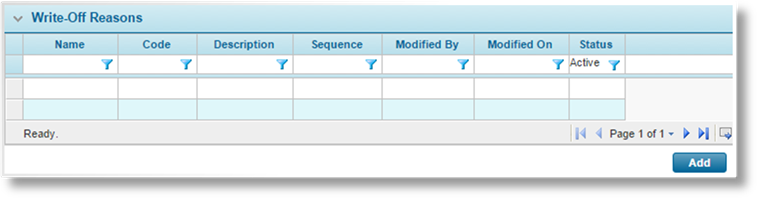
When an invoice is written off, either manually or automatically, a Write-Off Reason must be selected. The available options are defined here in the Write-Off Reasons panel. See Managing Write-Off Reasons for instructions on adding and editing options.

Rules can be set to automatically write off outstanding balances on invoices, depending on certain conditions. The Automatic Write-Off Schedule panel is used to enable the feature and schedule when the rules will be evaluated.
|
Enable Automatic Write-Offs |
Check this box to enable this feature. |
|
Frequency |
This field is displayed when Enable Automatic Write-Offs is checked. This displays how often the rule will be evaluated. |
|
Time of Day |
This field is displayed when Enable Automatic Write-Offs is checked. Select the time when the rules will be evaluated. |
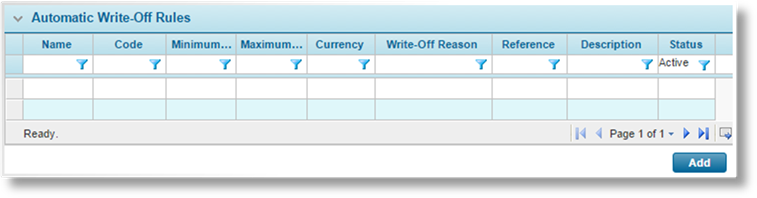
The Automatic Write-Off Rules list is displayed when Enable Automatic Write-Offs is checked. These rules define the conditions to automatically write off outstanding balances. See Managing Automatic Write-Off Rules for instructions on adding and editing options.

|
Last Modified By |
Identifies the last date and time the settings were changed, and the user who made the changes. |
Click Save to save the settings.
1. In the Write-Off Reasons panel, click a link in the Name column to view an existing option, or click Add to add a new option. The Write-Off Reason window opens.
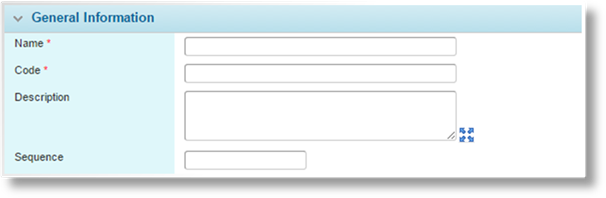
2. Complete the necessary information. Fields marked with a red asterisk * are required.
|
Name |
Enter the name as it should appear in the Write-Off Reason field. |
|
Code |
Enter a unique code as the internal identifier for this option. |
|
Description |
Enter a description for this option. This description only appears in this window, and is not displayed in the Write-Off Reason field. |
|
Sequence |
Enter a sequence number to control the order of the options in the Write-Off Reason field. Options without sequence numbers are displayed first, followed by numbered options in ascending order. |
|
|
Tip: It is advisable to leave gaps between the sequence numbers, such as 5, 10, 15. This allows new options to be added to the list at a later date, inserted between existing options. Otherwise, the sequence numbers of existing options must be changed to allow for the new addition. |
3. Click Save & New to save the option and clear the form to enter another write-off reason, click Save & Close to save and close the window, or click Close to close the window without saving the option.
The Status panel is added once the option has been saved.

|
Active |
Marks the option as active and available for use. If unchecked, the option remains as part of any existing write-offs, but cannot be selected for new write-offs. |
|
Created By |
Identifies the date and time the option was created, and the user who created it. |
|
Last Modified By |
Identifies the last date and time the option was changed, and the user who made the changes. |
4. Click Save & New to save the option and clear the form to enter another write-off reason, click Save & Close to save and close the window, or click Close to close the window without saving the option.
Managing Automatic Write-Off Rules
1. In the Automatic Write-Off Rules panel, click a link in the Name column to view an existing rule, or click Add to add a new rule. The Automatic Write-Off Rule window opens.
2. Complete the necessary information. Fields marked with a red asterisk * are required.

|
Name |
Enter the name of the rule. |
|
Code |
Enter a unique code as the internal identifier for this rule. |

The Write-Off Criteria panel defines the conditions where this rule will be applied. All conditions must be met for the rule to apply.
|
Minimum Invoice Age |
Enter the minimum number of days before an invoice is eligible to be written off. |
|
Maximum Outstanding Amount |
Enter the maximum amount that can be written off. This value must be greater than zero. |
|
Currency |
Due to exchange rates, the amount can only be applied for a single currency, selected here. Additional rules can be created for adjusted amounts in other currencies. |
The Write-Off Details will be included in the write-off receipts produced through this rule.
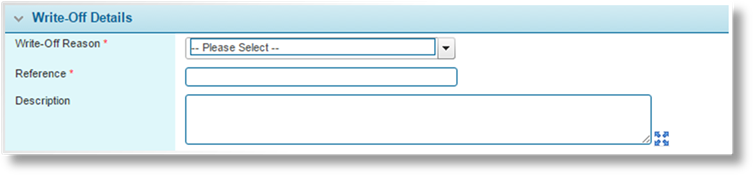
|
Write-Off Reason |
Select the reason for the write-offs. |
|
Reference |
Enter a reference code or number for the write-offs. |
|
Description |
Enter a description for the write-offs. This description will be added to all write-off receipts produced by this rule. |

The Status panel is added once the rule has been saved.
|
Active |
Marks the rule as active. If unchecked, the rule will not be applied. |
|
Created By |
Identifies the date and time the rule was created, and the user who created it. |
|
Last Modified By |
Identifies the last date and time the rule was changed, and the user who made the changes. |
3. Click Add & New or Save & New to save the rule and clear the form to enter another rule, click Add & Close or Save & Close to save and close the window, or click Close to close the window without saving the rule.
When viewing a saved rule, click Delete to delete the rule entirely.
The General Settings - Statements page provides configuration options for generating and sending scheduled statement of account documents.

The Default Bill to Party Settings panel provides settings for the generation and scheduling of statements.
|
Statement Frequency |
Select how often the process will run, producing statements. |
|
Generate On |
This field is available when Statement Frequency is set to Quarterly or Monthly. Select the day of the month when the statement process will run. |
|
•Day of Month |
This selection will enable the Day of Month field where a specific day can be entered. |
|
•Last Day of Month |
This selection causes statements to be generated on the last day of each month. |
|
Day of Month |
This field is available when Statement Frequency is set to Quarterly or Monthly, and when Generate On is set to Day of Month. Enter a number from 1 to 30 for the day of the month on which to generate statements. To generate statements on the 31st, select Last Day of Month instead. If a certain month ends before the chosen day, statements will be generated on the last day of that month. |
|
Day of Week |
This field is available when Statement Frequency is set to Weekly. Select a day of the week on which to generate statements. |
|
Generate for Balance Less Than |
A threshold can be set to only generate statements that exceed a certain amount. Enter zero or a negative value to generate statements that are less than the specified amount. If no value is provided, the statements will always generate. |
|
Generate for Balance Greater Than |
A threshold can be set to only generate statements that exceed a certain amount. Enter zero or a positive value to generate statements that are more than the specified amount. If no value is provided, the statements will always generate. |
|
Communication Preference |
Select the preferred method of communicating with the Bill to Party. |
|
Last Modified By |
Identifies the last date and time the settings were changed, and the user who made the changes. |
Click Save to save the settings.
The General Settings - Accounting page provides configuration options for managing fiscal years and additional settings.
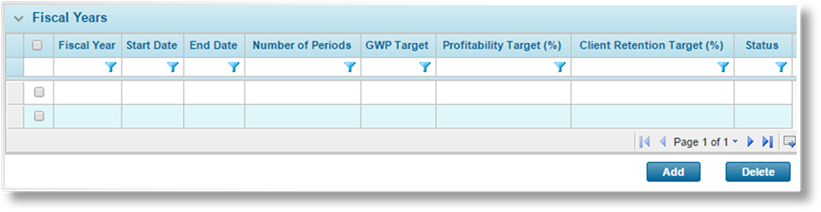
Fiscal Years define the Accounting Periods for your organization and the associated targets.
Click Add to create a new fiscal year configuration, or click a link in the Fiscal Year column to view an existing configuration. See Managing Fiscal Years for more information.

|
Include Taxes in Insurance Cost |
This setting is used to assign all taxes to the insurer company. If checked, all taxes on the premium will be included in the amount payable to the insurer company. If unchecked, no taxes will be included in the amount payable to the insurer company. |

|
Last Modified By |
Identifies the last date and time the settings were changed, and the user who made the changes. |
Click Save to save the settings.
Fiscal Years are created to define the Accounting Periods for your organization and some common target amounts for each period. Each period can be configured to automatically generate reports and post earnings.
1. In the main menu, select Billing, Configuration, then General Settings. The General Settings page opens. Navigate to the Accounting page. See Navigating Billing General Settings for instructions.

The Fiscal Years panel lists all currently configured years, including the total target amounts for the periods within that year.
2. Click Add to create a new fiscal year configuration, or click a link in the Fiscal Year column to view an existing configuration. The General Settings – Accounting page opens.
To delete a fiscal year, check the appropriate box, click the Delete button, and confirm the deletion. Only the most recent fiscal year can be deleted, and only if there are no closed periods with that year.
3. Complete the necessary information. Fields marked with a red asterisk * are required.

|
Fiscal Year |
This field is not displayed until the configuration has been saved. This is set to the year of the selected End Date. |
|
Status |
This field is not displayed until the configuration has been saved. A new configuration is set to Open status. Once the fiscal year is completed, the status changes to Closed. |
|
Start Date |
For the first
fiscal year in the system, the start date can be entered or selected from
the calendar lookup |
|
End Date |
The end date
defaults to one year after the Start Date, minus a
day. If it is necessary to change the date, enter the new date or
select it from the calendar lookup |
|
Period Duration |
Select how the fiscal year will be divided into periods. |
|
•Calendar Month |
The year will be divided into months, beginning from the Start Date. |
|
•Four Weeks |
The year will be divided into 28-day periods, with the last period containing 29 days (or 30 for a leap-year). |
|
Additional Period Assignment |
This field is only visible when Four Weeks is selected for Period Duration. Since the Four Weeks option produces 13 periods in a standard year, select if the extra period should be included in the First Quarter or Last Quarter of the year. |
|
Profitability Target |
Enter the profitability target for the year, in percentage. |
|
Client Retention Target |
Enter the client retention target for the year, in percentage. |
|
Currency |
Select the currency to be used. |
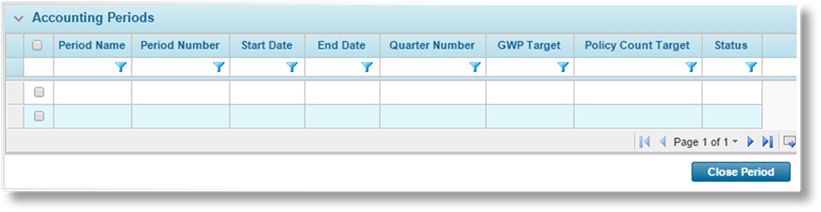
The Accounting Periods panel becomes available after the fiscal year configuration has been saved. This displays the calculated periods based on the Start Date, End Date, and the Period Duration.

|
Last Modified By |
Identifies the last date and time the fiscal year configuration was changed, and the user who made the changes. |
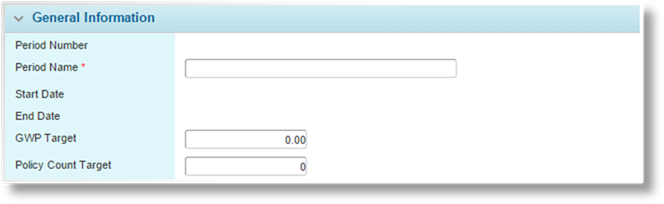
4. To view the period details, click a link in the Period Name column. The Accounting Period window opens.
|
Period Number |
Displays the period number. |
|
Period Name |
The name is defaulted based on the Period Duration selected for the fiscal year, but can be edited. |
|
Start Date |
Displays the calculated start date for the period. |
|
End Date |
Displays the calculated end date for the period. |
|
GWP Target |
Enter the GWP target for the period. |
|
Policy Count Target |
Enter the policy count target for the period. |

|
Last Modified By |
Identifies the last date and time the period was changed, and the user who made the changes. |
Click Save & Close to save the period and close the window, or click Close to close the window without saving the period.
5. To close accounting periods, check the boxes for the appropriate periods, then click Close Period. Note that a period cannot be closed if there are any earlier periods still open, and periods can no longer be edited once they have been closed. Once all periods are closed, the fiscal year is closed.
6. Click Save to save the fiscal year configuration, or click Close to return to the General Settings - Accounting page without saving.
The General Settings - Reporting page is used for managing the automatic generation of reports.
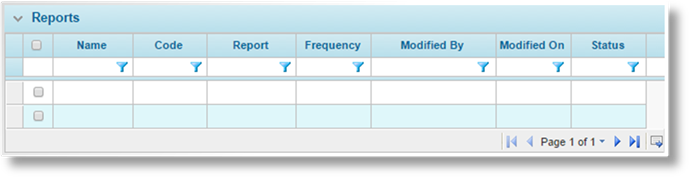
The Reports panel lists all report configurations. Each configuration entry defines a single report, the schedule for generation, output format, and any additional settings depending on the report type.
|
|
Tip: By default, only Active configurations are displayed. Clear the filter in the Status column to view all configurations. |
Click Add to create a new report configuration, or click a link in the Name column to view an existing configuration. The Report window opens.
Configurations cannot be deleted, but they can be deactivated. This leaves them in the system, but the associated reports will not be generated. To deactivate configurations, check all boxes for the configurations to be deactivated, then click Deactivate. All selected configurations are deactivated. If the Scheduled Reports list is still defaulted to only show active configurations, they disappear from the list.
|
|
Tip: Individual configurations can also be deactivated or reactivated directly through the configuration detail window. |
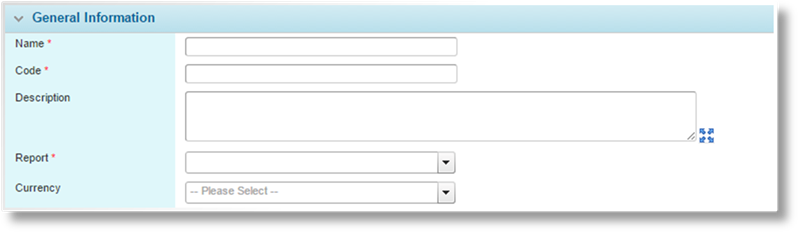
Report Window
When creating or editing a configuration, the Report window opens. Complete the necessary information. Fields marked with a red asterisk * are required.
|
Name |
Enter the name of the report configuration. |
|
Code |
Enter a unique code. |
|
Description |
Enter a description for the configuration. |
|
Report |
Select the report to be generated. |
|
Currency |
Select a currency to restrict the results to that currency. This field is required for Earnings reports. If a currency is selected, the report will include a Total line summing up the values. |
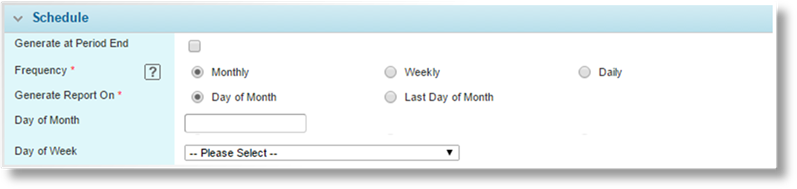
The Schedule panel defines when the report will be generated.
|
Generate at Period End |
If the system is configured to use Fiscal Years and Periods, this option will generate the report at the end of each period. If this option is unchecked, the schedule can be configured manually. |
|
Frequency |
This field is available when Generate at Period End is unchecked. Select how often the report will be generated. |
|
•Monthly |
The report will be generated on a specific day of each month, and will automatically include data for the last month. This reveals the Generate Report On field below. |
|
•Weekly |
The report will be generated on a specific day of the week, and will automatically include data for the last week. This reveals the Day of Week field below. |
|
•Daily |
The report will be generated each day, including all data for that day up to the time the report is generated. |
|
Generate Report On |
This field is available when Monthly is selected for the Frequency. Select when in the month the report will be generated. |
|
•Day of Month |
The report will be generated on a specific day of each month. This reveals the Day of Month field below. |
|
•Last Day of Month |
The report will be generated on the last day of each month. |
|
Day of Month |
This field is available when Monthly is selected for the Frequency and Day of Month is selected for Generate Report On. Enter the day of each month to generate the report. If the day is past the end of the month, the generation will shift to the last day of the month. |
|
Day of Week |
This field is available when Weekly is selected for the Frequency. Select the day of the week to generate the report. |

The Report Rules panel is available for Earnings reports when set to Generate at Period End. Check the Post at Period End option to post the report period when the report is generated.

Select the Output Format for the report, either as an Excel file or PDF.

|
Active |
Marks the report configuration as active and available for use. If unchecked, the configuration remains in the system, but the associated reports will not be generated. |
|
Created By |
Identifies the date and time the configuration was created, and the user who created it. |
|
Last Modified By |
Identifies the last date and time the configuration was changed, and the user who made the changes. |
Click Save to save the configuration or click Close to close the window without saving any changes.

 .
.
