Configurator Design Tool
In This Topic...
The Configurator tool provides controls for adding and configuring data sources, integrating with external systems to retrieve data.
This feature is generally not available to users, and should only be used by those with in-depth knowledge of the web services and integrations, as well as direct training in the use of this feature.
The Editing group contains the following standard options.

|
Open | This option is not available for this tool. |

|
Save | This option is not available for this tool. |

|
New | This option is not available for this tool. |

|
Options | This option is not available for this tool. |

|
Export | This option is not available for this tool. |

|
Import | This option is not available for this tool. |
The Configuration group contains the following options.

|
Data | Displays the Data Sources screen, where integrations with external systems are maintained. |

|
Images | Displays the Images screen, where image files can be uploaded for use in the configurations. |

|
Backup | Displays the Database Backups screen, used to manage backups of the SmartView system. |

|
RSS | Displays the RSS Feeds screen, where RSS configurations can be created to provide live data feeds. |
The Management group contains the following option.

|
Snaps | Displays the Snapshot Schedules screen, used to manage scheduled snapshot configurations. |
|
|
Languages | Displays the Export/Import Custom Translation File screen, used to manage files containing translations for labels throughout the system. |
|
|
Files | Displays the Data Import Files screen, used to manage custom data files to be used as data sources. |
Data Sources Screen
The Data Sources screen lists all configured data sources, and identifies the type of each data source.
Click a source name to display the Edit Data Source panel below.
The Edit Data Source panel is used to manage the settings for the data source selected in the Data Sources tab.
Click Save to save the data source.
If any of the selected configured implementations have been updated outside of the SmartView system, click Refresh Metadata to analyze the sources and make any necessary changes to the data mapping. The data source must be saved after refreshing in order to keep the new metadata.
Click the name of an implementation to view the current settings, or click the Add new implementation icon  to display the Edit Data Source Implementation panel below.
| Edit Data Source Implementation | |
| Enter the name of the implementation. | |
| Enter the connection code string. This will be custom for every source, and should be obtained from an official administrator or other documented source. | |
Click Ok to save the implementation, or click Cancel to close the panel without saving any changes.
Images Screen
The Images screen is used to upload image files for use as backgrounds in the dashboard and cells.
Click Select Files to open a standard file selection window. Locate and select the appropriate image file.
On selecting a file, it is added to the list. The filename, extension, and size are displayed.
To delete a file from the system, click the X icon.
Database Backups Screen
The Database Backups screen is used to create backups of the entire SmartView database, including all dashboards and configurations. Backup files are stored internally, and can be restored or deleted as necessary.
The list displays all saved backups, including the name of the backup and the date it was created.
Click the name of a backup to view the settings, or click the Add Database Backup icon  to display the Database Backup panel below. Click the X icon to delete a database, if permitted.
When creating a new backup, click Save to create a new backup with the current settings, or click Cancel to close the panel without creating the backup.
When viewing an existing backup, click Restore to recover the backup data, or click Cancel to close the panel.
Note: A backup created under a specific version of the system cannot be restored to a different version of the system. If you have created a backup in order to test changes, the backup of the good data must be restored before upgrading to a new version.
RSS Feeds Screen
The RSS Feeds screen is used to configure live data feeds from RSS sources.
The list panel displays all configured RSS feeds.
Click the name of a feed to view the current settings, or click the Add RSS Feed icon  to display the Edit RSS Feed panel below.
To delete a feed from the system, click the X icon. Note that feeds cannot be deleted once they have been associated to a saved DataView.
The following information is available.
Click Save to save the RSS feed.
Snapshot Schedules Screen
The Snapshot Schedules screen is used to manage scheduled snapshot configurations through the system.
The list panel displays all snapshot schedules created by users. The list can be filtered by entering a full or partial name in the Filter by user field.
Each schedule configuration entry displays the name of the scheduled snapshot, the name of the user who created it, and a summary of the schedule frequency with the [a/b] notation, where a is the number of times the schedule has run and b is the number of active snapshots.
Click the name of a configuration to open the schedule details panel.
The following information is available.
If the schedule configuration is active, the Update button is available to save any changes.
If the schedule configuration is inactive, the Delete Generated Snapshots link will delete all snapshots that have been generated so far for the current configuration.
If the schedule configuration is inactive, the Delete Schedule link will delete the entire schedule configuration, as well as deleting all snapshots for the configuration.
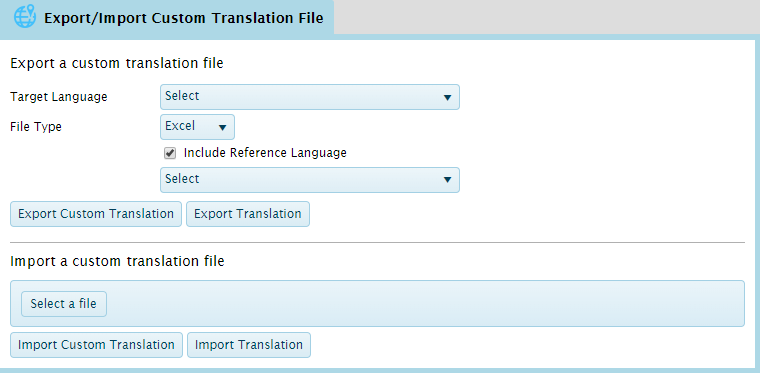
Export/Import Custom Translation File Screen
The Export/Import Custom Translation File screen is used to manage the language files that control regional translations for various system labels and custom labels throughout the system.
The language files include all system labels, as well as some custom text and labels defined in the configurations. Fields that allow customization include the Translation icon ![]() . Custom text and labels will not be available in the language file until they have been set for translations. For details on settings translations, see the Managing Field Translations section.
. Custom text and labels will not be available in the language file until they have been set for translations. For details on settings translations, see the Managing Field Translations section.
Note: The system does not use the regional or language settings defined in the browser or computer. Instead, the host system defines the language and passes it to the system through the integration.
-
The first step is to export the language file.
- Select the Target Language that you want to update.
- Select the File Type. The Excel format allows for direct editing, while the XML option may be more suited for translation services or integrations with other systems.
- The Include Reference Language box can be checked to add another language to the file, which can be used as a basis for the translation. After checking the box, select the appropriate reference language from the dropdown.
-
Click Export Custom Translation to download the file. Note that the Export Translation button is reserved for internal use.
-
If the file was downloaded in Excel format, open the file. The following columns are available.
Note: Columns with gray shading should not be modified. The Excel file has sheet protection enabled by default to prevent such changes.
Save the Excel file.
-
The final step is to import the file back into the system.
Data Import Files Screen
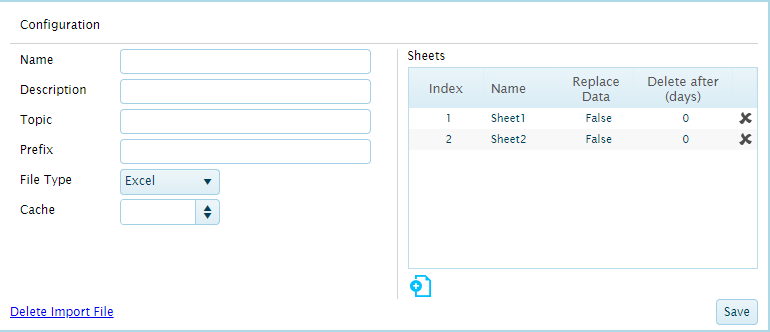
The Data Import Files screen is used to manage configurations which allow custom data files on the server to be used as data sources.
Note: The data files must be uploaded to the server by Insurity. Please contact your Insurity representative to request a file upload. Alternatively, a scheduled FTP transfer can be set up to regularly upload files.
The list panel displays all import configurations. Click the name of a configuration or the Create new file import configuration icon  to open the Configuration panel.
The Configuration panel includes all of the settings for the configuration and organizing the imported data.
The Sheets panel is used to divide the data according to the sheets in the source file.
Click the Add Sheet icon  to add an entry for each sheet in the source file. Note that CSV files only contain one sheet.
For each sheet, fill in the following information. Click in each field to edit the value.
To delete a sheet, click the X icon.
Click Save to save the configuration.
To delete a configuration, click the Delete Import File link. This deletes the configuration and the file itself. Note that the configuration and file cannot be deleted once they have been used in a dataview.


