Configuring the Policy for Billing
In This Topic...
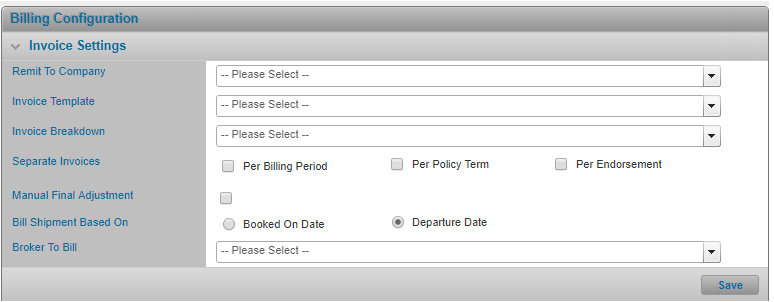
Configuring the Policy Invoice Settings
You must define certain settings in the policy to leverage the system’s billing module. Although most parameters are primarily configured per bill to party, there are certain details that are set at the policy level and apply to all bill to parties on the policy. For more information regarding each individual field onscreen and its purpose, refer to Appendix 1: Field Definition by Screen.
Why would I configure the policy-level invoice settings?
To be able to use the system’s billing module, to reconcile the policy’s premium and charges and invoice the policy’s bill to parties.
Before Getting Started
- You access an existing policy in the system.
- You are assigned the Edit Policy security right.
- The policy has a saved Definition and you checked the boxes for: ' Will you need to reconcile premiums and charges or deplete deposits so you can report on it? '.
- Verify the policy’s status is Incomplete so you can make changes. If the policy’s status is Confirmed, navigate to Review/Confirmation and click Suspend Policy Activity.
Steps
- Search for and select a policy to configure the billing system for.
-
Navigate to Configuration, then Bill to Party Setup, and click Billing Configuration.
- Complete the relevant fields.
- Click Save.
Result
The system saves your changes.
Selecting a Remit-to-Company for the Policy Invoices
Why would I select a remit to company for the policy invoices?
So the system can generate an appropriate invoice number for each invoice record the system creates, and to indicate which company the bill to parties must submit their payments to.
Before Getting Started
- You access an existing policy in the system.
- You are assigned the Edit Policy security right.
- The policy has a saved Definition and you checked the boxes for: Will you need to reconcile premiums and charges or deplete deposits so you can report on it?.
- Verify the policy’s status is Incomplete so you can make changes. If the policy’s status is Confirmed, navigate to Review/Confirmation and click Suspend Policy Activity.
Steps
- Navigate to Configuration, then Bill to Party Setup, and click Billing Configuration.
-
Select a Remit to Company. The company you select determines the invoice number the system uses when it generates the policy’s invoices.
- Click Save.

Result
The system saves your changes.
Selecting an Invoice Template for the Policy
Why would I select an invoice template for the policy?
So the system generates a PDF invoice that it can email to the recipients you define in the policy.
Before Getting Started
- You access an existing policy in the system.
- You are assigned the Edit Policy security right.
-
The policy has a saved Definition and you checked the boxes for:
- Will you need to reconcile premiums and charges or deplete deposits so you can report on it?
- Will PDF invoices be generated?
- The company you belong to has access to at least one invoice template (configured in the Administration section).
- Verify the policy’s status is Incomplete so you can make changes. If the policy’s status is Confirmed, navigate to Review/Confirmation and click Suspend Policy Activity.
Steps
- Navigate to Configuration, then Bill to Party Setup, and click Billing Configuration.
-
Select an invoice template.
- Click Save.

Result
The system saves your changes.
Configuring How Invoices are Split
Why would I configure how invoices are split?
Invoices can be split along renewals, endorsements and billing periods to provide additional clarity to the recipient.
Before Getting Started
- You access an existing policy in the system.
- You are assigned the Edit Policy security right.
- The policy has a saved Definition and you checked the boxes for: Will you need to reconcile premiums and charges or deplete deposits so you can report on it?.
- Verify the policy’s status is Incomplete so you can make changes. If the policy’s status is Confirmed, navigate to Review/Confirmation and click Suspend Policy Activity.
Steps
- Navigate to Configuration, then Bill to Party Setup, and click Billing Configuration.
-
Select from the following Invoice Breakdown options to determine the invoice details and sub-totals the system creates when it generates invoices (specifically for premium activity generated from shipments, declarations and storage locations):
- Total Invoice by Bill to Party, Invoice Details by Bill to Party; the system creates a separate invoice per bill to party on the policy and all of the premium activities are summarized for the bill to party.
- Total Invoice by Bill to Party, Invoice Details By Transaction; the system creates a separate invoice per bill to party on the policy, with individual line items for each transaction generated by the bill to party (where the transactions may be shipments, storage declarations or miscellaneous charges).
- Total Invoice By Transaction, Invoice Details by Transaction; the system creates a separate invoice per transaction with details broken down for the particular transaction (can be a shipment, a storage declaration or a miscellaneous charge).
-
For separate invoices, select one or more options that apply:
- Click Save.

Result
The system saves your changes.
Configuring Broker Billing
Why would I configure broker billing?
You want to bill net premium (net of commission) rather than gross premium (which includes the broker’s commission) and/ or, you belong to an insurer organization and you are issuing invoices to the broker directly (the broker is invoicing the assured for the total premium and keep the earned commission for the associated premium).
Before Getting Started
- You access an existing policy in the system.
- You are assigned the Edit Policy security right.
- The policy has a saved Definition and you checked the boxes for: ' Will you need to reconcile premiums and charges or deplete deposits so you can report on it? '.
- You specified a commission rate for the broker to bill so the system can calculate the premium to invoice the broker, minus the commission the broker keeps.
- There is at least one broker attached to the policy.
- You are using the system’s billing module to issue invoices.
- Verify the policy’s status is Incomplete so you can make changes. If the policy’s status is Confirmed, navigate to Review/Confirmation and click Suspend Policy Activity.
Steps
- Navigate to Profile if there is one broker and one insurer participating on the policy, or navigate to Configuration, Participants, Broker , and click Broker Commission if there are multiple brokers or insurers participating on the policy.
-
Click the Deduct Commission from Invoiced Premium checkbox to ensure the broker commission is subtracted from the premium on the system invoice.
- Click Save.
- Navigate to Configuration, then Bill to Party Setup, and click Billing Configuration.
-
Select a broker for the Broker To Bill field. This is the broker (already associated to the policy) that the system will invoice.
- Click Save.


Result
The system saves your changes.