Configuring Storage Incidental to Transit
In This Topic...
Configuring storage details for cargo during part of a shipment’s voyage.
Enabling Storage Incidental to Transit
Why would I enable storage incidental to transit?
The assureds’ shipments may require storage as part of the end-to-end voyage. Configuring storage incidental to transit allows limits and rating to be applied to locations based on geographic area as required.
Before Getting Started
- You access an existing policy in the system.
- You are assigned the Edit Policy security right.
-
The policy has a saved Definition and you checked the boxes for:
- Are assureds reporting shipment activity?
- Is storage incidental to transit applicable?
- Verify the policy’s status is Incomplete so you can make changes. If the policy’s status is Confirmed, navigate to Review/Confirmation and click Suspend Policy Activity.
Steps
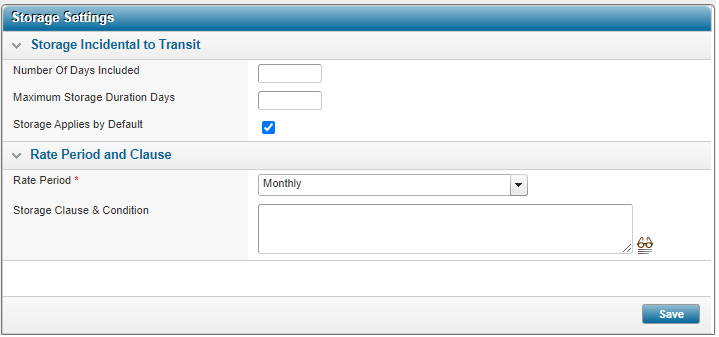
- Navigate to Configuration, then Storage, and click Storage Settings.
-
In the Storage Incidental to Transit panel, enter Number of Days Included, Maximum Storage Duration Days, and validate whether the Storage Applies by Default checkbox should be enabled or not. This checkbox is selected by default. This setting controls the default value of the Storage Applies or Storage Does not Apply options on the Shipment Incidental to Transit panel of the Shipment Form.
- Select the Rate Period.
- Click Save.
Result
The system saves your changes.
Defining Who Can Use a Location
Why would I define which primary assureds can use the location?
To indicate which of the policy’s primary assureds can use the particular storage location.
Before Getting Started
- You access an existing policy in the system.
- You are assigned the Edit Policy security right.
-
The policy has a saved Definition and you checked the boxes for:
- Are assureds reporting shipment activity?
- Is storage incidental to transit applicable?
- Are assureds reporting storage declarations?
- You are adding a storage location or modifying a storage location for the policy.
Steps
- Navigate to Configuration, then Storage, and select Named Locations or Unnamed Locations.
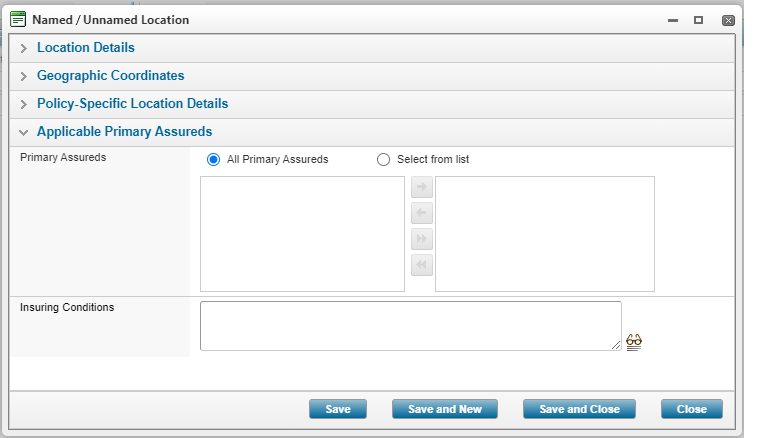
- Click Add or click the View Details hyperlink for the location you wish to configure. The system opens the location modal window.
-
In the Applicable Primary Assureds panel, using the Primary Assureds field, define which primary assureds can use this storage location:
- Use the default setting of All Primary Assureds to allow any primary assured configured for the policy and any new primary assureds added to the policy in the future, to use this storage location.
-
Select the Select from List option to configure the specific primary assureds already configured for the policy who can use this storage location:
- Select one or more items in the Excluded list, and click the right arrow
 to add them to the Included list.
 - Use the double right arrow
 to add all items to the Included list (the right column).
 - Use the up and down arrows to the right of the Included list to change the order of the included items.
- Select one or more items in the Excluded list, and click the right arrow
- Click Save to save the primary assureds configured for the location and remain on the page, Save and New if you wish to add more locations without returning to the main screen, Save and Close if you are done adding locations, or Close to return to the main screen without saving the latest values.
Result
The system saves your changes.
Managing Insuring Conditions for the Policy / Per Location
Why would I manage Insuring conditions?
To communicate specifics regarding the coverage provided to the user.
Before Getting Started
- You access an existing policy in the system.
- You are assigned the Edit Policy security right.
-
You navigate to one of the following screens:
- War Policy (via Configuration > War Policy),
- Shipment Settings, Conveyances, Insured Interests, Policy Rates, Special Rates, or Country Restrictions (via Configuration > Shipment),
- Storage Settings, Named Location, or Unnamed Location (via Configuration > Storage).
Steps
-
Type the clause wording into the Insuring Conditions text area or click the lookup
 icon to use the Clause Lookup to select some predefined clause text.
 - Click Save.
Result
The system saves your changes.
Using the Clause Lookup
Why would I use the clause lookup?
To insert a pre-defined clause or condition text from the Administration section or to use standard and consistent wording on every policy.
Before Getting Started
- You access an existing policy in the system.
- You are assigned the Edit Policy security right.
-
You navigate to one of the following screens:
- War Policy (via Configuration > War Policy),
- Shipment Settings, Conveyances, Insured Interests, Policy Rates, Special Rates, or Country Restrictions (via Configuration > Shipment),
- Storage Settings, Named Location, or Unnamed Location (via Configuration > Storage).
Steps
-
Click the lookup
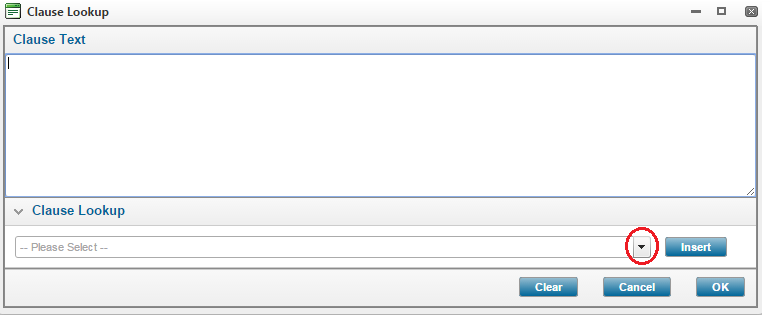
 icon to open the Clause Lookup. The system opens the Clause Lookup modal window. If you already entered any text in the Insuring Conditions field in the main screen, that text will be visible in the Clause Text area. You can insert your cursor anywhere in the Clause text.
 - Click the arrow in the Clause Lookup panel to view the list of available clauses and select one.
- Click Insert. The system populates the Clause Text area with the predefined text (configured in the Administration section).
- Edit the text if necessary.
- Repeat the steps above until you have added all of the required wording.
- Click Clear to delete all of the text in the Clause Text field, click Cancel to undo any changes you made in this screen and return to the main screen, or Ok, to save the clause text and return to the main screen.
Result
The system closes the Clause Lookup modal window and displays the clause text in the Insuring Conditions field on the main screen. You can now click Save to commit the insuring conditions for the policy.


