Customizing the Policy Shipment Screen
In This Topic...
From the policy, customize the shipment screen’s fields so the form better reflects the policy setup and the type of shipments your assureds need to book. There are several ways the system allows you to customize the Shipment Form and use more custom features that are less frequently used.
Why would I customize the policy’s Shipment screen?
To minimize confusion by hiding options that are not relevant to the policy and, streamline the entry process by hiding or defaulting fields where only one option is available. You can also re-label certain fields to match the Insured’s language.
Before Getting Started
- You access an existing policy in the system.
- You are assigned the Edit Policy security right.
-
The policy has a saved Definition and you checked the boxes:
- Are assureds reporting shipment activity?
- Will a custom shipment form be required (SSC Configuration or Custom Configurations)?
- Verify the policy’s status is Incomplete so you can make changes. If the policy’s status is Confirmed, navigate to Review / Confirmation and click Suspend Policy Activity.
Steps
- Navigate to Configuration, then Shipment, and click Custom Configurations.
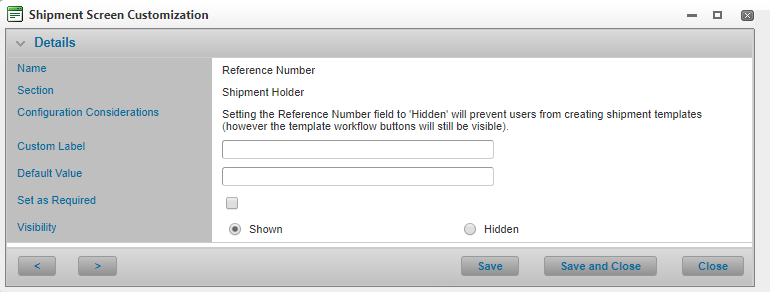
- Click the View Details hyperlink for each field you wish to customize. The system opens the Shipment Screen Customization modal window.
-
Depending on the field selected, you can apply the following potential customizations:
- Enter a Custom Label to replace the core field label or custom language file entry that applies to the selected shipment field.
- Specify a Default Value so the Shipment screen loads with certain fields pre-populated. The possible default values you can specify depend on the type of source field being customized (i.e. whether it is a checkbox, a textbox, a date field, etc.).
- Check the Set as Required box to introduce a system validation for optional fields when the system verifies coverage for the shipment.
- Configure the field’s Visibility setting to determine if the field will be hidden from the screen.
Note: The system only displays the customization options that make sense, considering the field’s core attributes and its inter-dependencies with other shipment fields. For example, if you wish to hide a field that is mandatory then you are forced to specify a default value for it. Alternatively, if a field is already mandatory, then Set as Required is not an available option.
- Click Save to save the details and remain in the modal, click Save and Close to save the details and return to the main screen, or click Close to close the modal without saving the latest values.
Result
The system saves your changes.
Configuring (Shipment) Custom Features
Why would I configure custom features?
To leverage some of the more custom and less commonly used features available, that meet the needs of a subset of assureds.
In order to make the shipment’s Reference Number unique or follow a specific format and allow either assureds or non-assured users to print a draft certificate.
Before Getting Started
- You access an existing policy in the system.
- You are assigned the Edit Policy security right.
-
The policy has a saved Definition and you checked the boxes:
- Are assureds reporting shipment activity?
- Will a custom shipment form be required (SSC Configuration or Custom Configurations)?
- Verify the policy’s status is Incomplete so you can make changes. If the policy’s status is Confirmed, navigate to Review/Confirmation and click Suspend Policy Activity.
Steps
-
Navigate to Configuration, then Shipment, and click Custom Configurations.
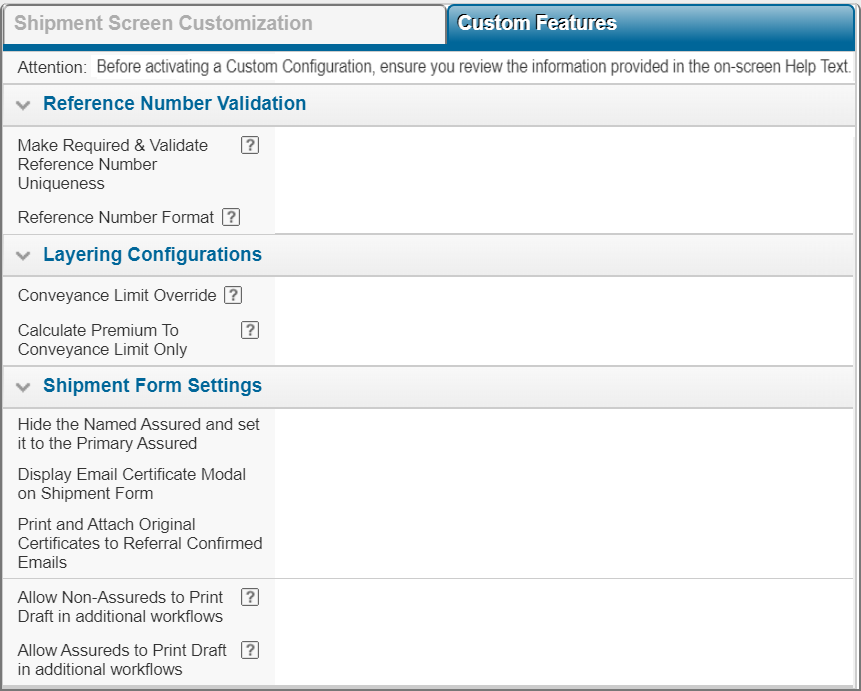
- Click the Custom Features tab.
- Configure or enable any of the available custom features. See the sections below for details on each of the panel settings.
- Click Save.
Validating the Shipment’s Reference Number
To validate that each shipment created or modified for this policy has a unique reference number:
Click the Make Required & Validate Reference Number Uniqueness. When this checkbox is selected, the system will validate the shipment’s reference number is unique across all renewals and endorsements for the specified policy. If you enable this feature the shipment’s Reference Number field will become mandatory for every shipment for the policy.
Enforcing a specific Format for the Shipment’s Reference Number
Use the Reference Number Format feature to ensure each shipment’s Reference Number is specified according to a pre-defined format. To define the required format use the following key:
- 9 = Numbers
- A = Letters
- X0 = Alphanumeric (letters and numbers)
- Special Characters - / , ( ) < > _ + = # * [ ] \ | (white or blank spaces)
Example: If the shipment’s Reference Number must always be specified using 3 numbers only and 3 letters only separated by a dash, the format would be: 999-AAA. Note that the system will validate any blank spaces entered into the field.
Configuring Layering
When your policy is configured with Additional Charges of type Layer, you can enable the policy’s layering features:
-
From the policy’s Additional Charges screens, after adding an additional charge of type Layer, expand the Layering panel to enter a Lower Layer Limit and an Upper Layer Limit to indicate which layer of the insured value is subject to this additional charge.
- Enter a Conveyance Limit Override amount. When verifying coverage for each shipment, the system ignores the individual conveyance limits (normally set on the policy’s Conveyances screen) and uses this value to determine if it must trigger a shipment referral.
- Select the Calculate Premium To Conveyance Limit Only field to ensure the system calculates premium only up to the shipment's selected conveyance’s limit and not based on the shipment's Total Sum Insured. The system will calculate premium using the rates associated with the policy’s additional charges of type Layer to calculate premium on the portion of insured value that is greater than the specified conveyance limit.
Configuring Shipment Form Settings
Below is a list of Shipment Form Settings and their descriptions.
| Hide the Named Assured and set it to the Primary Assured |
Check the Hide the Named Assured and set it to the Primary Assured checkbox to automatically set the Named Assured to be the same as the selected Primary Assured for the shipment. If the shipment’s Primary Assured will always be the same as the Named Assured, enable this feature to streamline the Shipment form. |
| Display Email Certificate Modal on Shipment Form |
Check this setting to display the Email Certificate Modal on the Shipment Form when creating a new shipment. When enabled, the Email Certificate button is available on the Shipment Form. |
| Print and Attach Original Certificates to Referral Confirmed Emails |
Enable this setting to automatically print and attach original certificates to Referral emails when creating a new shipment. When enabled, where a Shipment Referral is Confirmed and the Print Count = 0, a PDF certificate is generated using the first template available and attached to the referral confirmation email. |
| Allow Non-Assureds to Print Draft in additional workflows | Enable this feature to allow Non-Assured users to print draft certificates in additional workflows (including referrals). |
| Allow Assureds to Print Draft in additional workflows |
Enable this feature to allow Assured users to print draft certificates post Verify Coverage regardless of the shipment’s insurability. This also includes printing drafts for shipments in Quote Issued & Payment Pending statuses. |
Printing Draft Certificates in Additional Shipment Workflows
Note: Consult your Insurity account representative to have the ShowPrintDraftSetting licensee setting enabled. If you do not see the fields below on screen then this licensee setting has not been configured. This has to be completed before you can enable this feature on the policy.
- Check Allow Non-Assureds to Print Draft in additional workflows so non-assured users can print draft certificates when shipments are in the following statuses: Referred, Sanction Referred, Quote Requested, Quote Issued and Payment Pending.
-
Check Allow Assured to Print Draft in additional workflows so assured users can print draft certificates post-Verify Coverage regardless of the shipment’s insurability (before the assured actually submits the shipment into a status of Referred or Sanction Referred).
This also includes printing drafts for shipments in Quote Issued or Payment Pending statuses. Assureds cannot print a draft certificate after clicking the Submit Referral button when the shipment status is Referred or Sanction Referred.
If either of the above options are enabled the respective user groups with the appropriate security rights will have the option to Print Draft Certificate on the Shipment form. When printing a draft certificate the Draft watermark will always be displayed on the document to indicate it is not a legal, negotiable document.


