Managing Data Importer Templates
In This Topic...
Users can create and manage templates used in Data Importer based on their administrative scope. For details on user scoping, see the User Scoping section.
A template can only be associated to one policy at a time, however, a policy can have multiple templates associated to it. The templates available is based on the policies the user has access to.
Viewing Templates
Users may want to search for templates in order to make changes to a template or view the list of templates associated to a policy. Note that users will only be able to see templates based on the policies they have access to.
Why would I View Templates?
To view a template available within my organization.
Before Getting Started
- You are assigned theManage Uplink & Data Importer Templates security right.
- You have already accessed Data Importer from the Administration menu.
Steps
-
From the main menu navigate to the Template List. The Template List is displayed.

-
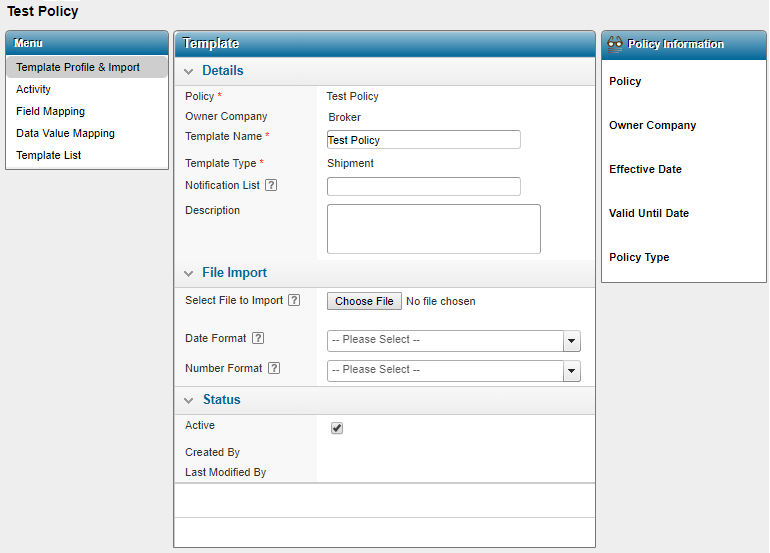
Click the View Details link to display the Template page.

Result
Creating a Template
In order to quickly create new Shipment Form imports when uploading a batch of shipments for booking.
Before Getting Started
- You are assigned the Manage Uplink & Data Importer Templates security right.
- You have already accessed Data Importer from the Administration menu.
Steps
-
From the main menu navigate to either the Template List. The Template List is displayed.

-
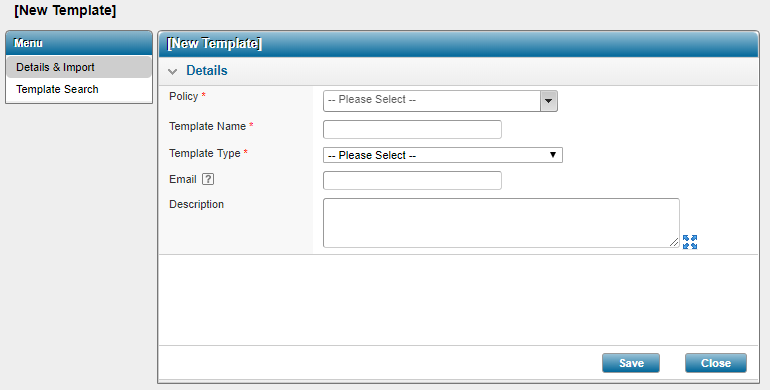
Click Add. The New Template page is displayed.

-
Enter the details for the template. Fields marked with a red asterisk * are required.
Policy
Select a policy for the template.
Note that templates cannot be associated to multiple policies.
Note: Once the policy is selected, the fields returned will be from the latest policy at the time the template is created.
Template Name Enter the template name. Template Type Select the template type.
Shipment is the only option at this time.
Email Enter the e-mail address of the users who will have access to the template.
When adding more than one recipient, emails must be comma separated. For example: john.smith@work.com,janedoe@theoffice.com
Description Enter a short description of the template. Caution: Once the template is saved, the Policy and Template Type fields are marked as read-only and can not be modified. To remove these values you must delete the template and create a new one.
- Click Save.
Result
The template is saved in the Templates List and available for use when importing shipments.
Modifying a Template
To modify the details of a template that have changed or may have been entered incorrectly.
Before Getting Started
- You are assigned the Manage Uplink & Data Importer Templates security right.
- You have already accessed Data Importer from the Administration menu.
Steps
-
From the main menu navigate to either the Template List. The Template List is displayed.

-
Click the View Details link of the template you wish to modify. The Template page is displayed.

-
Modify the fields as needed and click Save.
Caution: Once the template is saved, the Policy and Template Type fields are marked as read-only and can not be modified. To remove these values you must delete the template and create a new one.
-
If you are importing shipments, enter the details in the File Import panel and click Import.
In the File Import panel, make the necessary changes by uploading a new file, selecting the date format and number format.
Select File to Import Select a file in .xslx or .csv format to be imported. The first row must contain the column headers based on the Field Mapping screen configuration.
Each subsequent row will be categorized as a unique shipment.
Date Format Select the format of date values within the file to be uploaded.
Number Format Select the format of numeric values within the file to be uploaded.
Note: The Date Format and Number Format selected when importing the file are saved with the template until the next time they are modified. Users should always verify the Date Format entered in the excel file to be uploaded, prior to import.
Result
The new file is imported either successfully or with errors and the changes are saved.
Deleting a Template
Why would I delete a template?
To remove a template that is no longer needed, to recreate a template that had incorrect data, or to re-assign a template to a new policy.
Before Getting Started
- You are assigned the Manage Uplink & Data Importer Templates security right.
- You have already accessed Data Importer from the Administration menu.
Steps
-
From the main menu navigate to either the Template List. The Template List is displayed.

-
Click the View Details link of the template you wish to modify. The Template page is displayed.

- Click Delete.
Result
The template is removed from the Template List and is no longer available for selection.