Workflow Containers
In This Topic...
Workflow containers are used as a collection of related workflow components and configurations. The contents of each container are isolated from other containers, allowing the creation of a focused product.
If some content is meant to be available for more than one product, common containers can be created and shared to other containers. This makes much of the content available to the receiver containers.
Workflow containers can have versions based on a specific effective date. When a new version comes into effect, it can apply overrides to formulas, data tables, and even field behaviors.
Warning: Though not enforced through the UI, each individual Workflow Container can only contain a single Step workflow , as having more than one causes unintentional system behaviors. Multiple Tabbed workflows are, however, supported.
Note that when using Shared Containers, only the Step workflow contained within the "receiver" container is published. The publishing process disregards the Step workflow contained within the workflow that is being shared down.
Navigating Workflow Containers
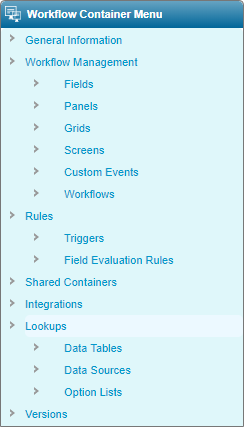
Each workflow container has multiple screens of information, accessed through the Workflow Container Menu widget to the left of the page. The widget becomes available on opening an existing workflow container or completing and saving the Workflow Container information for a new container.
| Workflow Container Menu | |
|
General Information |
Opens the core Workflow Container page to manage details of the container itself. |
|
Workflow Management |
This option expands to provide access to the workflow components options. |
|
Opens the Fields list to manage field configurations. See the Managing Fields section. |
|
Opens the Panels list to manage panel configurations. See the Managing Panels section. |
|
Opens the Grids list to manage grid configurations. See the Managing Grids section. |
|
Opens the Screens list to manage screen configurations. See the Managing Screens section. |
|
Opens the Custom Events list to manage custom workflow events. See |
|
Note: Though accessible from all Workflow Containers, the Custom Events functionality is currently only supported for Workflow Containers have Claims assigned as their Functional Area. |
|
|
Opens the Workflows list to manage workflow configurations. See the Managing Workflows section. |
|
Rules |
This option expands to provide access to the rules components options. |
|
Opens the Triggers list to manage trigger configurations. See the Managing Triggers section. |
|
Opens the Field Evaluation Rules list to manage evaluation rules. See the Managing Field Evaluation Rules section. |
|
Shared Containers |
Opens the Shared Containers list to manage sharing between workflow containers. See the Managing Shared Containers section. |
|
Integrations |
Opens the Integration Configurations list to manage integrations between systems. See the Managing Integration Configurations section. |
|
Lookups |
This option expands to provide access to the lookups components options. |
|
Opens the Data Tables list to manage data tables. See the Managing Data Tables section. |
|
Opens the Data Source Configurations list to manage data sources. See the Managing Data Sources section. |
|
Opens the Option Lists list to manage option lists. See the Managing Option Lists section. |
|
Versions |
Opens the Workflow Container Versions list to manage container versions. See the Managing Versions section. |
| Workflow Container Info | |
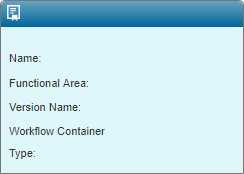
| Name | Displays the Name of the Workflow Container. |
| Functional Area | Displays the Functional Area of the Workflow Container, out of the following possibilities. |
|
|
| Version Name | Displays the current Version Name of the Workflow Container. |
| Workflow Container Type | Displays the Workflow Container Type, out of the following possibilities. |
|
| Common Screens | |
| Event Tracking |
The Event Tracking feature provides a report of all events for the current Workflow Container. This includes the publishing of a Workflow, as well as the Export and Import events. Each individual event can be opened to view a breakdown of the operations involved in processing the event.
For more information, see |
Managing Workflow Containers
- In the main menu, select Product Design, then Workflow Containers. The Workflow Containers page opens with a list of all available containers.
- Select an action.
- Click a link in the Name column to view an existing workflow container.
- Click Add to add a new workflow container.
- Check the boxes for one or more workflow containers and click Deactivate to disable the selected containers. A container can also be deactivated from the Workflow Container page. Inactive containers will still be functional in existing configurations, but cannot be selected for new configurations.
- On viewing or creating a container, the Workflow Container page opens.
- The panels and fields are described below. Fields marked with a red asterisk * are required.
- Select an action.
Some columns have been hidden.
If there are a large number of available containers, see
The Status panel becomes available once the workflow container has been saved.
|
Marks the workflow container as active and available for use. Inactive containers will still be functional in existing configurations, but cannot be selected for new configurations. |
|
|
Identifies the date and time the workflow container was created, and the user who created it. |
|
|
Identifies the last date and time the workflow container was changed, and the user who made the changes. |


