Claim Actions Widget
In This Topic...
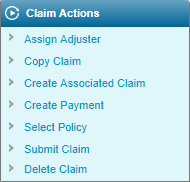
The Claim Actions widget lists the available actions that can be taken on the claim in its current status. Below are some general descriptions of each action.
The available actions are determined by the type of transaction, the status of the transaction, the availability of items to work with (such as e-mails and documents), and the user's security roles.
If no actions are available for the current claim, the Claim Actions widget is not displayed.
|
Click Assign Adjuster to select or replace the adjuster for the claim. See Assigning an Adjuster for details. |
|
|
Depending on workflow configuration and certain claim details, an adjuster may be assigned automatically. |
|
| Copy Claim | Click Copy Claim to select the claim data to be duplicated in a new claim transaction. See Copying a Claim for details. |
| Create Associated Claim |
Click Create Associated Claim to copy the claim information of the current claim and create a new claim transaction. See Associating a Claim for details. |
|
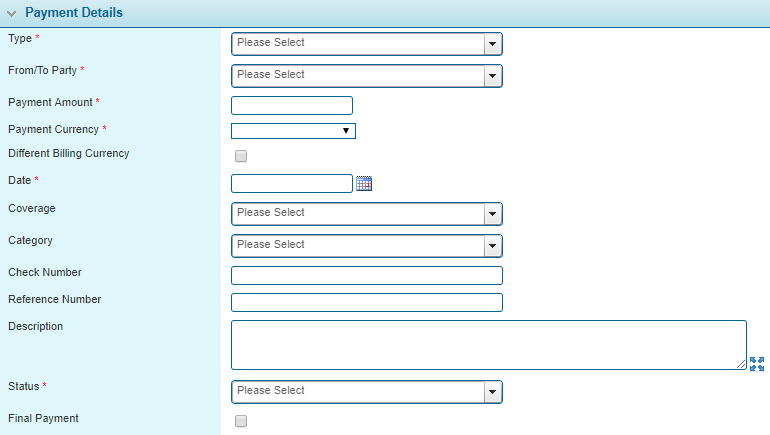
Click Create Payment to enter payment details for policy participants or claim parties. This is the same as entering a payment on the Payments screen. At least one policy participant or claim party must be attached to the claim for this option to be available. See Adding a Payment to a Claim for details. |
|
|
Once the Date of Loss has been specified for the claim, click Select Policy to choose the appropriate policy for the claim. The Policy Selection window opens. See Selecting the Policy for a Claim for details. |
|
|
Once all necessary claim information has been provided, click Submit Claim to submit the claim for processing. See Submitting a Claim for details. |
|
| Delete Claim | Click Delete Claim to delete the claim. See Deleting a Claim for details. |
Assigning an Adjuster
Submitting a claim may automatically assign an adjuster, replacing any previous adjuster assignment. The adjuster may be changed manually after automatic assignment if necessary.
If an adjuster has not already been assigned to a claim, click Assign Adjuster to add an adjuster. The Adjuster window opens.
|
Select the adjuster to attach to the claim. The list includes all available users that have been defined as adjusters. |
Click Save & Close to save the selection and close the window, or click Close to close the window without saving.
Copying a Claim
Creates a copy of the current claim transaction and creates a new claim submission in Notice of Intent status. Users can modify the copied information as necessary. All custom data included in the current claim is copied, including selected core system data. Claim data can also be copied based on custom validations and workflow events when configured to do so. For additional information, see the Configurations - Workflow Events section.

Associating a Claim
When multiple participants are involved in an incident, related claims can be associated. Associating a claim allows the user to copy select data of the current claim, and creates a new claim submission in Notice of Intent status. Only users with the appropriate security roles can associate claims and modify the information.
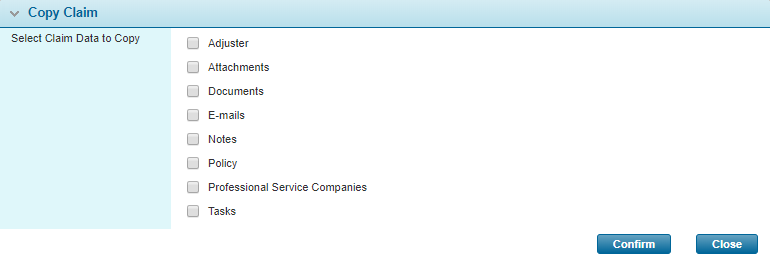
From the claim submission screen, click Create Associated Claim in the Claim Actions widget. The Copy Claim window opens.

By default, all available data is selected to be copied into the new transaction. Users can deselect unnecessary data by removing one or more checkboxes. All custom data included in the current claim is automatically copied.

The Associate Claim panel appears indicating that the link between claims is active.
Click Confirm to complete the claim association. A new claim submission will open in Notice of Intent status and users can modify the information as necessary.
Viewing and Modifying Associated Claims
Once the initial claim information has been copied and the link is created, users with the appropriate security rights can view and modify associated claims.
- From within the claim, click Associated Claims in the Common Screens widget. The Associated Claims window opens.
- To view an associated claim, click on the link in the System Number column. The claim opens in a separate window.
- To add a new associated claim from the Claims list, click Add. The Associate Claim window opens.
- Select the claims to be associated.
- Click Save and Close to save the selected claims and return to the Associated Claims window, or click Close to return to the window without associating any claims.
- Click Close to exit the Associated Claims window.
Deleting an Associated Claim
Associated claims can be deleted from the Associated Claims window.
- From within the claim, click Associated Claims in the Common Screens widget. The Associated Claims window opens.
- Select the associated claims to be deleted.
- Click Delete. The claim will be removed from the list.
- Click Close to return to the claim submission page.

Creating a Payment
Claim payments can be added directly from the Claims Actions widget, or added through the Payments screen that is automatically included in the published claim workflow. For information on the Payments screen, see the Managing Claim Payments section.
- From within the claim, click Create Payment in the Claim Actions widget. The Payment window opens.
- Complete the necessary information. Fields marked with a red asterisk * are required.
- Click Add & New to save the payment and clear the form for a new entry, click Add & Close to save the payment and return to claim submission form, or click Close to close the window and return to the submission form without saving the payment.

Selecting the Policy for a Claim
Once the Date of Loss has been provided it is displayed in the Claim Information widget and the option to Select Policy now becomes available in the Claim Actions widget. This option opens the Policy Selection window with the following fields.

Click Save & Close to save the policy selection and close the window, or click Close to close the window without selecting a policy.
Once a policy has been selected, the Policy No is displayed in the Policy Information widget.
Submitting a Claim
Once all information has been entered for the submission , click Submit Claim in the Claims Action widget. The system remains on the same page, but the action will drive any configurations that rely on this action, such as a Workflow Event, Adjuster Auto-Assignment configuration or Automatic Claim Payment Rule.
Deleting a Claim
If a claim was entered incorrectly or simply needs to be removed from the system, click Delete Claim in the Claims Action widget. The system deletes the current claim and redirects the user to the Claims Search / List. When deleting a claim, any links to Associated Claims are deleted. With the exception of Notes & Tasks, all resources associated to the deleted claim (such as Attachments, Documents, and E-mails) are also deleted. Even after a claim has been deleted, associated Notes & Tasks may still be accessible through downstream systems such as Client Center and/or SmartView.
Note: The option to delete a claim is only available when there are no payments associated to the claim, or if existing payments have been deleted. The claim can not be deleted if it has a Reserve amount that is greater than zero.


 .
.