Schedule of Forms Template – Implementation and User Guide
The Schedule of Forms accelerator is used to simplify the management of forms, as all form data, and form applicability conditions for a product are stored in Data Tables.
The default structure of the workflow is built into the SOFScheduleofFormsContainer workflow container. For details on the default components of the containers, see the Schedule of Forms Workflow Components section.
Note: If your environment does not include this workflow container by default, please contact your Insurity Customer Success Representative.
Template Functionality
The Schedule of Forms accelerator includes the following functionality:
- Maintenance of SOF applicability conditions in Excel spreadsheets.
- Ability to add custom manuscripts, and replace existing forms.
- Ability to set fill-in screens for certain forms.
- Ability to set forms as optional or mandatory.
- Default forms to automatically attach to the policy.
- Ability to version forms, by setting effective and expiry dates.
- Ability to attach forms to a select list of policy transactions.
Using the Schedule of Forms Template
The Schedule of Forms template contains the following grids:
- Schedule of Forms Grid
- Manuscript Grid
- Print Forms Grid
Forms included in the SOF will appear in the Schedule of Forms grid and will be able to be selected for inclusion. Only applicable forms will be visible in the Schedule of Forms grid. Applicability is determined by the configuration of the rules, conditions, effective date, and the transaction type (e.g. New Business, Endorsement, Renewal, etc.) Lastly, changes made to the workflow will change the forms available upon returning to the Schedule of Forms grid.
Manage and Select Forms
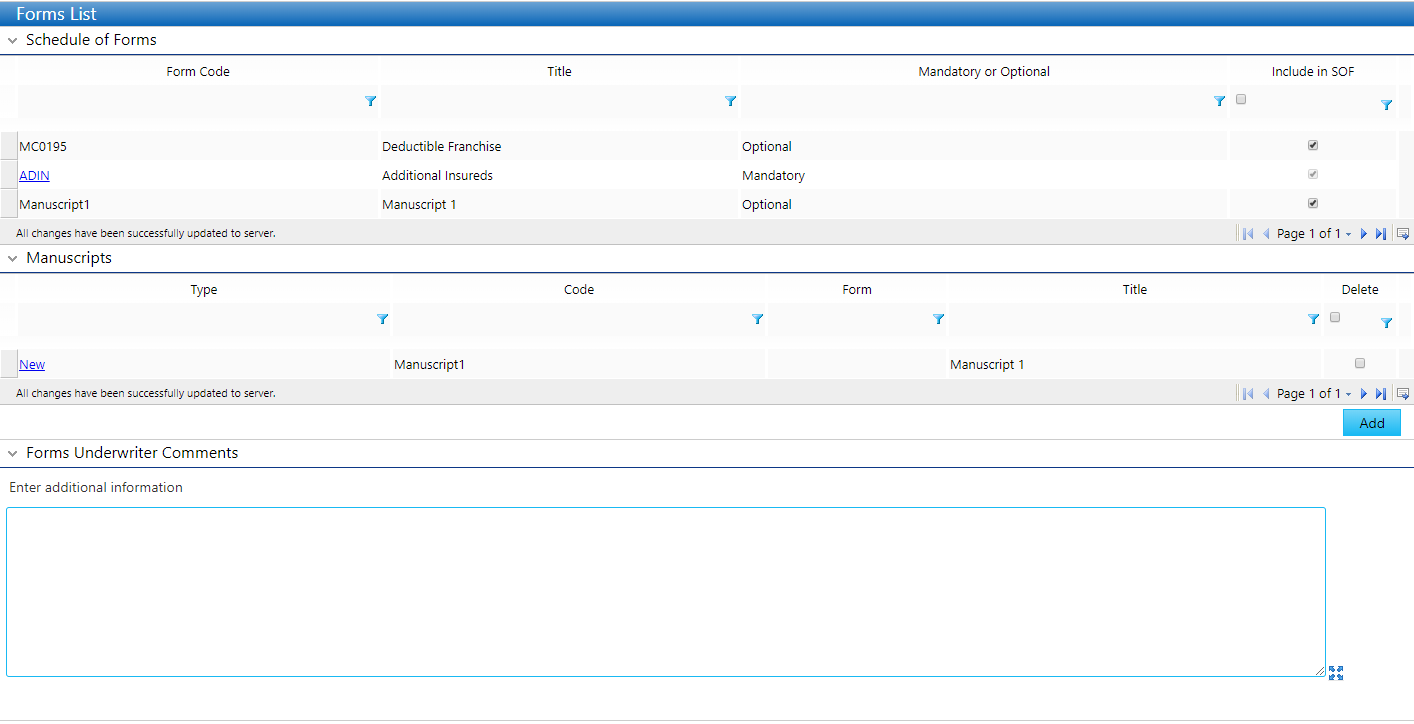
Navigate to the Forms screen in the workflow. The Schedule of Forms grid lists all applicable forms depending on information provided in the workflow. Forms that meet the applicability rules, conditions, effective date and transaction type, will be visible in the Schedule of Forms grid. All forms that are selected within this grid will be printed in the Schedule of Forms document.
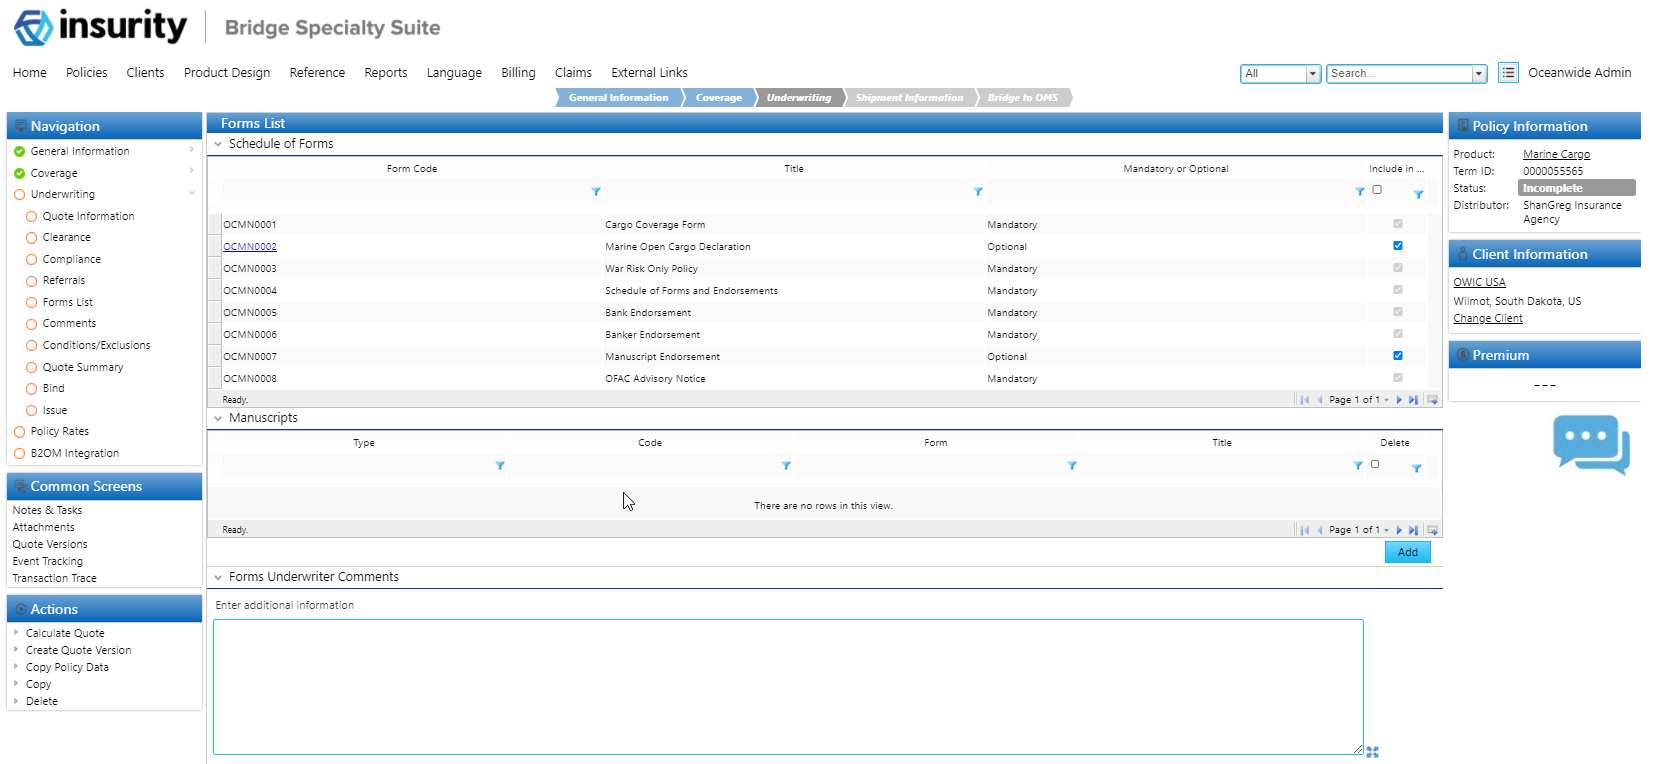
| Form Code | Displays the code of each form. If the code is shown as a link, then it is a fill-in form requiring users to provide information. Click the link to edit the form content. |
| Title | Displays the name of each form or manuscript. |
| Mandatory or Optional | Displays whether the form or manuscript is Mandatory or Optional. Mandatory forms and manuscripts are pre-selected and are automatically included. Optional forms and manuscripts may or may not be included. |
| Include in SOF | The checkbox indicates if the form is included to display in the Schedule of Forms section of a policy package. Users can uncheck optional forms. |
Verify that desired forms are included. In the Include in SOF column, check all forms to be included for the current transaction. Mandatory forms will not be available to be de-selected.
Note: If a desired form is not visible, this is because it is not applicable. Applicability is determined by the configuration of the rules, conditions, effective date, or the transaction type (e.g. New Business, Endorsement, Renewal, etc.)
- Forms with fill-in data will contain a link in the Form Code column. Click the link to edit the fill-in form content.
- Once form inclusion and fill-ins are complete, proceed to create manuscripts, if applicable.
Create Manuscripts
Manuscripts can be created to replace existing forms or create new ones. When a manuscript replaces a form, the user can choose to make the manuscript Always Print or not. As manuscripts get created, they populate the Schedule of Forms grid and are selected by default. Should a manuscript that is replacing an optional form be created, the manuscript will have the option to be selected or unselected as part of the SOF by the user in the Schedule of Forms grid.
Furthermore, Manuscripts can be edited after being created directly from the Manuscripts grid by clicking the link in the Type column of the desired manuscript.
Manuscripts are rolled forward to subsequent transactions unless they are deleted. However, any manuscripts replacing forms that are no longer applicable will only appear in the Manuscripts Grid.

| Type | Displays Replacement for a manuscript replacing a form. Otherwise, New is displayed if no form was replaced. |
| Code | Displays the automatically generated code for each manuscript. |
| Form | Displays the code of the form being replaced, if applicable. |
| Title | Displays the title of the manuscript. |
| Delete | Check this box to delete the manuscript upon Save & Refresh. |
- Navigate to the Forms List screen.
- Click Add to create a new manuscript.
The manuscript screen opens with the fields described below:
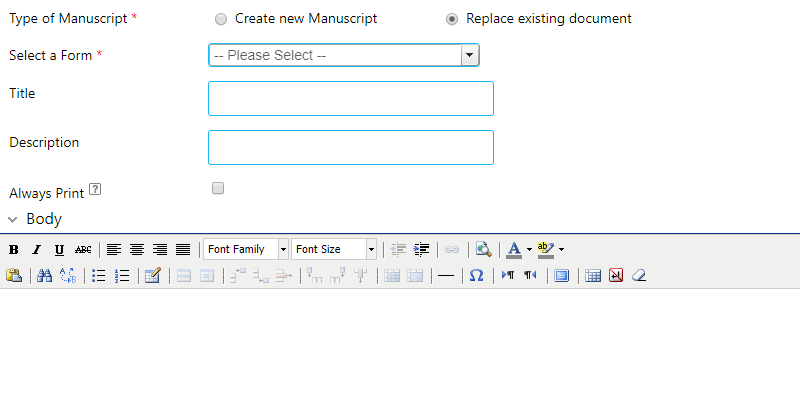
Type of Manuscript Select whether you want to Create new Manuscript or Replace existing document. Select a Form This field is displayed when Replace existing document is selected. Select the desired form to be replace. Title Enter the title of the manuscript. Description Enter a description of the manuscript. Always Print Check this field to always print the manuscript. Body Enter the full text of the manuscript. - Delete a desired manuscript by checking the respective checkbox in the Delete column. On Save & Refresh all checked manuscripts will be deleted.
Select Forms to Print
Once the appropriate forms are selected and manuscripts are created, they will be listed in the Select Forms to Print for the Current Transaction grid. This grid is recommended to be used in Endorsement and Adjustment transactions, to be able to have more control over which forms from those that are included in the policy will print. It should be hidden on all other transactions.
In this grid, only the selected forms and manuscripts will populate the grid, so Optional forms or manuscripts that are not selected in the Print Forms grid will not be available for printing.
Forms are selected to be printed by default if one of the following conditions are met:
- The form or manuscript is set to Always Print,
- The form or manuscript is newly added.
- The form is set to be selected by default on new transactions.
In subsequent transactions forms that have already been selected to print will not be checked (unless the form is set to be selected by default). The user can select the desired set of forms to print by checking the checkbox in the Print column.
Any manuscripts or forms that are set to Always Print, or selected as Always Print, cannot be unchecked by a user. This will be shown by a greyed out checked box.

| Form Code | Displays the code of each selected form or manuscript. |
| Title | Displays the name of each selected form or manuscript. |
| The checkbox indicates if the form is to be printed. Users can un-check forms that are not set to Always Print. |
Adding the Schedule of Forms Template to a Workflow
This section details the process of implementing the Schedule of Forms workflow, stepping through the process of adding the necessary configurations.
In order to add the Schedule of Forms workflow components into an existing workflow, the SOFScheduleofFormsContainer container needs to be shared and some custom components must be created. This section provides step-by-step instructions for preparing all components.
Add the SOFScheduleofFormsContainercontainer as a shared container. See the Managing Shared Containers section for instructions on sharing containers.
Custom Configuration
This section will outline the entities that need to be created in order to get the Schedule of Forms solution working in a workflow. There are two recommendations for the configuration of these entities.
Recommendation #1: Several products with different rules and forms, or one product in an environment
The first recommendation is to repeat the configuration the entities in the box below in each product container in an environment. This is the method to go with if the forms, and the management of the forms will be different for each product. If there is only one product in an environment, configure the entities directly in the product container.
Create the entities below, and repeat in each product container (replace ‘LOB’ with an identifier of the line of business).
Recommendation #2: Several products with the same rules and forms:
The second recommendation is to configure the entities once, in a container that is shared by all products in an environment. This is the method to use if you want the management of all forms to be in one place.
If the configuration below is going to be the same for all products, do the configuration in a common container that is shared with all product containers:
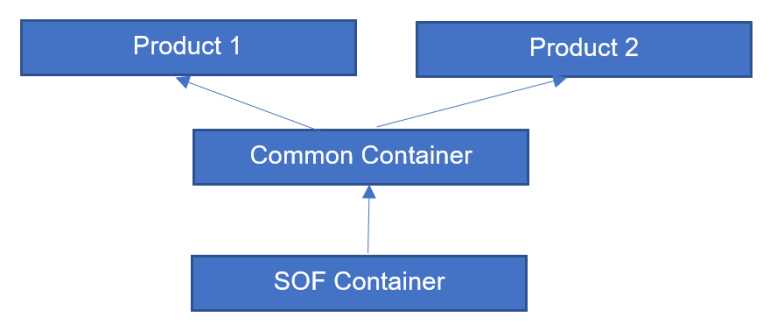
Create the following entities in the Common Container (replace ‘LOB’ with an identifier of container):
Note: It is recommended that any custom changes to the SOF container be done in a common container that is shared to the SOFScheduleofFormsContainer workflow container, and not done directly in the SOFScheduleofFormsContainer workflow container. Any changes made directly to the SOFScheduleofFormsContainer workflow container will be overridden if a new version of the container is taken.
The following entities that will be created are as follows. More information will be provided for each:
| 2 Data Tables | LOBSOFConditionsDT, LOBSOFFormsDT |
| 2 Data Sources | LOBSOFConditionsDS, LOBSOFFormsDS |
| 2 Lookup Field | LOBSOFConditionsLookup, LOBSOFFormsLookup |
| 1 Instruction Field | LOBSOFInstruction |
| 4 Field Evaluation Rules | LOBSOFCreatePolicy, LOBSOFUpdateCondAndFormsOnSave, LOBSOFUpdateCondAndFormsOnLoad, LOBSOFDeleteManuscript |
| 1 Field per Form | LOBSOFPrintFormCode X No. of Forms |
| 1 Trigger per Form | LOBSOFFormNameFillinScreen X No. of Fill-in Screens |
| Form Fill-in screens | LOBSOFFormNameFillinScreen X No. of Fill-in Screens |
Create a list of conditions to populate the Conditions grid SOFConditionsGrid. Use the SOF Conditions Excel spreadsheet as a template to fill in the conditions. Delete the instruction and example rows once completed.
Each applicability condition will make up one row in the spreadsheet. Each condition must be given a unique ID.
Conditions will be tied to rules. Each rule must be given a unique ID. A rule can be made up of one or multiple conditions in an AND conjunction. (ie. State is California AND Coverage type is Excess is one rule made up of two conditions).
Conditions are made up of a Field, Operator and Value.
Field: Enter in the code of the target field in the Field Code column, and the label of the target field in the Field Label column.
Operator: Select from a list of operators. Options include: Equals, NotEquals, Contains, DoesNotContain, In, GreaterThan, GreaterThanOrEquals, LessThan, LessThanOrEquals.
Value: The value you would expect in the workflow for the condition to return as TRUE.
Tip: Grid fields are not currently supported to be used for conditions. However, a field can be configured to output the results of all rows of a grid, and a condition can be created against that top-level field.
# Company State 1 Bob’s Grocery California 2 Sally’s Nails Florida 3 Company XYZ Texas
The grid above contains a list of company names, with the state they are located in. To set up a referral for a company in the state of Florida, do the following configuration:
- Create a calculated field, that evaluates the field code of the grid field ‘State’. The value of that field in this case would be California | Florida | Texas.
- Create a condition against the calculated field with the operator Contains and the Value Florida. The condition will evaluate to TRUE if at least one row has a State of Florida.
- Delete the instruction and example rows in the spreadsheet once completed.
Create a Data Table (ie. LOBSOFConditionsDT) in the product container. Upload the spreadsheet once filled in. There is no need to include any columns as Key Columns or as a Sorting Column.
Create a Data Source (ie. LOBSOFConditionsDS), with the Data Source type Data Table, and select the above Data Table. Check off Output results to a grid and select the SOFConditionsGrid.
Map the following columns of the data source to grid fields:
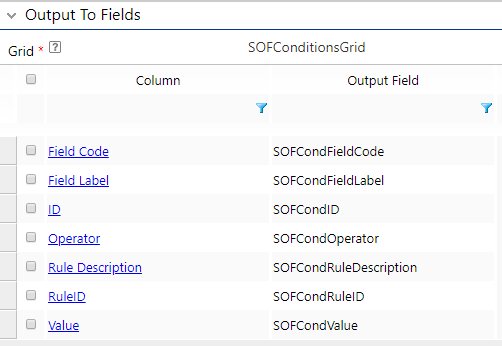
Configure a calculated field (ie. LOBSOFConditionsLookup) to output the custom conditions to the Conditions grid, containing the following formula:
ClearGrid(SOFSourceGrid):
LookupDataSourcetoGrid(LOBSOFConditionsDS):
The LookupDataSourceToGrid function contains the code of the Data Source configured.
Note: Do not set the calculated fields to always calculate! More information will be given below on adding the fields created to field evaluation rules (FERs).
Create a list of forms to populate the Source grid SOFSourceGrid. Use the SOF Forms spreadsheet as a template. Delete the instruction and example rows once completed.

Create a Data Table (ie. LOBSOFFormsDT ) in the product container. Upload the spreadsheet once filled in. There is no need to include any columns as Key Columns or as a Sorting Column.
Create a Data Source (ie. LOBSOFFormsDS) with the Data Source type Data Table, and select the above Data Table. Check off Output results to a grid and select the SOFSourceGrid.
Map the following columns of the data source to grid fields:
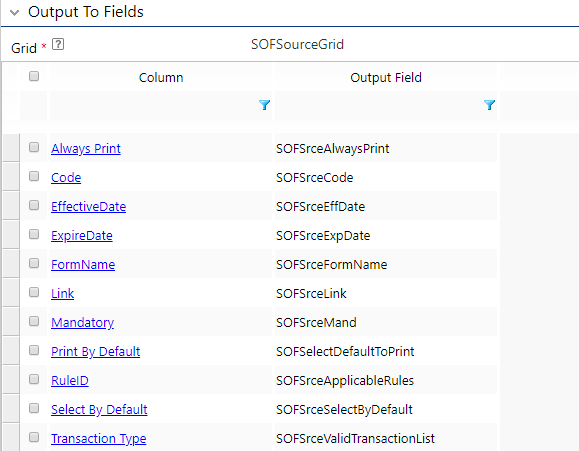
Create a calculated field (ie. LOBSOFFormsLookup) that will need to be configured to output the custom forms to the Source grid, containing the following calculation.
ClearGrid(SOFSourceGrid)
LookupDataSourcetoGrid(LOBSOFFormsDS):
The LookupDataSourceToGrid function contains the code of the Data Source configured.
Create a field (ie. LOBSOFInstruction) to be used for the calculation of the previous two calculated fields, and an existing SOF field in the correct order. It will contain the following calculation:
[[LOBSOFConditionsLookup]]
[[SOFCondRuleMapping]]
[[LOBSOFFormsLookup]].:
Create a step in the workflow to add the SOF screens. Add the screens: SOFFormsList, and SOFPrintScreen. SOFFormsList contains the SOF grid and the Manuscript grid. The SOFPrintScreen contains a grid that can be used to have more control over which forms to print on subsequent transactions such as endorsements. It is recommended to only expose this screen on endorsements.
Optionally, for more control over the SOF screens, manually create new screens and add the SOF grids, instead of using the already existing screens. Create a screen (ie. LOBSOFScreen) to add the components of the Schedule of Forms template. Alternatively, the SOF components can be added to an existing screen in the workflow. Add the following grids:
- SOFSelectGrid
- SOFManuscriptGrid
Create another screen (ie. LOBSOFPrintScreen) to add the form print component of the Schedule of Forms template. Add the following Grid:
- SOFSelectGrid View 1
Alternatively, the View Grid can be added to an existing screen in the workflow, as long as it is in a separate screen than the SOFSelectGrid (both grids cannot exist in the same screen).
Create the following Field Evaluation Rules (FERs) with the following Availability/Triggering Conditions. Note that the sequence of these field evaluation rules respective to one another does not matter.
LOBSOFCreatePolicy
Fields: LOBSOFInstruction
Type
Policy
Events
Create Policy
Policy Transaction Types
All
Policy Transaction Statuses
All
Security Roles
All
Screens
None

LOBSOFSaveFields:
Field: 1 Field per Form (ie. LOBSOFPrintFormCode X No. of Forms). The sequence that the fields are listed within the FER does not matter.
Type | Policy |
Events | Save |
Policy Transaction Types | All |
Policy Transaction Statuses | All |
Security Roles | All |
Screens | None |
LOBSOFUpdateCondAndFormsOnLoadFields:
Fields: SOFEvaluateCondAndUpdateFormsInstructions
Type | Policy |
Events | LoadPage |
Policy Transaction Types | All |
Policy Transaction Statuses | All |
Security Roles | All |
Screens | None |
Fill-in Screens (Optional)
Fill in screens can be configured for some or all forms. The fill-in screens can be configured just as one would configure a regular screen in Bridge. Each fill-in screen should be configured to open in a modal window, by checking the Open screen in modal mode checkbox:
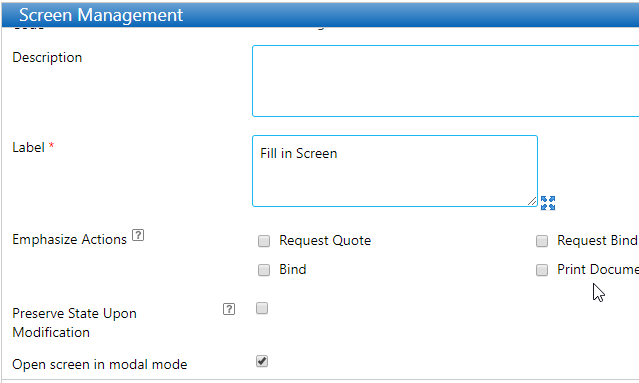
Once the screen is configured, it must be added as a hidden screen in the workflow. It is recommended to make a separate workflow step to house all the Schedule of Forms fill-in screens.
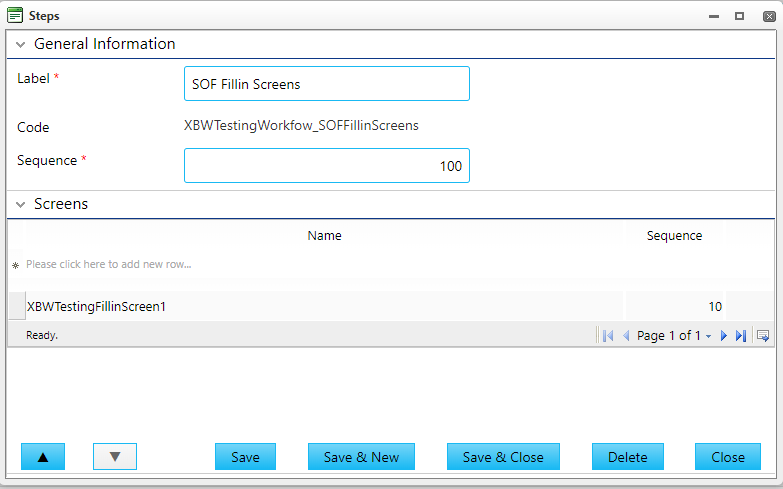
The fill-in screens will be associated to a form in the SOF Forms data table. For each form that you want to associate to a fill-in screen, update the Link column with the following URL:
WorkflowCode_FillinScreenCode.aspx
Where WorkflowCode is the code of the LOB product workflow, or workflow that the screen is configured in, and the FillinScreenCode is the code of the fill in screen. This will create a link to access the fill-in screen by clicking on the code of the form in the UI.
Document Set-up
Note: The Oceanwide Word Ribbon is required when configuring documents. Click here for more information about setting up the Oceanwide word ribbon
Create a Microsoft Word document for each form. The template should include the following syntax:
«TableStart:SOFSelectGrid»
<Enter Content Here>
«RepeaterTrigger_SOFSelectCheckEQUALSTrue»
«TableEnd:SOFSelectGrid»
The repeater Trigger SOFSelectCheckEQUALSTrue will determine which forms have been selected in the UI and include them in the document.
Replace <Enter Content Here> with the formatting and information of a manuscript.
The following fields are available as placeholders within the document:
SOFSelectDisplayCode: Code of the Form or Manuscript
SOFSelectFormName: Title of the Form/Manuscript
SOFSelectMand: Indicator if the form is mandatory or optional
Create one document template per form
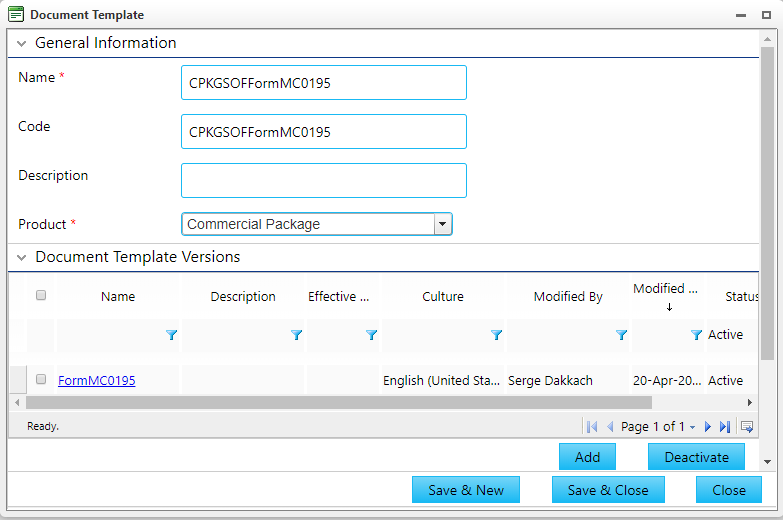
Navigate to Product Design, Document Templates.
Add a new template.
Select your product and attach your form document.
The Effective Date of the document template can be left blank as the effective date is set in the LOBSOFFormsListDT data table.
Note: Each form will require a separate Document Template.
Create a field for each form (ie. LOBSOFPrintFormCode) where FormCode will be replaced with the code of the form. Flag each field as Available for Triggers.
Count([[SOFSelectManuCode]]
where [[SOFSelectManuCode]] = "FormCode"
and [[SOFSelectToPrint]] = True).:
Where FormCode: Value of the code column in the forms data table
Create one trigger per form (ie. LOBSOFPrintFormCodeGreaterThan0) or the name of your choice. Add the following trigger formula:
Field
Operator
Value
LOBSOFPrintFormCode
Greater Than
0
If manuscript forms will be used, create a Document for all manuscripts. The template should include the following syntax:
«TableStart:SOFManuscriptGrid»
<Enter Content Here>
«RepeaterTrigger_SOFManuPrintEQUALSTRUE»«TableEnd:SOFManuscriptGrid»
The repeater Trigger SOFManuPrintEQUALSTRUE will only allow manuscripts that are selected for printing in the Print Grid to be included in the document.
Replace <Enter Content Here> with the formatting and information of a manuscript.
The following fields are available as placeholders within the document:
- SOFManuType: Indicator if the Manuscript is new or a replacement to a form
- SOFManuSelect: Existing: Code of the form the manuscript is replacing (Blank value if Manuscript is new)
- SOFManuCode: Unique Code of the manuscript
- SOFManuTitle: Manuscript Title
- SOFManuDesc: Manuscript description
- SOFManuBody: Manuscript Body
- SOFManuAlwaysPrint: Value of Yes if the manuscript is set to always print, otherwise No
Note: A page break inside the document formula will be required for the manuscript to print on a separate page, for all rows before the last one.
Set up forms in the Master Cover.
Create a Policy Declaration document under Documents/Forms in the Master Cover:
- Navigate to Master Covers, Your Product, Documents/Forms.
- Click on Create to create a new Documents/Forms.
- Select a Document Name of your choice.
- Select the Quote Document, or document the forms will be attached to as option for Document Template.
In the Associated Documents panel:
- Add each form template, as well as their corresponding trigger. The sequence of the forms should match the order they are listed in the LOBSOFFormsListDT data table, to ensure that they print in the correct order when generating the document.
- Add the manuscript template, and add the trigger SOFIsManuscriptGridEmptyEQUALSFalse.

- Click Save & Refresh.
Underwriter Comments (Optional)
Add a text area on the screen for underwriter comments.
Schedule of Forms Workflow Components
The Schedule of Forms workflow container contains three screens that hold the grids that make up the backbone of the schedule of forms solution. Configuration done at the product level allows users to implement product specific conditions that interact with the core components.
The container is a Policy container with the code SOFScheduleofForms.
Caution: Unlike the Standard Containers, the Accelerator workflow containers are not reset to their default settings when a new version is deployed. This prevents custom configurations from being lost, but also makes it difficult or impossible to restore default configurations that have been broken. This section provides the default settings and formulas to allow components to be manually changed back the original configuration.
If you do not have the Schedule of Forms data dictionary, please contact your Insurity Customer Success Representative.