Incomplete is the default status for newly created
submissions, and existing submissions that have been returned to
Incomplete status by a validation rule.
|

|
Notes: All fields marked with a red
asterisk * are required and must be
completed before proceeding. |
|
Depending on the system settings and your individual
security rights, some screens, panels, and fields may not be
displayed. |
|
Individual panels can be collapsed or expanded by
clicking the plus or minus icons   at the left side of the
header. at the left side of the
header. |
Once the client has been selected
or created, the submission page opens as Incomplete. The submission is
saved, and the Term ID and Transaction
ID are generated (see the Policy Information widget and
detail window).
Fill in the submission form.
All fields in the center form area
are custom to the selected product. For any questions on the custom
fields, check for any Help icons  that may be available, refer to any
supplemental documentation provided by your Insurance Representative, or contact
your insurance Representative directly.
that may be available, refer to any
supplemental documentation provided by your Insurance Representative, or contact
your insurance Representative directly.
See the Moving Through the
Workflow section for instructions on navigating through the submission
form.
While navigating
through the workflow in this status, the system performs a series of validations
in the background at key points. The validations may display errors,
warnings, or messages with additional information, and may automatically change
the status of the submission.
• If any
required information for the current screen is incorrect or incomplete, an error
message is shown at the top of the form, detailing what must be changed before
proceeding. Make any necessary corrections and click
Next or Save &
Refresh to validate the information again.
• If the
system attempts to calculate quotes and finds that some details do not meet the
requirements for one or more quotes, an error message is shown at the top of the
form, detailing what must be changed. It is still possible to navigate
through the workflow, but the error must be corrected before the quotes can be
calculated.
• For
client and distributor users: If certain details of the submission
require review by the Underwriter, one or more quote options may go into
Underwriting Required status. These quotes are not shown in the
Quote Summary window. If all quote options go into Underwriting
Required status, the transaction Status changes to Underwriting
Required, and all referral reasons are displayed at the top of
the form. Proceed to the section on Underwriting Required submissions.
• For
underwriter users: If certain details of the submission require review
by the Underwriter, one or more quote options may go into Referred
status. The referral reasons are displayed at the top of the form, and the
quote options are shown in the Quote Summary window. If all quotes
go into Referral, the transaction Status changes to
Referred. Proceed to the section on Referred submissions.
• For
client and distributor users: If at least one quote option is valid
and does not require review by the Underwriter, the Status changes to
Quoted and the valid quote options become available in
the Quote Summary detail window accessed through the
Premium widget. Proceed to the section on Quoted submissions.
• For
underwriter users: If at least one quote option is valid and does not
require review by the Underwriter, the Status changes to
Quoted and the quote options become available in the
Quote Summary detail window accessed through the
Premium widget. Proceed to the section on Quoted submissions.
While in
Incomplete status, the following Actions are available.
• Click
Calculate Quote to save the submission and trigger the
validation process. This process is similar to what occurs in the
background during navigation, and has the same results listed above.
•
Alternate versions of the current transaction can be created with minor
or major variations, producing multiple Quote
Versions from which a single quote can be selected.
Note:
A Client must be selected to create quote versions,
and the client cannot be changed once versions have been created for a term.
1.
Click Create Quote Version. The Create Quote
Version window opens.
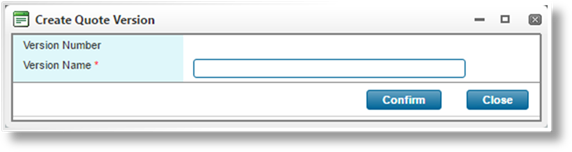
|
Version
Number |
Displays the
number of the new quote version. |
|
Version
Name |
Enter the name
of the version. This name is displayed in the Policy
Information and the Quote
Versions list. |
2.
Click Confirm to create the new quote version, or
click Close to close the window without creating the
new version.
3.
On clicking Confirm the new quote version opens immediately. The
Quote Versions option in the Common Screens widget can be
used to navigate between versions.
• Click
Copy to create a new submission with similar
information to the current submission. Depending on settings in the
product, individual fields may copy the value from the source transaction, reset
to their default values, or be left blank. The insurer, distributor, and
client details are updated to the most recent details stored in the
system. The new submission has the Incomplete status as a
New Business transaction.
• Click
Delete to delete this transaction from the system.
• Click
Lock to prevent any changes to the transaction.
• Click
Unlock to re-enable a locked transaction.
• The
Print Document and Compose
E-mail options become available if any document templates
or e-mail templates, respectively, are currently available. See the
sections on Printing
Documents and Sending and Managing E-mails.
|
|
Note: Making changes on the
submission form could disable certain actions until the submission has
been saved and recalculated.
|