The default self-registration page
provides all fields necessary to create a fully-detailed client record. It
also enforces the Terms of Use, which must be accepted before the user
can access the system.
The website can now be configured
to display a simplified self-registration page, requiring only the First
Name, Last Name, and E-mail address of the user. This
provides quicker access to the system so that the user can begin the submission
process.
When viewing the client within the
system, either through the Clients menu or through the submission/policy
page, all fields will be available and the client details can be completed.
The simplified self-registration
page must be enabled by Oceanwide. Please contact your Oceanwide
Representative for more information about this feature.
In order to conserve space and
allow the users to focus on the submission form, most of the information in the
Policy Information widget can now be hidden by removing a specific
security right.
The
ViewPolicyInformationWidget security right has been created for this
purpose, and has been automatically added to all security roles that currently
include the ViewSubmission right. With this new right, the
Policy Information widget displays all the standard information as it did
before this feature was introduced. Without this right, the user will only
see the Effective, Valid Until, and Cancel On date fields,
where appropriate.
Clicking a date field opens the
Policy Information details page, which still contains all
information.
The Effective and Valid
Until date fields can be hidden by settings in the master cover. If
all information in the widget is hidden, the widget itself is not shown, and the
details page is not accessible.
The ViewPolicy right is also
required to view the Policy Information widget. Without this right,
the widget is not displayed, regardless of the
ViewPolicyInformationWidget right.
Maintenance of security roles is
handled by Oceanwide. To request changes, please contact your Oceanwide
Representative.
The following new function and
placeholders are now available to pull additional policy information into
generated documents, e-mails, and calculated fields.
The following table provides the
name of the placeholder as it appears in the Word Ribbon (under the Term
Information menu), the code for the placeholder as it can be used in
e-mails, plus a description of the information being called.
|
Word Ribbon |
E-mail Placeholder |
Description |
|
Previous Term Policy Number |
[[PreviousTermPolicyNumber]] |
Returns the Policy Number for the previous term
of the current policy. |
|
Term Effective Date |
[[TermEffectiveDate]] |
Returns the Effective date of the current
term. |
|
Term Expiry Date |
[[TermExpiryDate]] |
Returns the Valid Until date of the current
term. |
|
Term Total Premium |
[[TermTotalPremium]] |
Returns the total premium of all bound transactions
within the current term, including all premium types. Premium from
unbound transactions within the term will not be included, nor will the
premium from any transaction bound after the transaction in question was
last calculated. |
|
Term Number |
[[TermNumber]] |
Returns the number of the current term. For
example, the original policy is term 1, the first renewal is term 2, the
second renewal is term 3, etc. |
The same information can also be
pulled into calculated fields, but different placeholders are required.
|
Policy Information |
Placeholder Reference |
|
Previous Term Policy Number |
[[PreviousTerm/PolicyNumber]] |
|
Term Effective Date |
[[CurrentTerm/EffectiveDate]] |
|
Term Expiry Date |
[[CurrentTerm/ExpiryDate]] |
|
Term Total Premium |
[[CurrentTerm/Premium/TotalPremiumAmount]]
(this placeholder already existed, it was just made available through
documents and emails.) |
|
Term Number |
Use $GetTermNumber function, described
below. |
The Term Number is retrieved
using the new function, $GetTermNumber.
$GetTermNumber(p0)
Returns the sequential term number
of the provided transaction.
P0
(numeric): Transaction ID number of the submission. The
[[SubPolSystemID]] placeholder can be used to automatically insert the
Transaction ID of the current transaction.
Returns (numeric): Returns the number of the
current term.
eg. The original policy
returns 1, the first renewal returns 2, the second renewal returns 3, etc.
For more information on using
placeholders in documents, please see the Document Configuration Reference
Guide, 2.0.0.
For more information on using
placeholders in e-mails, please see the Appendix A - E-mail Syntax
section of the Bridge 2.2.0 User Guide - Product Design.
For more information on using
placeholders in calculated fields, please see the Bridge 2.2.0 - User Guide -
Calculated Fields.
New functions have been added for
working with date ranges and division with remainder thresholds.
$DaysInPeriod(p0,p1,p2,p3)
Compares two date ranges for any
period that may overlap, counting the number of days that are common between the
two ranges.
P0
(date): Start date of the first date range
P1
(date): End date of the first date range
P2
(date): Start date of the second date range
P3
(date): End date of the second date range
Returns (numeric): Number of days that are
included in both ranges. Note that the start and end dates are included in
each range. Time of day is not taken into account. If there is no
overlap, the function returns 0.
eg. If the first date range is from
January 1st to June 30th and the second range is from June
15th to August 31st, the function returns 17, counting the
overlapping days at the end of June.
If the first date range is from
January 1st to January 31st and the second range is from
January 10th to January 20th, the function returns 11,
since the full second range is included within the first range.
|

|
Example: If a client has a dependent who
will turn 18 during the coverage term, this function can be used to
identify how many days in the term the dependent remains a
minor. |
|
$DaysInPeriod([[CurrentTerm/EffectiveDate]],[[CurrentTerm/ExpiryDate]],[[BirthDate]],$AddYears([[BirthDate]],18))-1 |
|
The
[[CurrentTerm/EffectiveDate]] and
[[CurrentTerm/ExpiryDate]] define the
date range of the current term. |
|
The
[[BirthDate]] is when the dependent
was born, and the function $AddYears([[BirthDate]],18) adds 18 years to determine the
dependent's 18th birthday, defining the second date
range. |
|
The function returns
the total number of days in the current term that the dependent remains a
minor, plus their 18th birthday. The birthday itself is
removed by the -1 after the
function. |
$AdjustedMonths(p0,p1,p2)
Divides one number by another, and
adds 1 to the total if the remainder exceeds a specific amount. This
function is commonly used to determine how many months are in a specific number
of days, possibly including a partial month.
P0
(numeric): The dividend, the number to be divided
P1
(numeric): The divisor, the number to divide by
P2
(numeric): If the remainder equals or exceeds this value, the result is
increased by 1
Returns (integer): The whole number resulting from
the division and remainder.
eg. This function can be used to
convert a number of days into months, with any remainder meeting or exceeding 16
days counting as an additional full month. Enter the number of days, which
can come from a field or other function, divide by the average length of a
month, 30 (for example), and set the remainder threshold to 16.
$AdjustedMonths([[DaysField]],30.42,16)
If [[DaysField]] equals 130, the number of months is
4 with a remainder of 10. Since 10 is less than the remainder threshold,
the final value is 4.
If [[DaysField]] equals 78, the number of months is 2
with a remainder of 18. Since 18 is more than the remainder threshold, the
final value is 3.
|
|
Example: Continuing the example from the
previous function, the number of days in the current term that the
dependent remains a minor can be converted to months. |
|
|
$AdjustedMonths($DaysInPeriod([[CurrentTerm/EffectiveDate]],[[CurrentTerm/ExpiryDate]],[[BirthDate]],$AddYears([[BirthDate]],18))-1,30,16) |
|
|
The
$DaysInPeriod()-1 parameter returns the number of days, with the
18th birthday deducted. |
|
|
The
number of days is divided by 30 as the
average length of a month. |
|
|
The remainder threshold
is set to 16 so that a partial
month of 16 days or more is counted as a full
month. |
A new setting has been added to the
Field Management screen. When the Radio Buttons option is
selected as the Control Type, the Layout options become
available. Here, the user can select if the options will be displayed in a
Horizontal or Vertical format.

The two layouts appear as
below:

For more information on configuring
fields, please see the Managing Fields section of the Bridge 2.2.0
User Guide - Product Design.
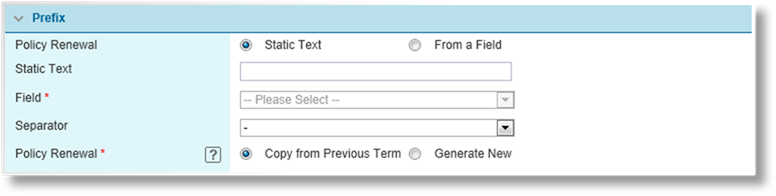
Previously, a renewal for any
policy would inherit the same policy number from the original (New Business)
term. New settings have been introduced in the Master Cover - Policy
Numbering page allowing any or all of the three components, Prefix,
Sequence, and Suffix, to be regenerated on binding a renewal
transaction.
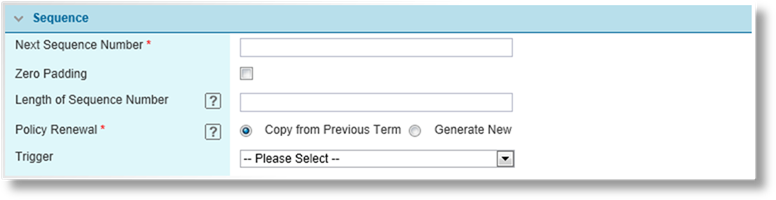
In addition, a trigger can now be
selected for the Sequence number. Controlling if the number is
included or left out.
|
Policy Renewal |
Select how the policy numbering is to be handled for
renewals. |
|
•
Copy from Previous Term |
Uses the same prefix from the previous term policy
number. |
|
•
Generate New |
A new prefix is generated using the settings in this
panel. |
|
Trigger |
A trigger can be selected to control the sequence
number. If the trigger evaluates as true, the number is generated
using the settings in this panel. If the trigger evaluates as false,
the number is omitted completely. |
|
Policy Renewal |
Select how the policy numbering is to be handled for
renewals. |
|
•
Copy from Previous Term |
Uses the same number from the previous term policy
number. |
|
•
Generate New |
A new sequence number is generated using the settings
in this panel. |
|
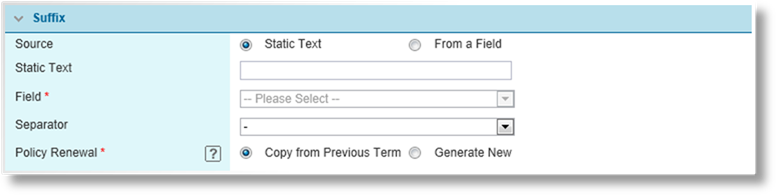
Policy Renewal |
Select how the policy numbering is to be handled for
renewals. |
|
•
Copy from Previous Term |
Uses the same suffix from the previous term policy
number. |
|
•
Generate New |
A new suffix is generated using the settings in this
panel. |
|

|
Warning: If any policies have been bound
under the current master cover, care should be taken when changing the
Policy Renewal settings. If all three options have the same
setting, either Copy from Previous Term or Generate New,
there will be no problems with new policies. If the settings are
mixed, all existing policy numbers must be upgraded. Please contact
your Oceanwide Representative for more information on upgrading existing
data. |
While navigating through a
multi-screen workflow, the user will pass through several screens.
Triggers can now be set to identify specific screens, for use in overrides or
calculated fields.
When settings conditions for a
trigger, the Field list now includes the Current Screen
option. The option can be compared to the screen Code, as defined
in the Screen Management page. The conditions can be set to test if
the current screen matches, or does not match, the provided screen code, and
multiple conditions can be set to check for multiple screens.
|
|
Example: A specific panel is included in a
workflow on three different screens. |
|
The
first time this panel appears, two fields that are relevant to the screen
are visible, while two other fields are hidden using overrides checking
the screen. |
|
The
second time the panel appears, the first two fields are no longer
relevant, so they are now hidden by overrides, while the second two fields
are now displayed. |
|
The
third time the panel is displayed, all fields are visible, but the entire
panel is set to read-only so the user can review the details. |
|
Each
of these overrides are linked to one of three triggers, activating the
overrides only on specific screens. |
For more information on configuring
triggers and overrides, please see the Bridge 2.2.0 User Guide - Product
Design.
As the user navigates through the
workflow, there may be screens where certain actions are common and expected,
such as binding the submission on the last page, requesting a special quote on a
summary page, or printing a specific document related to the content of the
screen.
A new configuration option has been
added to the Screen Management page.

Emphasize Actions allows
some common options to be added to the navigation buttons at the bottom of the
submission form. These extra buttons are configured separately per screen,
making them available at appropriate points in the workflow.
Each button matches an option in
the Actions widget, performs exactly the same function, and follows the
same rules for availability based on the transaction type, status, and the
rights of the user. Even when activated for a particular screen, the
button will only appear if the matching option is available in the
Actions widget.
For more information on configuring
screens, please see the Managing Screens section of the Bridge 2.2.0
User Guide - Product Design.
A full quote is made up of the
Premium, Limits, Deductibles, and Insuring
Conditions. When generating a custom quote for a client, it may be
necessary to update one component without affecting the others, but
recalculating the full quote updates all components.
Buttons have been added to the
Quote Summary window, allowing each section to be recalculated
individually. All calculated fields will be recalculated, the suitable
component will be adjusted, and the calculated fields will be calculated again
to ensure that all dependencies are accounted for, all without changing the
remaining quote components.
For more information, please see
the Premium Widget section of the Bridge 2.1.1 - User Guide -
Workflow.